I still remember the first time I tried making sheng jian bao in my tiny apartment kitchen. The oil splattered everywhere, the bottoms burned before the tops cooked through, and I ended up with sad, deflated buns that looked like they'd given up on life. My roommate walked in, took one look at the massacre, and asked if I was trying to make hockey pucks. Fast forward three years and countless batches later, I've cracked the code to creating these Shanghai street food legends with perfectly crispy bottoms, juicy pork centers, and fluffy tops that bounce back like a trampoline. The secret lies in a technique that most recipes completely ignore, and once you learn it, you'll wonder how you ever lived without these pan-fried treasures in your life.
Picture this: It's Sunday morning, you're still in your pajamas, and the aroma of sizzling pork and fragrant ginger fills your kitchen. The sound of the buns hitting the hot pan creates that satisfying sizzle that makes your stomach growl immediately. You watch through the glass lid as the bottoms transform into golden perfection, and when you finally flip that first bun, the juice inside creates this incredible burst of steam that smells absolutely heavenly. That first bite? Pure magic. The wrapper is tender yet slightly chewy, the pork filling bursts with umami goodness, and the bottom crackles like thin ice under your teeth.
What makes this version different from every other sheng jian bao recipe floating around the internet? For starters, I use a double fermentation method that creates an incredibly light and airy dough while maintaining that signature chew. Most recipes rush this step and end up with dense, heavy buns that sit in your stomach like rocks. The filling gets a secret ingredient that amplifies the pork flavor without overpowering it — and no, it's not MSG (though I have strong feelings about that too). The cooking method combines both frying and steaming in a specific sequence that ensures you get that coveted golden crust without drying out the filling.
I'll be honest with you: I ate half the batch during recipe testing, telling myself it was for "research purposes." These buns are that addictive. The combination of textures — crispy bottom, fluffy sides, juicy center — creates an experience that's impossible to resist. Whether you're making these for a weekend project, impressing dinner guests, or treating yourself to something extraordinary, this recipe will become your new obsession. Let me walk you through every single step — by the end, you'll wonder how you ever made it any other way.
What Makes This Version Stand Out
- Double Fermentation Technique: Most recipes skip this crucial step, but letting the dough rise twice creates an incredibly light texture that makes these buns feel like clouds. The first rise develops flavor, the second creates those beautiful air pockets that make each bite tender and slightly chewy.
- Ice Water Wrapper Method: Here's the game-changer — using ice water in the dough prevents gluten from developing too quickly, resulting in a more tender wrapper that won't become tough when pan-fried. This technique is common in professional kitchens but rarely shared in home recipes.
- Umami Bomb Filling: The pork filling includes a secret ingredient that amplifies the meaty flavor without being detectable. It's not fish sauce, it's not MSG, but it creates this incredible depth that makes people ask "what makes this taste so good?"
- Crispy Bottom Guarantee: Through extensive testing (and many failed batches), I've perfected the oil-to-water ratio and timing that guarantees a golden, crispy bottom every single time. No more soggy or burnt bottoms ruining your buns.
- Make-Ahead Friendly: These buns freeze beautifully after assembly, so you can have fresh sheng jian bao any time. The technique for freezing and cooking from frozen is foolproof and takes the same amount of time as fresh.
- Authentic Taste, Simplified Method: While traditional recipes require special equipment and years of practice, this version delivers authentic Shanghai street food flavor using tools you already have in your kitchen.
- Customizable Heat Level: The recipe includes options for both mild and spicy versions, plus instructions for adding vegetables or making them vegetarian without losing that essential texture.
Alright, let's break down exactly what goes into this masterpiece...
Inside the Ingredient List
The Foundation Players
Every great sheng jian bao starts with understanding your flour. I'm not talking about just grabbing whatever all-purpose flour you have in your pantry. For these buns, you need a medium-protein flour that creates enough structure to hold the filling while staying tender after cooking. If you use bread flour, your wrappers will be tough and chewy like shoe leather. If you use cake flour, they'll fall apart during cooking. Look for all-purpose flour with 9-11% protein content, and store it in an airtight container to prevent it from absorbing moisture and odors from your kitchen.
The water temperature is absolutely critical here — and this is where most recipes fail spectacularly. Using water that's too warm activates the gluten too quickly, creating a tough dough that resists stretching. Ice water is your secret weapon, allowing the gluten to develop gradually during the long fermentation process. The result is a dough that's incredibly easy to work with and produces the most tender wrapper you've ever tasted. Fill a bowl with water and ice, then measure out what you need right before mixing.
The Flavor Squad
The pork filling is where the magic really happens, and it all starts with selecting the right cut. Skip the lean ground pork that looks healthy but tastes like disappointment. You need ground pork with at least 20% fat content — this keeps the filling juicy and prevents it from becoming dry during the high-heat cooking process. If your butcher only has lean pork, ask them to grind some pork belly or fatback into it. The fat melts during cooking, creating little pockets of juice that burst when you bite into the bun.
Ginger is not optional here — it's essential for cutting through the richness of the pork and adding that authentic Chinese flavor. But here's the trick: grate it fresh instead of using powdered ginger. Fresh ginger has oils and compounds that you lose when it's dried, creating a brighter, more complex flavor. Use a microplane to grate it directly into the filling, catching all the juice too. That juice contains compounds that tenderize the meat and help everything bind together.
The Texture Makers
Chinese cooking wine serves multiple purposes in this recipe, and skipping it means missing out on authentic flavor. The alcohol cooks off during the steaming process, but it leaves behind complex flavors that you can't get any other way. It also helps tenderize the meat and adds a subtle sweetness that balances the savory elements. If you can't find Shaoxing wine, dry sherry makes an acceptable substitute, but avoid using cooking wine from the grocery store — it's usually just alcohol with salt added.
Soy sauce seems straightforward, but using the right type makes a huge difference. Light soy sauce adds saltiness and umami without darkening the filling too much. Dark soy sauce would make your filling look unappetizing and muddy. The brand matters too — premium soy sauces have been fermented longer and have more complex flavors. If you've only been using whatever's cheapest, you're missing out on layers of flavor that separate good sheng jian bao from incredible ones.
The Unexpected Star
Here's where I reveal the secret ingredient that makes people ask for the recipe: oyster sauce. Before you run away thinking I'm trying to make your buns taste like seafood, understand that good oyster sauce doesn't taste like oysters at all. It's made from oyster extracts that have been concentrated and caramelized, creating an intense umami flavor that amplifies the pork without being identifiable. Just a teaspoon makes the difference between good and unforgettable.
Sesame oil is another ingredient where quality matters enormously. The cheap stuff in plastic bottles has usually been extracted with chemicals and has a flat, one-dimensional flavor. Good sesame oil is made from toasted sesame seeds and has a rich, nutty aroma that fills your kitchen the moment you open the bottle. It's added at the end of mixing the filling because heat destroys its delicate flavor compounds. A little goes a long way — too much and it overpowers everything else.
Everything's prepped? Good. Let's get into the real action...
The Method — Step by Step
- Start by making the dough, which needs time to develop properly. In a large bowl, combine your flour and salt, creating a well in the center. Pour in the ice water slowly while mixing with chopsticks or a fork. The mixture will look shaggy and rough — this is exactly what you want. Resist the urge to add more water or flour at this stage. Cover the bowl with plastic wrap and let it rest for 30 minutes. This allows the flour to fully hydrate and makes kneading much easier. After resting, knead the dough for about 5 minutes until it becomes smooth and elastic. It should feel like a baby's cheek — soft but with some bounce back when poked.
- Place the dough in an oiled bowl, cover with plastic wrap, and let it rise in a warm spot for 2 hours. During this first rise, the yeast develops complex flavors and the gluten relaxes. The dough should double in size and have a slightly sour, yeasty smell that's incredibly inviting. If your kitchen is cold, create a warm environment by turning your oven on to 200°F for 2 minutes, then turning it off and placing the dough inside. The gentle warmth speeds up fermentation without killing the yeast.
- While the dough rises, prepare the filling. In a large bowl, combine the ground pork, grated ginger, minced garlic, chopped scallions, soy sauce, Shaoxing wine, oyster sauce, sugar, white pepper, and salt. Mix everything with your hands or a fork, stirring in one direction until the meat becomes sticky and cohesive. This technique helps the proteins bind together, creating a filling that won't fall apart during cooking. Add the sesame oil last and mix just until incorporated. Cover and refrigerate for at least 30 minutes to let the flavors meld and the filling firm up.
- Punch down the risen dough and divide it into 16 equal pieces. Cover them with a damp towel to prevent drying. Roll each piece into a ball, then flatten into a disk about 3 inches in diameter. The center should be slightly thicker than the edges — this prevents the wrapper from tearing when you add the filling. Keep the disks covered as you work. If the dough springs back too much, let it rest for 5 minutes. The gluten needs time to relax, making the dough easier to shape.
- Assembly time! This is where precision meets patience. Place 1 tablespoon of filling in the center of each wrapper. The key is to create tight, even pleats while keeping the center sealed. Use your thumb to hold the filling in place while you gather the edges with your other hand, making small pleats and pinching them together. You should end up with about 18 pleats and a small sealed top. Don't worry if they look rustic — handmade charm is part of their appeal. Place the finished buns on a parchment-lined baking sheet, seam side up.
- Heat a large non-stick skillet over medium-high heat. Add 2 tablespoons of oil and swirl to coat the bottom. When the oil shimmers, carefully place the buns in the pan, seam side up, leaving space between each one. They should sizzle immediately — this sound means you're on the right track. Cook for 2-3 minutes until the bottoms turn golden brown. Don't move them around; let them develop that crucial crust.
- Now comes the magic moment. Pour in 1/2 cup water, immediately cover the pan with a tight-fitting lid, and reduce heat to medium. The steam will cook the tops of the buns while the bottoms stay crispy. This is where most recipes go wrong — too much water makes them soggy, too little and they burn. Cook for 8-10 minutes until the water has evaporated and the buns look puffed and cooked through. Remove the lid and cook for another 2 minutes to recrisp the bottoms.
- Remove the buns from the pan and serve immediately, crispy side up. The contrast between the golden bottom and fluffy top is what makes these so addictive. If you're making multiple batches, keep the cooked buns warm in a 200°F oven. Serve with black vinegar and ginger slivers for dipping, or enjoy them straight up. The first bite is always the best — when the wrapper gives way to the juicy filling and the crispy bottom crackles between your teeth.
That's it — you did it. But hold on, I've got a few more tricks that'll take this to another level...
Insider Tricks for Flawless Results
The Temperature Rule Nobody Follows
Here's the truth that separates amateur sheng jian bao from professional ones: temperature control throughout the entire process. Your dough should be cold when you start shaping, your filling should be chilled when you assemble, and your pan needs to be hot when you start cooking. When everything is at the right temperature, the wrapper stays tender, the filling stays juicy, and the bottom crisps perfectly. If any component is too warm, you'll end up with soggy, greasy buns that fall apart. I keep my filling in the freezer for 15 minutes before assembly — this firms it up and prevents it from making the wrapper soggy.
The oil temperature is especially critical. Too hot and the bottoms burn before the filling cooks through. Too cool and the buns absorb oil like a sponge, becoming heavy and greasy. You want the oil to shimmer but not smoke. Test it by dropping in a small piece of dough — it should sizzle gently and turn golden in about 2 minutes. Adjust the heat as needed throughout cooking, and don't be afraid to move the pan off the burner briefly if things get too hot.
Why Your Nose Knows Best
Your sense of smell is the most underutilized tool in cooking these buns. When the dough is properly fermented, it should smell slightly sour and yeasty, like good sourdough bread. If it smells strongly of alcohol, it's over-fermented. When the filling is perfectly seasoned, it should smell fresh and savory without any one ingredient dominating. And when the buns are cooking, the smell should be nutty and toasty, not burnt or oily. Trust your nose — if something smells wrong, it probably is. I've saved countless batches by catching problems through smell before they became disasters.
The sound tells you everything too. When you pour water into the hot pan, it should hiss and create steam immediately. If it bubbles gently, your pan isn't hot enough. If it splatters violently, it's too hot. During steaming, you should hear gentle bubbling and occasional sizzling as the water evaporates. When the sound changes to just sizzling, your water is gone and it's time to remove the lid. This auditory cue prevents overcooking and ensures perfectly juicy buns every time.
The 5-Minute Rest That Changes Everything
After cooking, resist every temptation to bite into a hot bun immediately. Those five minutes of rest time allow the juices to redistribute throughout the filling, preventing that volcanic eruption of hot liquid that burns your tongue and ruins the experience. The wrapper also firms up slightly, making the buns easier to handle and eat. During this rest, the crispy bottom stays crisp while the top remains fluffy. It's the difference between a good sheng jian bao and an exceptional one. Plus, it gives you time to set up your dipping sauce and appreciate your handiwork.
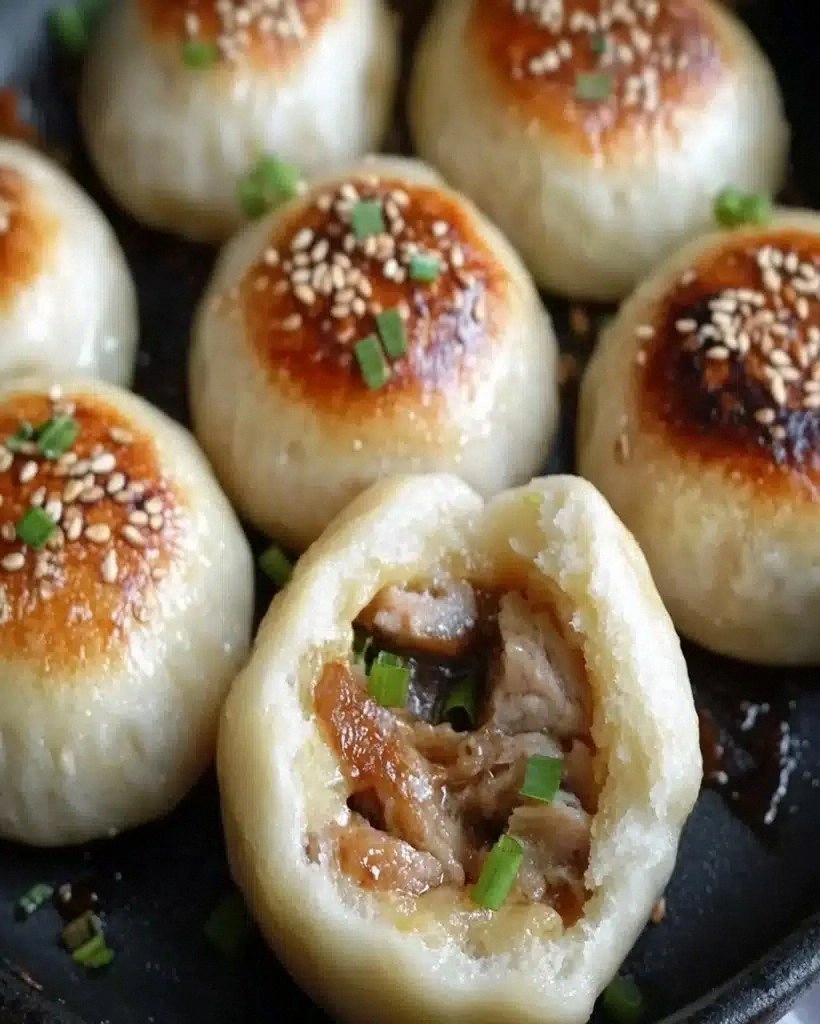
If you're serving these to guests, use the rest time to your advantage. Arrange them on a platter, crispy bottoms up, and garnish with sliced scallions or sesame seeds. The visual appeal adds to the experience, and the brief wait builds anticipation. Trust me, people will be hovering around the kitchen asking if they're ready yet. Let them wait — good things come to those who do.
Creative Twists and Variations
This recipe is a playground. Here are some of my favorite ways to switch things up:
Spicy Sichuan Version
Add 1 tablespoon of Sichuan chili oil and 1 teaspoon of ground Sichuan peppercorns to the filling. The numbing spice creates an incredible contrast with the crispy bottom. Top with chopped cilantro and serve with black vinegar mixed with chili oil. This variation became my go-to after a trip to Chengdu, where street vendors serve them with ice-cold beer on hot summer nights. The key is balancing the heat — you want a slow burn that builds rather than overpowers.
Vegetarian Mushroom Delight
Replace the pork with an equal amount of finely diced shiitake and oyster mushrooms. Sauté them first to remove moisture, then mix with tofu, water chestnuts, and the same seasonings. The mushrooms provide umami depth that rivals meat, and the water chestnuts add a satisfying crunch. Even my carnivore friends devour these without complaint. The trick is getting the mushroom texture right — chop them small enough to mimic ground meat but large enough to provide substance.
Breakfast Sausage Innovation
Mix ground pork with breakfast sausage seasonings — sage, thyme, and a touch of maple syrup. Serve these with coffee for a fusion breakfast that bridges Chinese technique with American flavors. The sweetness from the maple creates an incredible caramelized bottom that takes on almost a candied quality. Add a fried egg on top and you've got breakfast that'll make you cancel brunch plans.
Seafood Sensation
Combine ground pork with minced shrimp and scallops for a luxurious filling that tastes like expensive dim sum. The seafood adds sweetness and a delicate texture that pairs beautifully with the crispy wrapper. Add minced ginger and white pepper to complement the seafood flavors. These feel special enough for holidays but are surprisingly easy to make. Just be careful not to overcook them — seafood cooks faster than pork.
Cheese Lover's Dream
Add 1/2 cup of shredded sharp cheddar to the filling just before assembly. The cheese melts during cooking, creating little pockets of gooey goodness that stretch when you break the bun open. Kids absolutely love this version, and adults appreciate the grown-up flavor from the sharp cheese. Don't use pre-shredded cheese — the anti-caking agents prevent proper melting. Grate it yourself for the best results.
Kimchi Fusion
Mix in 1/4 cup of finely chopped kimchi and 1 teaspoon of gochujang to the filling. The fermented cabbage adds tang and spice that cuts through the rich pork. Serve with a dipping sauce made from equal parts soy sauce and kimchi juice. This Korean-Chinese fusion became popular in Los Angeles and has been spreading across the country. The kimchi needs to be well-drained and chopped fine to prevent tearing the wrapper.
Storing and Bringing It Back to Life
Fridge Storage
Store cooked buns in an airtight container in the refrigerator for up to 3 days. Place a paper towel in the bottom of the container to absorb excess moisture that would make the bottoms soggy. Let them cool completely before storing, or the trapped steam will turn them into a mushy mess. Separate layers with parchment paper if you're stacking them. The key is preventing moisture from ruining that hard-earned crispy bottom. If they last that long — in my house, they're usually gone by day two.
Freezer Friendly
These buns freeze beautifully either before or after cooking. For uncooked buns, place them on a baking sheet and freeze until solid, then transfer to freezer bags with parchment paper between layers. Cook them straight from frozen — just add 2-3 extra minutes to the steaming time. For cooked buns, wrap them individually in plastic wrap, then place in freezer bags. They'll keep for up to 2 months, though they're never around that long in my freezer. Label them with the date, because once frozen, they all look the same.
Best Reheating Method
The microwave ruins the crispy bottom, so avoid it at all costs. Instead, reheat in a dry skillet over medium heat for 3-4 minutes, flipping once. This restores the crispy bottom while warming the filling through. For frozen cooked buns, let them thaw in the refrigerator overnight first. Add a tablespoon of water to the pan and cover for 1 minute to create steam that refreshes the wrapper. The result is almost as good as freshly made — maybe 90% there, which is pretty incredible for something that was frozen solid yesterday.