Picture this: it’s 2 a.m., the house is silent except for the occasional sigh of the refrigerator, and a sudden craving for something sweet, salty, and utterly addictive slams into you like a drum solo at a jazz club. I was half‑asleep, rummaging through the pantry, when I realized I had a tub of cream cheese, a jar of peanut butter, and a bag of chocolate that had been gathering dust for weeks. The usual midnight snack—cereal or a bland protein bar—just wouldn’t cut it; I needed a treat that could convince my taste buds to throw a party and my brain to forget it was still Thursday. That desperate moment sparked the birth of what I now swear is the most decadent, no‑bake peanut butter ball you’ll ever encounter.
The kitchen filled with the buttery aroma of softened cream cheese as I whisked it into a silky cloud, while the peanut butter melted into a glossy river of gold, releasing that unmistakable roasted‑nut perfume that makes you feel like you’re strolling through a farmer’s market in late summer. I could hear the faint crackle of the chocolate as it hit the pan, a sound that promised glossy, glossy perfection, and the faint rustle of the cookie crumbs as they waited patiently for their turn. My hands felt the cool, creamy mixture slide between my fingers, and the texture was so smooth it felt like silk slipping through a sieve. When the first ball hit the chilled plate, it made a soft, satisfying thud, and the scent that rose was a heady mix of sweet, salty, and buttery—an olfactory hug that made me grin like a kid who just found the secret stash of candy.
Most recipes out there either over‑complicate the process with unnecessary baking steps or skimp on the richness that makes these bites unforgettable. I’ve tried versions that call for endless whipping, others that demand a trip to the specialty store for obscure ingredients, and a few that simply taste flat, like a deflated balloon. This version, however, is a love letter to simplicity and flavor: eight ounces of premium cream cheese, a cup of creamy peanut butter, a cup of powdered sugar, and a handful of optional coatings that let you customize the crunch factor to your heart’s desire. The secret? A quick chill in the freezer that firms the center before a final dip in melted chocolate, creating a contrast that’s as dramatic as a sunrise over a calm sea.
Let me walk you through every single step — by the end, you’ll wonder how you ever made it any other way. Okay, ready for the game‑changer? This next part? Pure magic. I dare you to taste this and not go back for seconds. If you’ve ever struggled with no‑bake desserts, you’re not alone — and I’ve got the fix. Stay with me here — this is worth it.
What Makes This Version Stand Out
- Flavor Explosion: The combination of tangy cream cheese and rich peanut butter creates a depth that sings louder than a choir of angels, while the powdered sugar adds just the right amount of sweetness without overwhelming the palate.
- Texture Symphony: A creamy interior meets a crisp, chocolate‑coated exterior, delivering a bite that’s both melt‑in‑your‑mouth and satisfyingly crunchy, like biting into a caramelized almond.
- Simplicity Redefined: No oven, no fancy equipment—just a bowl, a spatula, and a freezer. This is the kind of recipe that even a kitchen novice can nail on the first try.
- Customizable Coatings: From chopped nuts to shredded coconut, each coating adds its own personality, letting you tailor the final product to match any occasion or mood.
- Crowd‑Pleaser Power: Whether you’re feeding a family, impressing guests at a potluck, or indulging in a solo snack, these balls have a universal appeal that draws compliments like magnets.
- Ingredient Quality Matters: Using real, full‑fat cream cheese and natural peanut butter (no added sugars) elevates the flavor profile, making each bite feel indulgent yet wholesome.
- No‑Bake Convenience: The entire process can be completed in under an hour, making it perfect for last‑minute gatherings or a quick sweet fix after a long day.
- Make‑Ahead Magic: Store them in the fridge for up to a week, and they’ll stay fresh, firm, and ready to satisfy any sudden cravings that strike.
Inside the Ingredient List
The Flavor Base
8 oz Cream Cheese: This is the backbone of the ball, providing a tangy richness that balances the sweet elements. Choose a full‑fat, block‑style cream cheese for the creamiest texture; low‑fat versions become grainy and won’t hold together as well. If you accidentally use softened cream cheese straight from the fridge, let it sit at room temperature for ten minutes to avoid lumps. A quick tip: roll the cream cheese between two sheets of parchment before measuring to eliminate excess air pockets.
The Texture Crew
1 cup Creamy Peanut Butter: Opt for a natural, unsweetened variety to keep the flavor pure—no hidden sugars or oils to throw off the balance. This ingredient contributes the signature nutty depth and a buttery mouthfeel that makes each bite melt like butter on warm toast. If you’re allergic to peanuts, try almond butter; the flavor shifts subtly but stays delicious. Skipping the peanut butter entirely results in a bland center that feels more like plain cream cheese than a treat.
1 cup Powdered Sugar: The powdered sugar sweetens without adding grit, ensuring the mixture stays silky smooth. Sift it before adding to prevent clumps, which can ruin the texture and create unsightly lumps. For a less sweet version, reduce to three‑quarters of a cup, but expect a slightly less glossy finish. If you’re watching carbs, consider a low‑calorie sweetener that measures cup‑for‑cup, though the texture may be a tad grainier.
The Unexpected Star
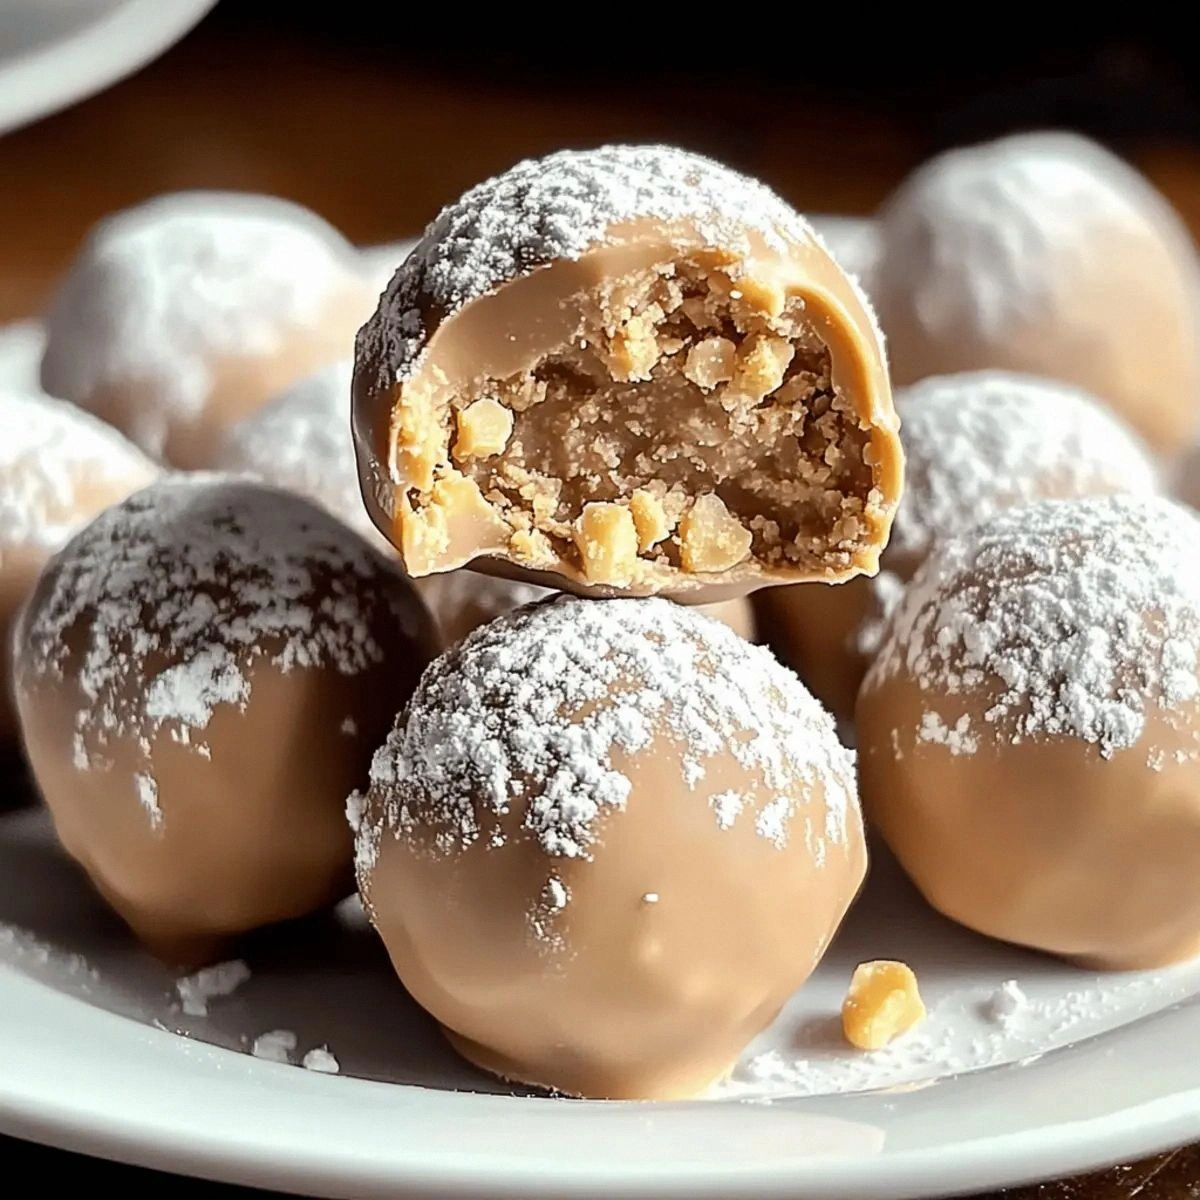
Melted Chocolate: This is the outer armor that gives the balls their glossy sheen and a snap that’s as satisfying as a fresh apple bite. Dark chocolate (70% cacao) offers a bittersweet contrast to the sweet interior, while milk chocolate adds a creamier, milder finish. If you want a twist, try white chocolate for a sweeter, vanilla‑kissed crust. Skipping the chocolate coating turns the balls into simple cheese‑peanut butter bites, which are still tasty but lack that dramatic visual pop.
The Final Flourish
Chopped Nuts, Shredded Coconut, Cookie Crumbs: These optional coatings let you customize texture and flavor. Toasted chopped peanuts amplify the nutty profile, shredded coconut adds a tropical chew, and cookie crumbs (think graham or chocolate wafer) introduce a buttery crunch. Feel free to mix and match—half coconut, half nuts makes a delightful contrast. Forgetting the coating entirely leaves the chocolate shell exposed, which can be messy and less visually appealing.
Everything's prepped? Good. Let's get into the real action...
The Method — Step by Step
-
First, let the cream cheese sit at room temperature for about ten minutes; this softens it just enough to blend without a whisk. While it’s warming, line a baking sheet with parchment paper—this will be your rolling runway. In a large mixing bowl, combine the softened cream cheese, peanut butter, and powdered sugar. Using a sturdy spatula, mash and fold until the mixture is uniformly smooth, glossy, and no white streaks of cheese remain. The scent should be a sweet, nutty perfume that makes you want to taste it right away—trust me, that feeling is the first checkpoint of success.
Kitchen Hack: Place the bowl over a double boiler for a few seconds to make the mixture extra pliable; it slides like butter on a hot pan. -
Now, with a medium‑sized cookie scoop (or a tablespoon), portion out the mixture onto the prepared parchment. Roll each scoop between your palms, applying gentle pressure to form smooth spheres about one inch in diameter. If the mixture sticks, wet your hands lightly with cold water—this prevents the batter from melting into a paste. As you roll, you’ll notice the balls becoming firmer, a sign that the fats are emulsifying properly. Once all balls are formed, set the tray aside and pop it into the freezer for at least 20 minutes; this chilling step is crucial for maintaining shape during the chocolate dip.
-
While the balls chill, melt the chocolate. Use a heat‑proof bowl set over a pot of simmering water (double boiler) and stir constantly until the chocolate is glossy and fully melted—avoid overheating, as chocolate can scorch and become grainy. If you prefer a quicker method, microwave in 20‑second bursts, stirring in between; the key is to keep the temperature under 115°F (46°C) for dark chocolate. Add a pinch of sea salt to the melted chocolate; this tiny addition heightens the flavor, making the chocolate coating taste richer and more complex.
Watch Out: If the chocolate gets too hot, it will seize and become clumpy—immediately remove from heat and stir in a teaspoon of neutral oil to rescue it. -
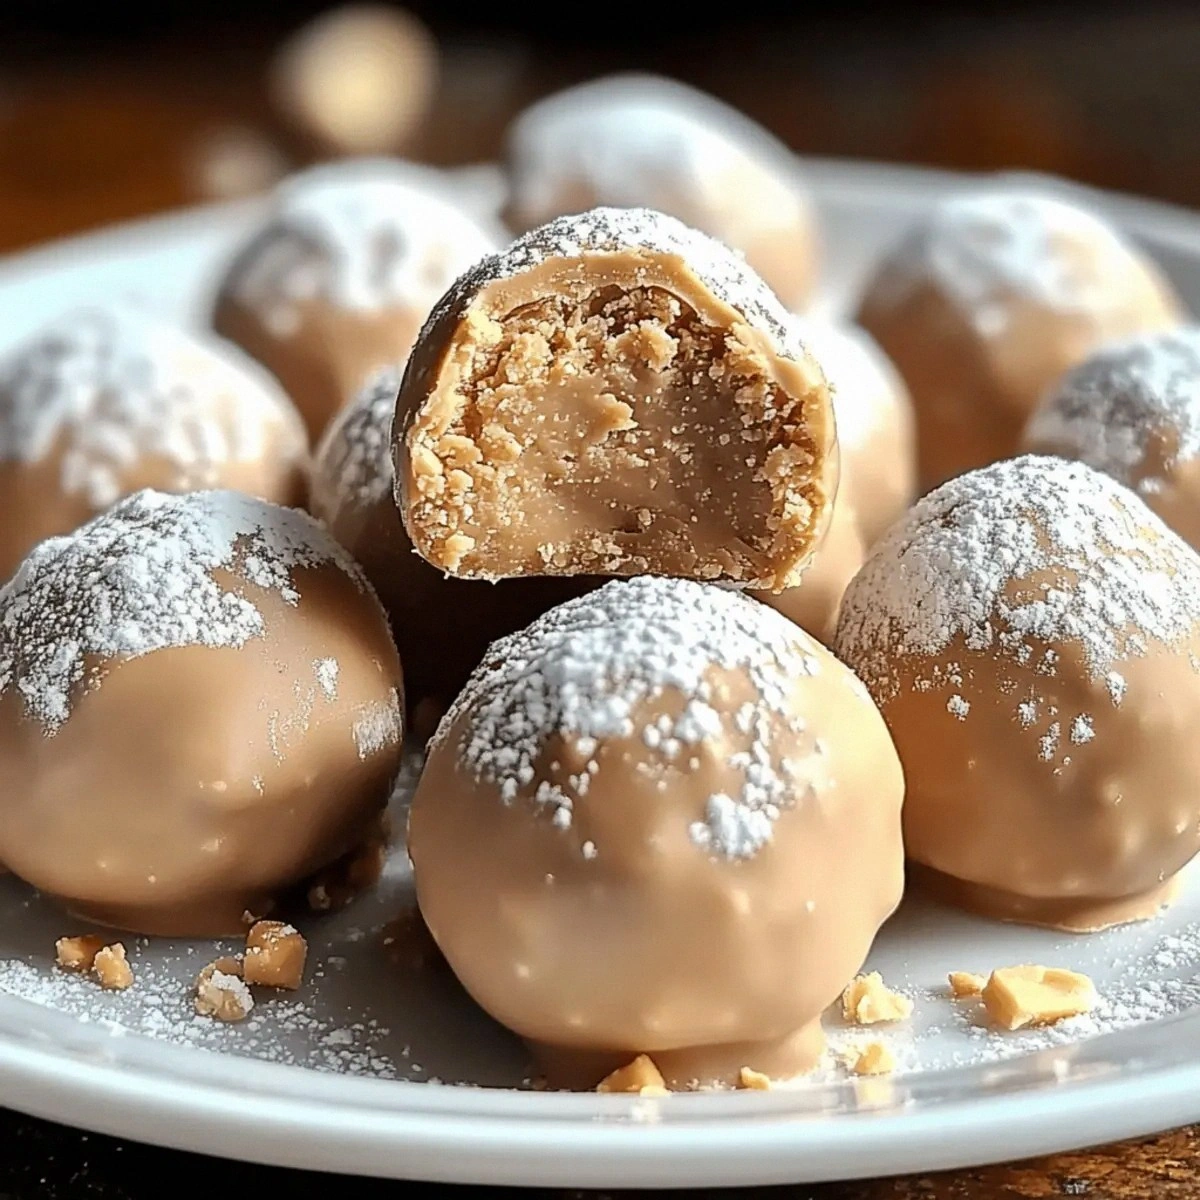
Retrieve the chilled balls from the freezer. Working in batches, dip each ball into the melted chocolate, allowing excess to drip back into the bowl. The chocolate should coat the ball in a thin, even layer that glistens like a polished marble. Place the chocolate‑covered balls back onto the parchment, and while the chocolate is still wet, sprinkle your chosen coating—nuts, coconut, or cookie crumbs—over the top. Press lightly so the coating adheres before the chocolate sets. This is the moment of truth: the coating should stick without sliding off, and the chocolate should begin to firm up within seconds.
-
Once all balls are coated and rolled in their toppings, transfer the tray to the refrigerator for another 15 minutes. This final chill ensures the chocolate hardens completely and the interior stays firm. If you’re impatient, a quick 5‑minute stint in the freezer works too, but be careful not to over‑freeze, or the chocolate may develop a dull, matte finish. When you pull the tray out, the balls should be solid to the touch, with a glossy sheen that catches the light—think of tiny planets ready to be devoured.
Kitchen Hack: Store the finished balls on a wire rack set over a baking sheet; this prevents condensation from making the chocolate soggy. -
Now for the grand reveal: gently lift a ball with a pair of tongs and bite into it. You should hear a faint crack as the chocolate gives way, followed by a creamy, peanut‑buttery center that melts like butter on warm toast. The coating adds a satisfying crunch that contrasts beautifully with the smooth interior. This texture dance is what makes these treats unforgettable, and it’s the payoff for every minute you spent perfecting the steps. If you notice any soft spots, simply return the ball to the fridge for a few more minutes; the extra chill will firm it up without affecting flavor.
-
Arrange the finished balls on a serving platter. For an extra wow factor, drizzle a thin ribbon of contrasting chocolate (white if you used dark, or vice‑versa) over the top, then sprinkle a pinch of flaky sea salt. This final flourish adds visual appeal and a burst of flavor that elevates the whole dish from snack to show‑stopper. Serve them at room temperature for the best texture; if they’re too cold, the chocolate can feel brittle, while a warm ball may become overly soft.
-
That’s it — you did it. But hold on, I’ve got a few more tricks that’ll take this to another level. From storage hacks to creative twists, the adventure doesn’t end at the first bite. Ready to become the ultimate peanut butter ball maestro? Let’s keep the momentum going.
Insider Tricks for Flawless Results
The Temperature Rule Nobody Follows
Never let the cream cheese get too warm; even a slight rise in temperature can cause the mixture to become runny, making it impossible to roll into balls. Keep the mixing bowl on a chilled surface or place a bowl of ice water underneath while you work. I once left the mixture out for ten minutes too long and ended up with a soupy mess—lesson learned: keep it cool, keep it firm.
Why Your Nose Knows Best
The moment the chocolate is perfectly melted, it will emit a faint, sweet aroma that’s slightly nutty and buttery. Trust that scent; it’s a reliable indicator that the chocolate is at the ideal temperature for dipping. If you’re unsure, dip a tiny piece of banana; it should coat instantly and release a glossy sheen without clumping.
The 5‑Minute Rest That Changes Everything
After coating the balls, give them a brief five‑minute rest on a cool countertop before moving them to the fridge. This short pause lets the chocolate set a little on its own, reducing the chance of a “wet” look when you add the final coating. Skipping this step can lead to a dull, uneven finish that looks less professional.
Coating Consistency Is Key
When sprinkling nuts or coconut, make sure the topping is dry and room‑temperature. Moisture in the coating creates clumps that won’t adhere well and can cause the chocolate to lose its shine. Toasting the nuts for just a minute on a dry skillet intensifies their flavor and adds a subtle crunch that’s hard to beat.
Freeze‑Proofing for Party‑Ready Batches
If you’re preparing a large batch for a gathering, freeze the balls in a single layer before transferring them to an airtight container. This prevents them from sticking together and makes it easy to grab a handful without breaking the delicate chocolate shell. I once tried to store them all in one clump and ended up with a mushy mess—never again.
Creative Twists and Variations
This recipe is a playground. Here are some of my favorite ways to switch things up:
Chocolate‑Covered Espresso Delight
Swap half of the melted dark chocolate with espresso‑infused chocolate, and roll the balls in finely ground espresso beans. The result is a sophisticated treat with a subtle coffee bite that’s perfect for brunch or an after‑dinner pick‑me‑up.
Nut‑Free Coconut Dream
Replace the peanut butter with a smooth coconut butter and use shredded coconut for the coating. This creates a tropical, dairy‑free version that’s just as creamy and has a whisper of island sunshine in every bite.
Spicy Chili Chocolate
Add a pinch of cayenne pepper to the melted chocolate and dust the finished balls with a blend of chili powder and smoked paprika. The heat sneaks up on you, delivering a thrilling contrast to the sweet interior—great for those who love a little kick.
Caramel Swirl Surprise
Before forming the balls, swirl in a tablespoon of caramel sauce into the cream cheese mixture. The caramel pockets melt into gooey ribbons as the ball sets, offering a caramel‑burst surprise that’s both unexpected and delightful.
Berry‑Infused Bliss
Mix a quarter cup of freeze‑dried raspberry powder into the base and coat the finished balls in white chocolate with a dusting of powdered sugar. The tangy berry notes cut through the richness, making these perfect for springtime gatherings.
Salted Pretzel Crunch
After the chocolate dip, roll the balls in crushed pretzel pieces mixed with a pinch of flaky sea salt. The salty‑sweet combo mimics the addictive flavor profile of pretzel‑covered chocolate bars, delivering a satisfying crunch.
Storing and Bringing It Back to Life
Fridge Storage
Place the balls in an airtight container lined with parchment paper. They’ll stay fresh for up to seven days, maintaining their texture and flavor. If you notice the chocolate surface becoming dull, a quick 10‑second dip in freshly melted chocolate revives the shine.
Freezer Friendly
For longer storage, arrange the balls on a tray, freeze solid, then transfer to a zip‑top freezer bag. They can be kept for up to three months. When you’re ready to serve, let them thaw in the refrigerator for 30 minutes, then give them a brief room‑temperature rest before plating.
Best Reheating Method
If the balls have hardened too much after refrigeration, place them on a microwave‑safe plate and heat for 5‑10 seconds, just enough to soften the chocolate slightly. Adding a tiny splash of water to the microwave (in a separate cup) creates steam that gently revives the texture without melting the interior.