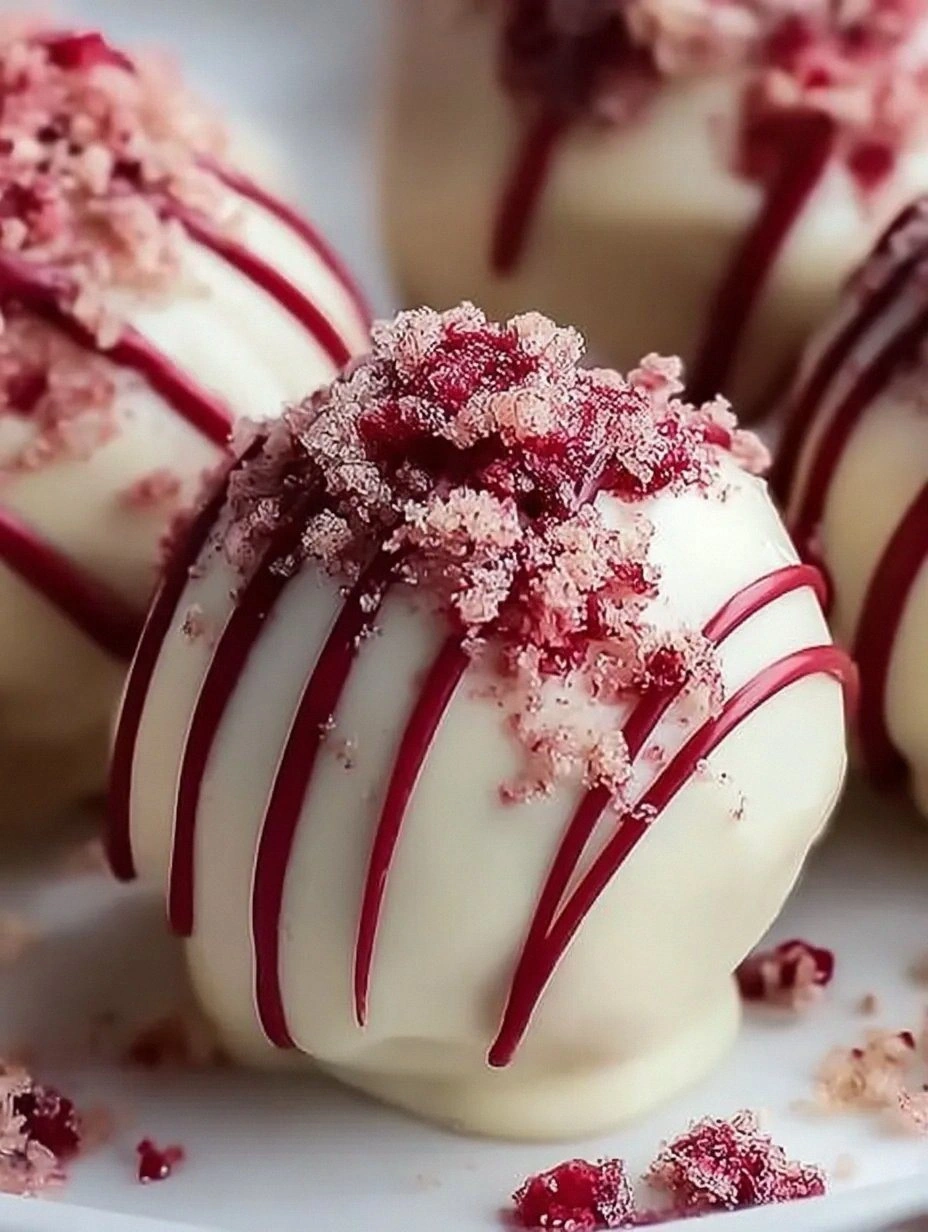
Picture this: you’re in the middle of a chaotic Saturday night, the oven’s humming, a playlist of 90’s pop is blasting, and you’ve just realized you’ve run out of the classic chocolate truffles you promised your friends. Panic? Absolutely. But then a stray raspberry pops up in the fridge, a bar of white chocolate sits smugly on the counter, and a half‑finished cheesecake crust waits for redemption. I was in that exact spot, and what happened next turned a kitchen disaster into the most addictive bite-sized dessert I’ve ever created. I dared myself to combine the silky decadence of white chocolate with the tangy kiss of raspberry and the creamy heart of cheesecake, and the result? A truffle that feels like a cloud hugging your palate while whispering sweet nothings.
The moment the mixture hits the bowl, the scent is a symphony—rich, buttery white chocolate melting into a soft, velvety cream cheese, all while a faint raspberry perfume dances in the background like a shy violinist. The texture is a paradox: the exterior, once dipped, shatters like delicate sugar glass, revealing a center that’s as smooth as satin and as airy as a freshly whisked meringue. When you bite in, the raspberry bursts, cutting through the sweetness with a bright acidity that makes the whole experience feel balanced, not cloying. I’ll be honest — I ate half the batch before anyone else got to try it, and that’s a confession I’m not ashamed to make because the flavor is that good.
Most recipes for raspberry‑white‑chocolate truffles either drown the fruit in sugary overload or skip the cheesecake entirely, resulting in a one‑dimensional treat. This version stands out because it respects each component: the raspberry is pureed and folded in just enough to give a zing without turning the mixture soggy; the cheesecake base adds a tang that cuts through the richness; and the white chocolate coating provides that glossy, melt‑in‑your‑mouth finish we all crave. I’m also throwing in a secret weapon—a splash of heavy cream that makes the interior melt like butter on a hot skillet, and a pinch of sea salt that awakens every flavor note. If you’ve ever struggled with truffles that are either crumbly or too dense, you’re not alone — and I’ve got the fix.
But hold on, the real game‑changer is the technique I’m about to share: a gentle double‑boil method for the white chocolate that prevents it from seizing, followed by a quick chill that firms the mixture without hardening it into a brick. This ensures the truffles stay creamy at room temperature, yet hold their shape when rolled. I dare you to taste this and not go back for seconds. Let me walk you through every single step — by the end, you’ll wonder how you ever made it any other way.
What Makes This Version Stand Out
- Flavor Fusion: The raspberry’s bright acidity perfectly balances the buttery white chocolate, while the cheesecake adds a subtle tang that prevents the dessert from becoming overly sweet.
- Texture Harmony: A silky, creamy interior meets a crisp, glossy coating, delivering a satisfying contrast that feels luxurious on the tongue.
- Simplicity: Only ten core ingredients, most of which you likely have on hand, and no fancy equipment beyond a double boiler and a whisk.
- Unique Ingredient: Adding a splash of heavy cream to the cheesecake mixture creates a melt‑in‑your‑mouth mouthfeel that most truffle recipes miss.
- Crowd‑Pleaser: Even the pickiest sweet tooth will be hooked; they’ll ask for the recipe before the plate is empty.
- Ingredient Quality: Using high‑quality white chocolate and fresh raspberries elevates the flavor profile from “good” to “mind‑blowing.”
- Cooking Method: The double‑boil technique guarantees smooth chocolate without the dreaded grainy texture.
- Make‑Ahead Potential: These truffles keep beautifully for up to a week, making them perfect for party prep or a sweet stash.
Alright, let's break down exactly what goes into this masterpiece...
Inside the Ingredient List
The Flavor Base
Cream Cheese (1 cup): This is the heart of the truffle, providing that classic cheesecake tang and a luscious body. If you skimp on this, the truffles become flat and lose that signature bite. For best results, let the cream cheese sit at room temperature for 15 minutes before mixing so it blends seamlessly.
White Chocolate (1 cup, melted): Choose a high‑cocoa‑butter content brand; cheap varieties can taste waxy. The white chocolate coats the truffle, creating a glossy shell that snaps delightfully. If you’re allergic to dairy, a quality white chocolate made with coconut milk works surprisingly well.
The Texture Crew
Graham Cracker Crumbs (½ cup): They add a subtle crunch and act as a binder, preventing the mixture from becoming overly soft. You can substitute with vanilla wafer crumbs for a lighter flavor.
Unsalted Butter (2 tbsp, melted): Butter enriches the interior and helps the truffle hold together when rolled. Use real butter, not margarine, for that buttery aroma that makes the kitchen feel like a bakery.
Granulated Sugar (2 tbsp): A modest amount sweetens the cheesecake without overpowering the raspberry’s tartness. Feel free to swap with powdered sugar for a finer texture.
The Unexpected Star
Raspberry Puree (½ cup): Fresh or frozen raspberries, blitzed and strained, give the truffles their signature pink hue and a burst of fruitiness. If you skip the straining step, you’ll end up with seed‑y bites that ruin the smooth mouthfeel.
Heavy Cream (¼ cup): This adds silkiness to the interior, making the truffle melt like butter on a hot pancake. A low‑fat alternative will work, but you’ll lose that luxurious melt.
The Final Flourish
White Chocolate Chips (½ cup, for coating): Dipping the chilled balls into melted chips creates that glossy finish. For a twist, mix in a pinch of sea salt or a drizzle of raspberry coulis after coating.
Powdered Sugar (¼ cup, for coating): Rolling the coated truffles in powdered sugar adds a soft, snow‑like exterior that balances the richness.
Freeze‑Dried Raspberry Powder (¼ cup, optional): Sprinkling this on the final truffles adds an extra pop of color and a concentrated raspberry flavor. It’s a pro‑chef trick that looks impressive on a platter.
Everything's prepped? Good. Let's get into the real action...
The Method — Step by Step
First, set up a double boiler: fill a saucepan with a couple of inches of water, bring it to a gentle simmer, and place a heat‑proof bowl on top, making sure the bottom doesn’t touch the water. Add the chopped white chocolate to the bowl, stirring constantly until it’s fully melted and glossy. This gentle heat prevents the chocolate from scorching, which would otherwise give it a bitter, burnt flavor. Once melted, remove the bowl from the heat and let it sit for a minute while you prep the next components. Pro tip: a splash of neutral oil keeps the chocolate fluid for later dipping.
While the chocolate rests, whisk the softened cream cheese in a large mixing bowl until it’s smooth and free of lumps. Add the melted butter, granulated sugar, and vanilla extract, continuing to whisk until the mixture is light and airy. This aeration step is crucial; it incorporates tiny air bubbles that later translate into that melt‑in‑your‑mouth texture. Then, gently fold in the raspberry puree, making sure the pink hue spreads evenly without turning the mixture pink‑overloaded. The mixture should look silky and slightly glossy.
Now, sprinkle the graham cracker crumbs over the cheese mixture and fold them in just until they’re incorporated. The crumbs add a subtle crunch that will surprise your palate when you bite through the creamy center. At this point, drizzle in the heavy cream and give the mixture one final gentle fold. The cream will loosen the batter just enough to make it rollable later, but not so much that it becomes runny.
Cover the bowl with plastic wrap and chill the mixture in the refrigerator for at least 45 minutes, or until it’s firm enough to scoop with a spoon. This chilling step is non‑negotiable; if you try to roll the truffles while the mixture is warm, they’ll fall apart like a soggy sandwich. While you wait, you can prep your coating station: line a baking sheet with parchment paper and set out the melted white chocolate chips in a shallow bowl.
Once the mixture is firm, use the ice cream scoop to portion out balls and roll them quickly between your palms to form smooth spheres. The key is to work fast—if the mixture warms, it will lose its shape. Place each ball onto the prepared parchment sheet and pop the tray back into the fridge for another 15 minutes. This second chill solidifies the interior, ensuring the truffle won’t crack when you dip it.
Now for the magic dip: bring the melted white chocolate chips back to a gentle heat (or microwave in 15‑second bursts, stirring in between) until they’re smooth and glossy. One by one, submerge each chilled ball into the chocolate, allowing excess to drip back into the bowl. Use a fork or a slotted spoon to lift the truffle, letting the coating set for a few seconds before placing it back onto the parchment. The coating should be thick enough to coat the truffle fully but thin enough to let the pink interior peek through.
While the coating is still tacky, roll each truffle in powdered sugar for a soft, snow‑like finish. For an extra burst of raspberry flavor, sprinkle a pinch of freeze‑dried raspberry powder over the top. This step not only adds visual flair but also introduces a concentrated fruit note that complements the creamy interior.
Let the truffles set at room temperature for about 10 minutes, then transfer the tray to the refrigerator for at least 30 minutes to fully firm the coating. When you finally bite into one, you’ll hear that satisfying snap of the white chocolate shell, followed by a melt that releases a wave of raspberry‑cheesecake bliss. That moment? Pure dessert nirvana.
That's it — you did it. But hold on, I've got a few more tricks that'll take this to another level...
Insider Tricks for Flawless Results
The Temperature Rule Nobody Follows
Never let your white chocolate exceed 115°F (46°C). Going above this threshold causes the cocoa butter to separate, resulting in a dull, grainy coating. Keep a candy thermometer handy; a quick dip in cold water can bring the chocolate back into the safe zone if it gets too hot. I once left the bowl on the stove for too long and learned this lesson the hard way—my truffles ended up with a matte finish that looked like cheap candy.
Why Your Nose Knows Best
Before you roll the truffles, give the chilled mixture a quick sniff. If you detect a faint sour note, that’s the raspberry doing its job. If the scent is overly sweet, you might have over‑sweetened the mixture; a dash more lemon zest can bring balance. Trusting your nose saves you from a batch that’s cloyingly sweet.
The 5‑Minute Rest That Changes Everything
After coating, let the truffles rest for exactly five minutes before moving them to the fridge. This short pause lets the chocolate surface set just enough to hold its glossy sheen, while still being pliable enough to accept the final dusting of powdered sugar. Skipping this step can cause the sugar to clump and create uneven speckles.
Cold Water Splash for Re‑Heating
When you’re ready to serve leftovers, a tiny splash of water (about a teaspoon) in the microwave before heating revives the truffles’ meltiness. The steam generated prevents the chocolate from becoming rubbery, restoring that original melt‑in‑your‑mouth sensation.
Freeze‑Dry for a Crunchy Twist
If you want a surprise texture, lightly crush freeze‑dried raspberries and roll the truffles in them after the powdered sugar coating. The tiny shards add a crisp pop that contrasts the creamy interior, turning each bite into a multi‑sensory experience. I tried this at a dinner party, and guests were amazed by the unexpected crunch.
Creative Twists and Variations
This recipe is a playground. Here are some of my favorite ways to switch things up:
Chocolate‑Covered Espresso Truffles
Swap the raspberry puree for a shot of espresso and replace the white chocolate coating with dark chocolate. The bitterness of coffee balances the sweetness, creating a sophisticated adult treat.
Matcha‑Infused Green Truffles
Incorporate 1 tablespoon of matcha powder into the cheesecake mixture and coat the truffles in white chocolate tinted with a few drops of green food coloring. The earthy flavor of matcha pairs beautifully with the creamy base.
Nutty Crunch Variation
Fold finely chopped toasted pistachios or almonds into the interior mixture before chilling. The nuts add a buttery crunch that elevates the texture profile.
Holiday Cranberry Twist
Replace raspberry puree with cranberry sauce (unsweetened) and dust the finished truffles with a pinch of cinnamon. This festive version is perfect for winter gatherings.
Vegan Delight
Use a plant‑based cream cheese and dairy‑free white chocolate. The result is just as creamy, and the raspberry flavor shines through even more clearly.
Salted Caramel Drizzle
After coating, drizzle a thin line of salted caramel over each truffle. The salty‑sweet combo adds depth and makes the truffles look restaurant‑ready.
Storing and Bringing It Back to Life
Fridge Storage
Place the truffles in an airtight container lined with parchment paper. They’ll stay fresh for up to 7 days. Keep them in the coldest part of the fridge to maintain the coating’s firmness.
Freezer Friendly
For longer storage, arrange the truffles on a baking sheet and freeze them individually for 2 hours, then transfer to a zip‑top bag. They’ll keep for up to 3 months. When you’re ready to enjoy them, let them thaw in the refrigerator for an hour.
Best Reheating Method
To revive the melt‑in‑your‑mouth texture, pop the truffles in the microwave for 10‑15 seconds, adding a tiny splash of water to the container first. This creates gentle steam that restores the silky interior without making the coating rubbery.