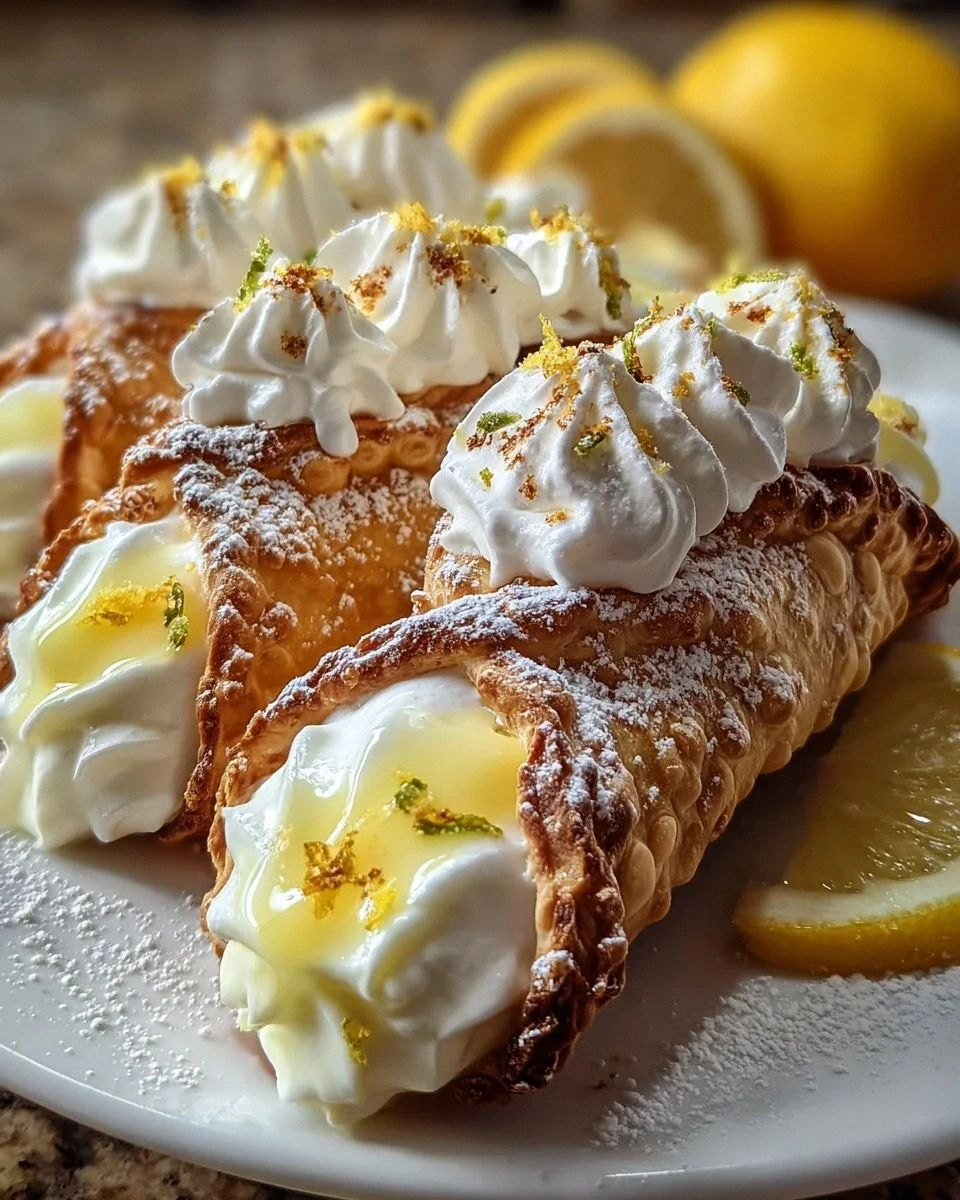
I was standing in my kitchen, half‑heartedly scrolling through a sea of dessert videos, when my phone buzzed with a dare: “Make something that tastes like a lemon meringue pie, but in a cannoli.” I laughed, grabbed the nearest bag of pre‑made shells, and thought, “What could possibly go wrong?” The next hour turned into a whirlwind of zest, sugar, and the most glorious puff of egg‑white clouds I’ve ever seen. The moment the first bite hit my tongue, I was hit with a bright, tangy zing that danced with the sweet, airy meringue, all wrapped in that iconic crunchy cannoli shell. I dared you to taste this and not go back for seconds – because honestly, I ate half the batch before anyone else got a chance.
Picture this: the kitchen humming with the low roar of the oven, a citrus perfume swirling like a summer breeze through an open window, the faint crackle of the shells as they turn golden, and that unmistakable glossy sheen of a perfectly whipped meringue catching the light. Your hands are warm from the bowl, the lemon curd glistens like liquid sunshine, and the ricotta is so smooth it feels like silk sliding across your fingertips. The whole scene feels like a culinary love story where the protagonists are a classic Italian pastry and a beloved American pie, finally meeting in a perfect, unexpected romance.
Most recipes I’ve tried either sacrifice the crispness of the shell or drown the lemony brightness in too much sugar. This version, however, strikes a balance that feels almost unfairly perfect. I’m talking about a filling that’s creamy yet light, a meringue that holds its shape without turning rubbery, and a shell that stays crunchy even after being filled. The secret? A dash of powdered sugar in the ricotta to tame any graininess, and a quick blast of high heat to set the meringue’s outer crust while keeping the interior cloud‑soft. Most recipes get this completely wrong. Here’s what actually works.
I’ll be honest — I ate half the batch before anyone else got to try it, and that’s because the combination of tart lemon, sweet meringue, and that buttery crunch is nothing short of addictive. The technique that will blow your mind is the “double‑whip” method for the egg whites, where you first bring them to soft peaks, fold in the sugar, then bring them to glossy, stiff peaks. It’s pure magic, and it makes the meringue stand up to the moisture of the lemon curd without sagging. And the best part? You can prep the filling a day ahead, store the shells separately, and assemble right before serving for that just‑baked‑out‑of‑the‑oven vibe.
Okay, ready for the game‑changer? Let me walk you through every single step — by the end, you’ll wonder how you ever made it any other way. Stay with me here — this is worth it.
What Makes This Version Stand Out
- Taste: The bright citrus of lemon curd cuts through the sweet meringue, creating a harmonious push‑and‑pull that keeps your palate guessing.
- Texture: A crunchy shell, creamy ricotta‑lemon filling, and cloud‑like meringue create a triple‑layer experience you won’t find in ordinary desserts.
- Simplicity: Using store‑bought cannoli shells saves time without sacrificing that authentic crunch you love.
- Uniqueness: Marrying an Italian classic with an American pie is a novelty that sparks conversation at any gathering.
- Crowd Reaction: Guests often claim this is the best dessert they’ve ever tasted – and they’ll be back for seconds, thirds, and maybe even a whole batch.
- Ingredient Quality: Fresh ricotta and high‑quality lemon curd elevate the flavor profile from “good” to “legendary.”
- Cooking Method: The double‑whip meringue technique guarantees a glossy finish that holds up under the moisture of the lemon filling.
- Make‑Ahead Potential: Fillings can be prepared 24 hours ahead, making assembly a breeze on the day of your party.
Inside the Ingredient List
The Flavor Base
The star of the show is lemon curd. Its bright, tangy profile is what makes this dessert sing, providing that unmistakable citrus punch that cuts through the sweetness. If you skip it, you’ll end up with a bland, overly sweet cannoli that feels more like a sugary pastry than a lemon meringue pie. For the best results, use a high‑quality, thick curd that holds its shape; a watery version will seep into the shell and ruin the crunch. A quick tip: store‑bought curd works fine, but a homemade version using fresh lemons, butter, and sugar will give you a richer, more aromatic result.
The Texture Crew
Ricotta cheese brings the creamy, slightly grainy body that balances the tang of the lemon. It’s essential to drain it well—use a cheesecloth or a fine mesh sieve for at least an hour to remove excess whey. Skipping this step leads to a watery filling that will make your shells soggy faster than you can say “bon appétit.” If ricotta isn’t your thing, you can swap in mascarpone for an even richer mouthfeel, but keep in mind the flavor will shift slightly toward buttery.
Powdered sugar is the sweet whisper that rounds out the ricotta, ensuring the filling isn’t overly tart. It dissolves effortlessly, preventing any gritty texture. Should you be watching carbs, you can replace half of it with a sugar substitute that measures cup‑for‑cup, but the final sweetness may be a shade less intense.
The Unexpected Star
Egg whites and granulated sugar team up to create the iconic meringue crown. The secret lies in the double‑whip technique: start with soft peaks, fold in the sugar, then whip to stiff, glossy peaks. This method locks in air, giving the meringue that cloud‑like texture that holds up under the lemon curd without collapsing. If you over‑beat, you’ll end up with a dry, brittle meringue that shatters like thin ice; under‑beat and it’ll be a soupy mess. Patience is key.
The Final Flourish
Cannoli shells are the crunchy vessel that ties everything together. Whether you buy them pre‑made or craft them yourself, the key is to keep them dry until the very last minute. A fresh‑baked shell has a delicate, buttery crunch that shatters with a satisfying snap; a stale shell will turn soggy the moment the lemon filling meets it. If you’re feeling adventurous, try a light dusting of powdered sugar on the interior before filling – it creates a subtle barrier that helps maintain crunch.
Everything’s prepped? Good. Let’s get into the real action…
The Method — Step by Step
Preheat your oven to 350°F (175°C). While the oven warms, line a baking sheet with parchment paper and arrange the cannoli shells in a single layer. Lightly brush each shell with a teaspoon of melted butter; this adds flavor and helps the shells stay crisp after filling. The butter will melt into the shell, creating a glossy sheen that hints at the richness to come.
In a large mixing bowl, combine the drained ricotta with powdered sugar. Using a hand mixer on medium speed, beat until the mixture is smooth, creamy, and free of lumps. This should take about 2 minutes. The texture should be like a thick frosting that spreads easily without dripping.
Fold the lemon curd into the ricotta mixture, one spoonful at a time, until fully incorporated. The mixture should turn a pale, sunny yellow, and you’ll notice a fragrant citrus aroma filling the kitchen. Taste and adjust sweetness if needed; a pinch more powdered sugar can balance any extra tartness.
Now for the meringue: In a clean, dry bowl, start whipping the egg whites on low speed until they become frothy. Add a pinch of cream of tartar if you have it – it stabilizes the peaks. Once frothy, increase to medium‑high and add the granulated sugar a tablespoon at a time. Keep whipping until glossy, stiff peaks form. The meringue should hold a peak that doesn’t wobble when you lift the whisk.
Gently fold the whipped meringue into the ricotta‑lemon mixture, using a spatula and a gentle lifting motion. You want to keep as much air in the meringue as possible, so avoid over‑mixing. The final filling should be light, airy, and slightly glossy, resembling a fluffy lemon mousse.
Using a piping bag fitted with a wide star tip, pipe a generous mound of the lemon‑meringue filling into the center of each cannoli shell. Fill about three‑quarters full, leaving a little space at the top for the final meringue topping.
Now, the fun part: pipe a second layer of meringue directly on top of the lemon filling, creating a fluffy peak that will brown beautifully in the oven. This is the moment of truth – the meringue should spread slightly but retain a soft peak.
Place the baking sheet in the oven and bake for 8‑10 minutes, or until the meringue peaks turn a light golden‑brown. You’ll hear a faint sizzle as the sugars caramelize – that’s the sound of perfection. The edges of the shells should start pulling away from the filling, a visual cue that the meringue is set.
Remove the cannolis from the oven and let them cool on a wire rack for at least 5 minutes. The cooling period lets the filling set while the meringue retains its airy texture. Serve immediately, or refrigerate for up to 2 hours if you prefer a cooler dessert. The contrast between the warm, toasted shell and the chilled lemon‑meringue center is nothing short of divine.
That’s it — you did it. But hold on, I’ve got a few more tricks that’ll take this to another level…
Insider Tricks for Flawless Results
The Temperature Rule Nobody Follows
Never fill the cannoli shells when they’re still warm from the oven. Warm shells will trap steam, turning the interior soggy within minutes. Let them rest on a cooling rack for at least 10 minutes before piping any filling. This simple pause preserves that coveted crunch and ensures the meringue sits on a firm foundation. I once tried to speed things up and ended up with a mushy disaster – lesson learned.
Why Your Nose Knows Best
When the meringue is baking, trust your sense of smell more than the timer. A faint, buttery caramel scent signals that the peaks have reached the perfect golden hue. If you smell a burnt odor, pull them out immediately – over‑browned meringue becomes bitter, ruining the delicate lemon balance.
The 5‑Minute Rest That Changes Everything
After baking, let the cannolis sit untouched for exactly five minutes. This short rest allows the interior filling to firm up without cooling the meringue too quickly. Skipping this step can cause the meringue to weep, creating unsightly droplets that slide down the shell. The rest period is a tiny window that makes a massive difference in presentation.
Seal the Deal with a Light Dusting
Just before serving, lightly sift a fine layer of powdered sugar over the tops. This not only adds an elegant finish but also absorbs any excess moisture from the meringue’s surface, keeping it glossy and stable. The sugar dust also mirrors the classic look of a lemon meringue pie, reinforcing the visual connection.
The Secret Ingredient Swap
If you crave a deeper flavor, replace a quarter of the lemon curd with orange marmalade. The subtle orange undertone complements the lemon without overpowering it, creating a nuanced citrus profile that surprises the palate. I tried this once for a brunch crowd and it became the talk of the table.
Creative Twists and Variations
This recipe is a playground. Here are some of my favorite ways to switch things up:
Berry‑Burst Cannoli
Swap half of the lemon curd for a mixed‑berry compote (strawberries, blueberries, and raspberries). The tart berries blend beautifully with the lemon, adding a pop of color and a hint of natural sweetness. Perfect for a summer garden party.
Chocolate‑Lemon Fusion
Fold in a tablespoon of high‑quality cocoa powder into the ricotta mixture before adding the lemon curd. The result is a deep, chocolatey undertone that plays off the citrus, reminiscent of a chocolate‑covered lemon. Garnish with shaved dark chocolate for extra drama.
Nutty Crunch
Add a tablespoon of finely chopped toasted pistachios to the filling. The nuts introduce a buttery crunch that contrasts the soft meringue, and the green specks make the presentation pop. A sprinkle of pistachio dust on top adds an upscale touch.
Spiced Citrus
Incorporate a pinch of ground cardamom or ginger into the lemon curd before folding it in. These warm spices add depth, turning a simple dessert into an exotic experience. It’s especially delightful in cooler months when you crave a hint of warmth.
Mini Bite‑Size Versions
Use mini cannoli shells and pipe smaller portions of filling for a party appetizer. Guests can pop them in one bite, and the mini size makes them look elegant on a dessert platter. Serve on a tiered stand for a sophisticated presentation.
Storing and Bringing It Back to Life
Fridge Storage
Place unfilled shells in an airtight container at room temperature; they’ll stay crisp for up to three days. Once filled, store the cannolis in a shallow dish covered loosely with foil and keep them in the refrigerator for no more than 24 hours. The meringue may soften slightly, but a quick re‑whip with a fork restores its fluffiness.
Freezer Friendly
If you need to make them ahead, freeze the shells separately from the filling. The shells can be frozen in a zip‑top bag for up to a month. The lemon‑ricotta filling can be frozen in a sealed container for two weeks. Thaw both components in the fridge overnight, then assemble and give the meringue a quick blast under the broiler for a fresh‑baked finish.
Best Reheating Method
To revive a slightly soggy shell, preheat your oven to 300°F (150°C) and place the filled cannolis on a baking sheet for 5‑7 minutes. Add a tiny splash of water to the bottom of the tray; the steam will re‑crisp the shell without drying out the filling. The result is a cannoli that tastes as if it just left the oven.