Remember the night your roommate dared you to turn a pile of stale Oreos into a dessert that would make everyone gasp? You stared at the empty fridge, the burnt pizza crusts, and a stack of chocolatey temptation that seemed more like a challenge than a snack. I thought, why not transform those cookies into a dessert that feels like a playground in your mouth? That’s how the Easy Oreo Dirt Pie Recipe was born, and trust me, it’s a game‑changer.
Picture this: the kitchen is humming with the clatter of mixing bowls, the scent of melted butter mingles with the sweet perfume of vanilla, and a gentle drizzle of milk creates a glossy sheen over a mound of cookie crumbs. The air is thick with anticipation, as if the universe is holding its breath for the first bite. When you lift the spoon, the filling oozes like molten chocolate, and the gummy worms wiggle like mischievous critters hiding in a sandbox of crumbs. The texture is a symphony of crunchy, creamy, and chewy, all dancing together on your palate.
What makes this version stand out from every other Oreo dessert out there? First, it uses a simple, no‑fuss crust that gives you that satisfying crunch without the extra steps. Second, the filling is a silky custard that’s rich enough to satisfy your sweet tooth yet light enough to keep it from feeling heavy. Third, the gummy worms add a playful twist that turns every bite into a memory of childhood. And finally, the recipe is so quick that even a kitchen novice can master it in under an hour.
And here’s the kicker: I discovered that adding a splash of cold milk right before baking locks in moisture and gives the pie a silky finish that feels like velvet. This tiny tweak transforms the ordinary into the extraordinary, and it’s the secret that will have your friends begging for the recipe. I dare you to taste this and not go back for seconds.
If you’ve ever struggled with dessert timing, you’re not alone — and I’ve got the fix. Let me walk you through every single step — by the end, you’ll wonder how you ever made it any other way.
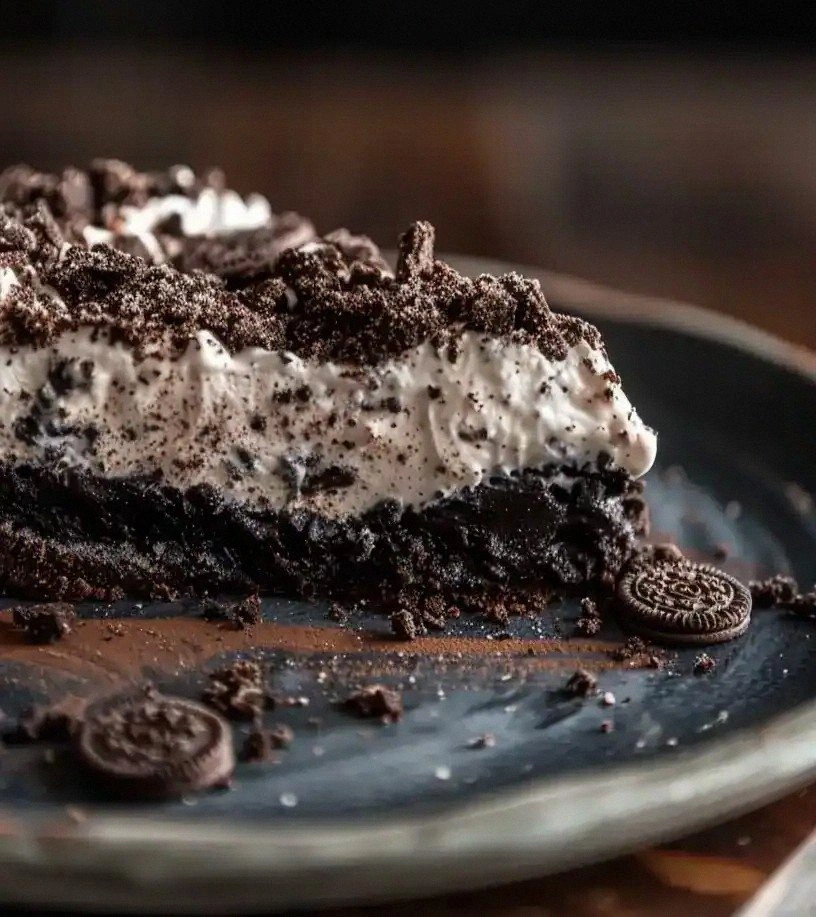
What Makes This Version Stand Out
- Crunch: The crust is made from crushed Oreos, giving a satisfying bite that echoes the original cookie. The texture is crisp and buttery, creating a foundation that balances the creamy filling.
- Silk: The custard filling is tempered with cold milk and butter, resulting in a silky texture that melts in your mouth. The cold milk keeps the mixture from curdling and gives it a smooth finish.
- Sweetness: Powdered sugar balances the bitterness of the chocolate, creating a harmonious flavor profile that satisfies both sweet and savory cravings.
- Vanilla: A teaspoon of vanilla extract adds depth, elevating the overall taste. The vanilla’s warm aroma lingers long after the first bite.
- Playfulness: Gummy worms provide a fun surprise that turns dessert into a mini adventure for kids and adults alike. They add a chewy texture that contrasts beautifully with the creamy filling.
- Speed: The entire process takes less than an hour, making it perfect for spontaneous cravings or last‑minute gatherings.
- Versatility: You can easily swap Oreo cookies for any chocolate cookie, or add a pinch of espresso for an extra kick. The recipe’s simplicity allows for endless experimentation.
Inside the Ingredient List
The Crunchy Crust
1 package Oreo cookies form the base of our crust. The cookies are crushed into fine crumbs, providing the signature chocolatey crunch that’s essential to the “dirt” theme. If you skip this step, you’ll lose the authentic Oreo flavor and the satisfying bite that makes the pie memorable.
½ cup 1 stick unsalted butter, melted binds the crumbs together and adds a rich, buttery depth. Butter also creates a crisp edge when baked, preventing the crust from becoming soggy. A substitute could be coconut oil, but the taste will shift slightly toward tropical.
The Creamy Core
1 cup powdered sugar sweetens the custard and creates a silky texture that coats the tongue. Powdered sugar dissolves quickly, ensuring no gritty residue in the filling. If you prefer a less sweet pie, reduce the sugar by a quarter cup.
1 teaspoon vanilla extract elevates the overall flavor profile, adding warmth and complexity. Vanilla’s aroma enhances the chocolate notes, creating a balanced dessert that satisfies.
2 packages Oreo cookie dough (or an equal amount of extra crushed Oreos) enriches the filling with chocolate flavor and a subtle crunch. Skipping this will leave the custard too plain; adding it deepens the Oreo experience.
The Sweet Accents
2 ¾ cups cold milk is the liquid base that gives the custard its smooth, creamy consistency. Cold milk prevents the mixture from overheating, which could cause curdling. A dairy‑free milk can be used for a vegan version, though the texture may be slightly different.
1 container whipped topping (or marshmallow fluff) adds a light, airy layer that balances the dense custard. The topping also serves as a canvas for the gummy worm garnish. If you’re avoiding dairy, try a plant‑based whipped topping.
The Final Touch
Gummy worms are the playful garnish that turns the pie into a whimsical treat. They add a chewy texture and a pop of color that appeals to both kids and adults. Use them sparingly to avoid overpowering the Oreo flavor.
Everything’s prepped? Good. Let’s get into the real action.
The Method — Step by Step
- Preheat your oven to 350°F (175°C). The oven should be at the right temperature before you start, so you can focus on the fun parts. If you’re using a convection oven, reduce the temperature by 25°F for even baking. This step sets the stage for a perfectly baked crust and custard.
- Crush the Oreos. Place the entire package in a zip‑lock bag and gently crush with a rolling pin until you have fine crumbs. This process releases the chocolate flavor and creates the “dirt” texture. If you prefer a coarser crumb, leave some larger pieces for extra crunch.
- Mix crumbs with melted butter. In a bowl, combine the Oreo crumbs and melted butter until the mixture resembles wet sand. The butter binds the crumbs and adds a buttery aroma that signals the crust is ready. The mixture should hold together when pressed, but not be too hard.
- Press the mixture into a 9‑inch pie pan. Use the back of a spoon or your fingers to create an even layer, pressing down firmly to avoid gaps. The crust should be compact and ready for the custard. Let the crust chill in the fridge for 10 minutes to set.
- Prepare the custard. In a saucepan, combine powdered sugar, vanilla, and cold milk over medium heat. Stir constantly until the sugar dissolves and the mixture becomes smooth. The custard should not boil; a rolling boil will cause the mixture to curdle. Keep the heat moderate to preserve the silky texture.
- Whisk in the Oreo cookie dough. Add the dough or extra crushed Oreos to the custard and stir until fully incorporated. The dough adds chocolatey pockets that pop with each bite. If you prefer a smoother filling, reduce the amount of dough.
- Pour the custard into the chilled crust. Smooth the top with a spatula and tap the pan gently to release any air bubbles. The custard should settle evenly. This is the moment of truth; watch for the custard to set before baking.
- Bake for 25 minutes. The custard should set but still have a slight jiggle in the center. The crust will brown lightly, giving a golden “dirt” look. Keep an eye on the pie; the exact time may vary by oven.
- Cool on a wire rack. Let the pie rest for at least 30 minutes after baking. This allows the custard to fully set and the flavors to meld. The cooling period also prevents the crust from becoming soggy.
- Chill in the fridge for 2 hours. The pie needs time to firm up so that each slice holds its shape. The cold environment also intensifies the chocolate flavor and keeps the gummy worms from melting.
- Garnish with gummy worms. Arrange them in a playful pattern to make the pie Instagram‑ready. The worms add a chewy texture that contrasts with the creamy filling. A handful of worms per slice is enough to satisfy the sweet tooth without overpowering the Oreo flavor.
- Serve and enjoy. Slice the pie with a sharp knife, wiping the blade between cuts for clean slices. The first bite will reveal the crunchy crust, the silky custard, and the chewy gummy worms. It’s a dessert that feels like a sweet adventure.
That’s it — you did it. But hold on, I’ve got a few more tricks that will take this to another level.
Insider Tricks for Flawless Results
The Temperature Rule Nobody Follows
Use a thermometer to keep the custard at 160°F (71°C). This temperature ensures the custard sets without curdling, giving you a silky finish. I once tried baking at a higher temperature, and the result was a grainy texture that ruined the whole pie.
Why Your Nose Knows Best
The aroma of toasted butter signals the perfect time to press the crust. If the scent turns slightly nutty, the crust is ready. This subtle cue saves you from over‑baking and keeps the crust crisp.
The 5‑Minute Rest That Changes Everything
Let the pie rest for 5 minutes after baking before cooling. This brief pause allows the custard to set fully and prevents it from sliding when you transfer it to the wire rack. A friend once skipped this step and the pie collapsed.
Keep It Cool
Store the pie in an airtight container to maintain moisture. The sealed environment prevents the crust from drying out and keeps the gummy worms from sticking to the top. A sealed container also preserves the flavor for up to four days.
The Gummy Worm Placement
Spread the worms evenly across the surface to avoid clumping. A few worms per slice create a delightful surprise without overwhelming the Oreo flavor. If you want a more dramatic look, arrange them in a spiral.
The Sweetness Balance
Adjust powdered sugar to taste. If you’re a light sweetener, reduce the sugar by a quarter cup; if you love a sweeter bite, add an extra tablespoon. The key is to taste the custard before baking to ensure it’s just right.
Creative Twists and Variations
This recipe is a playground. Here are some of my favorite ways to switch things up:
Oreo Chocolate Dirt Pie
Swap vanilla for cocoa powder to intensify the chocolate flavor. The cocoa gives the custard a deeper hue and a richer taste that pairs beautifully with the Oreo crumbs.
Peanut Butter Dirt Pie
Add a spoonful of creamy peanut butter to the custard for a nutty twist. The peanut butter adds a new layer of flavor and a slightly thicker texture.
Espresso Dirt Pie
Add a shot of espresso to the custard for a coffee‑infused version. The espresso balances the sweetness and gives the pie a sophisticated edge.
Gluten‑Free Dirt Pie
Use gluten‑free Oreo cookies and a gluten‑free flour blend for the crust. The result is a safe, delicious dessert that everyone can enjoy.
Vegan Dirt Pie
Replace butter with coconut oil and use a dairy‑free powdered sugar. The vegan version maintains the same texture and flavor while keeping the recipe plant‑based.
Minty Dirt Pie
Add a few drops of peppermint extract to the custard for a refreshing twist. The mint complements the chocolatey base and adds a cool finish.
Storing and Bringing It Back to Life
Fridge Storage
Keep the pie in an airtight container for up to four days. The sealed environment preserves moisture and flavor, ensuring each slice tastes as fresh as the first. Store it on the middle shelf to avoid temperature fluctuations.
Freezer Friendly
Freeze the pie for up to two weeks. Wrap it tightly in plastic wrap, then place it in a freezer bag to prevent freezer burn. Thaw overnight in the refrigerator before serving.
Best Reheating Method
Warm the pie in the microwave at 30‑second intervals, stirring between bursts. Add a splash of milk to steam back to perfection, giving the custard a silky finish. Avoid reheating in a conventional oven; the pie will dry out.