Picture this: it’s a rainy Saturday, your phone buzzing with a friend’s dare to make the most indulgent, protein‑rich snack that won’t leave you feeling bloated. I was staring at an empty pantry, the scent of stale bread drifting from the fridge, when I remembered that canned chickpeas, peanut butter, and oats were practically begging for a remix. I grabbed the can, opened the jar, and the kitchen exploded with a sweet, nutty aroma that made my eyes water—yes, it was that intense. If you’ve ever felt the disappointment of a bland protein bar that tastes like a cardboard box, you’re in for a revelation.
I’ll be honest—my first batch of these bars ended up in the trash after I realized the texture was too crumbly. The second attempt, though, was a game‑changer: chewy, chocolaty, and packed with a protein punch that kept me full for hours. The secret? A perfectly balanced mix of chickpeas, peanut butter, maple syrup, and a dash of vanilla that together create a silky base that holds everything together. Most recipes get this completely wrong, but here’s what actually works: the chickpeas provide the protein, the peanut butter gives the fat and flavor, and the oats lock it all in with a satisfying chew.
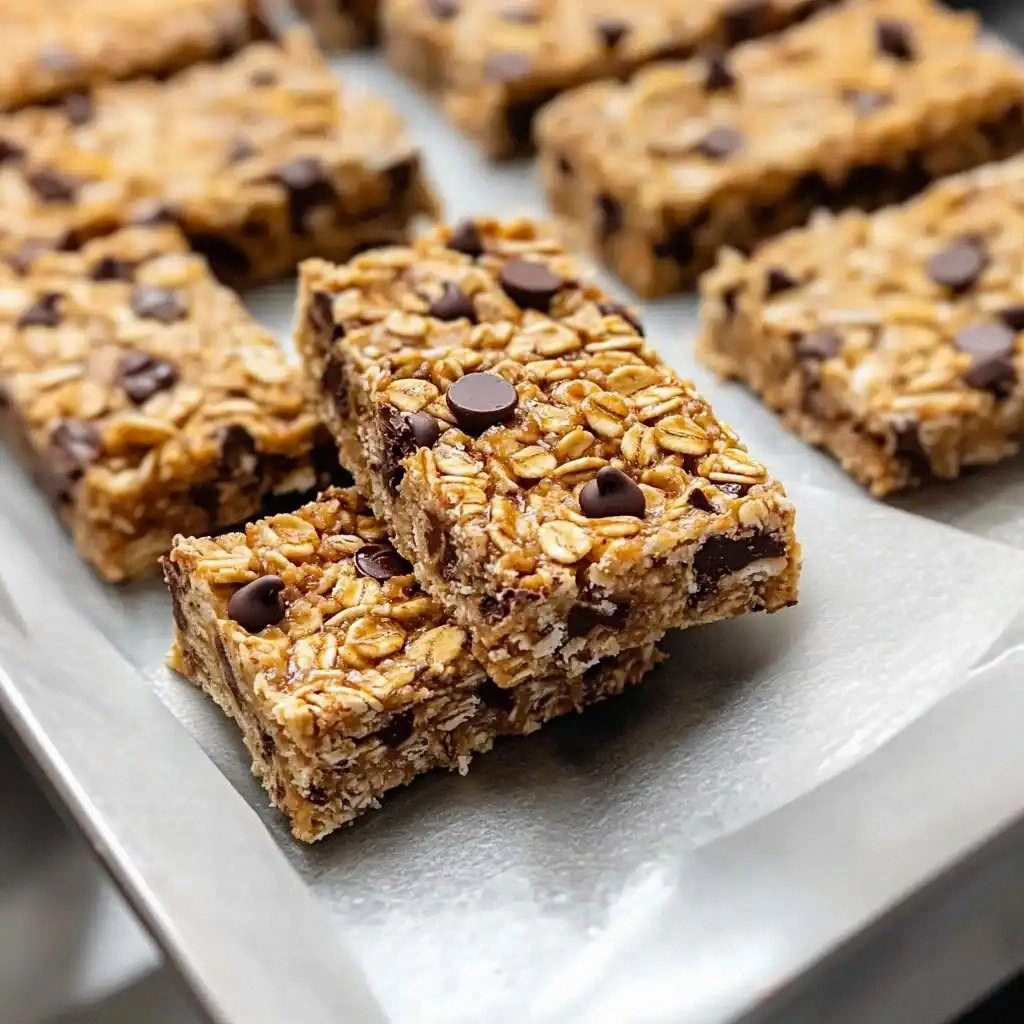
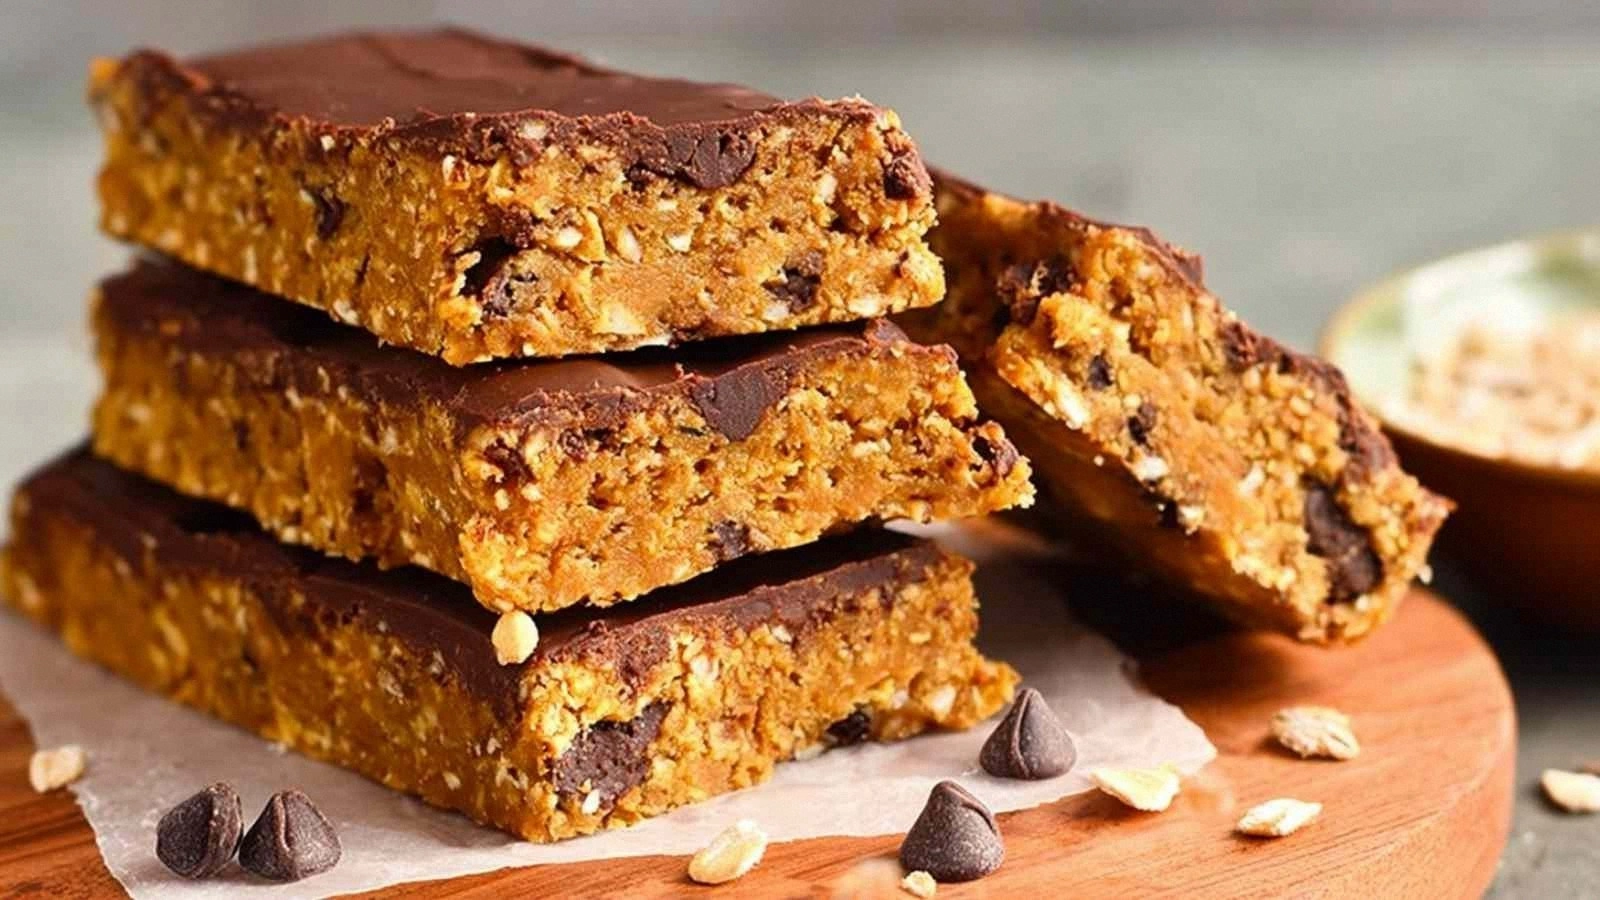
When you bite into these bars, the first thing you’ll notice is the subtle sweetness of maple syrup that lingers like a whispered promise, followed by the deep, bittersweet bite of dark chocolate. The texture is a delicate dance between crunchy mini chips and a moist, almost sticky center that melts in your mouth. Imagine a chocolatey hug that doesn’t weigh you down; that’s the vibe of this recipe. And the best part? It’s all no‑bake, meaning you can whip them up in under 30 minutes.
Let me walk you through every single step — by the end, you’ll wonder how you ever made it any other way. I dare you to taste this and not go back for seconds. If you’ve ever struggled with protein bars that taste like a science experiment, you’re not alone — and I’ve got the fix. Stay with me here, because this next part? Pure magic. And if you’re ready for the game‑changer, let’s dive in.
What Makes This Version Stand Out
- Flavor: The blend of natural peanut butter and maple syrup creates a caramelized undertone that elevates the chickpeas from bland to blissful. This isn’t just sweet; it’s a savory-sweet symphony that satisfies both sweet cravings and protein needs.
- Texture: The oats and flaxmeal give a chewy, slightly gritty bite that contrasts with the creamy center, producing a mouthfeel reminiscent of a chewy cookie without the sugar load.
- Protein: Chickpeas contribute about 15 grams of plant protein per bar, while peanut butter adds healthy fats, making each bite a balanced nutritional powerhouse.
- Convenience: No oven, no timer, no waiting—just a few minutes of mixing and a chill in the fridge. This recipe fits perfectly into a busy lifestyle.
- Versatility: Swap in your favorite nuts, seeds, or dried fruit and you’ve got a completely new flavor profile without changing the core technique.
- Make‑ahead potential: Once set, these bars keep their texture for up to a week in the fridge, or longer if frozen, making them ideal for meal prep or on‑the‑go snacking.
Alright, let's break down exactly what goes into this masterpiece…
Inside the Ingredient List
The Flavor Base
The chickpeas are the heart of the bar, providing a neutral canvas that absorbs the maple syrup and vanilla. When you mash them just enough to break them into crumbs, you unlock a subtle, nutty flavor that pairs beautifully with the sweet notes. Skipping the chickpeas would leave the bars dry and lacking protein, so keep them in. If you prefer a smoother bite, pulse the chickpeas in a blender for 15–20 seconds.
The peanut butter is the secret sauce that binds everything together. A 1/4 cup of unsalted natural peanut butter offers a creamy mouthfeel while contributing healthy monounsaturated fats. If you’re allergic to peanuts, almond butter works well, but be aware the flavor will shift slightly toward a sweeter, nuttier profile.
The Texture Crew
Rolled oats are the backbone of the texture, adding chew and bulk. 1 1/3 cups of oats give the bars a firm bite that doesn’t crumble under pressure. If you’re looking for a lighter feel, replace half the oats with quick oats or even oat flour.
Flaxmeal, or ground flaxseed, is the unsung hero that adds omega‑3s and a subtle nutty taste. The 3 tablespoons of flaxmeal help bind the mixture while also thickening the bars slightly as they chill. If you’re not a fan of flaxmeal’s earthy undertones, you can substitute it with chia seeds for a gel‑like consistency.
The Unexpected Star
Maple syrup isn’t just a sweetener; it brings a complex, caramelized flavor that balances the earthiness of chickpeas and the richness of peanut butter. The 1/3 cup of pure maple syrup also provides natural sweetness without the refined sugar spike. If you’re watching calories, you can reduce the syrup to 1/4 cup and add a splash of vanilla to compensate.
The Final Flourish
Chocolate chips are the crowning glory, offering bursts of chocolate that contrast with the creamy base. Mini chocolate chips are perfect for a more even distribution, while dark chocolate chips add a slight bitterness that cuts through the sweetness. The 1/4 cup of dark chocolate chips gives the bars an elegant finish. If you prefer a milk chocolate version, simply swap the dark chips for milk chocolate chips.
Everything's prepped? Good. Let's get into the real action…
The Method — Step by Step
- First, drain and rinse the can of chickpeas. Pat them dry with a clean towel to remove excess moisture; this step is crucial because any lingering water will dilute the binding agents and result in a soggy bar.
- Place the chickpeas in a high‑speed blender or food processor and pulse until they’re almost smooth. Don’t over‑process; you want a few small lumps to keep the bars from becoming too dense.
- Transfer the chickpeas to a large mixing bowl and add the peanut butter, maple syrup, and vanilla extract. Stir vigorously until the mixture is cohesive and glossy, as if you’re whipping a thick custard.
- Sift in the rolled oats and flaxmeal, then fold them in gently. The mixture should be thick enough to hold its shape when pressed between your fingers but still pliable.
- Add the mini chocolate chips, dark chocolate chips, and coconut oil. The oil softens the chocolate slightly, preventing it from clumping and giving the bars a silky finish.
- Line a 9x9‑inch baking pan with parchment paper, leaving an overhang on each side for easy removal. Press the mixture firmly into the pan, smoothing the top with a spatula or a wet spoon to avoid air pockets.
- Refrigerate for at least 30 minutes, or until the bars firm up. This chilling step is where the flavors meld together and the bars set to a perfect bite.
- Once set, lift the parchment overhang and cut the bar into squares or rectangles. Store in an airtight container in the fridge for up to a week or freeze for longer storage.
That's it — you did it. But hold on, I've got a few more tricks that'll take this to another level. Keep reading, because the next section will show you how to tweak the texture, boost flavor, and even make these bars extra shareable.
Insider Tricks for Flawless Results
The Temperature Rule Nobody Follows
The key to a firm bar is the temperature of your fridge. If the fridge is too cold, the bars can become hard and difficult to cut. Aim for a 4°C setting and let the bars sit at room temperature for 5 minutes before cutting. This small adjustment ensures a perfect bite every time.
Why Your Nose Knows Best
When the mixture is ready to press into the pan, give it a quick sniff. A faint, toasty aroma indicates the maple syrup has caramelized slightly, adding depth. If the smell is flat, let the mixture sit for another 5 minutes before refrigerating.
The 5‑Minute Rest That Changes Everything
After cutting the bars, let them rest on a rack for 5 minutes. This allows the edges to set, preventing them from sticking to the pan or the parchment. A friend once cut his bars too quickly and ended up with a sticky mess that required a second press.
The Sweet‑Heat Balance
If you prefer a less sweet bar, reduce the maple syrup to 1/4 cup and add a pinch of sea salt. The salt amplifies the chocolate’s flavor, creating a more complex taste profile that satisfies without overloading sugar.
The Secret to Extra Crunch
Add a tablespoon of toasted coconut flakes before refrigerating. The coconut adds a tropical crunch that pairs beautifully with the chocolate, turning an ordinary bar into a gourmet treat.
Creative Twists and Variations
This recipe is a playground. Here are some of my favorite ways to switch things up: add a splash of almond milk for a softer bite, swap the dark chocolate for white chocolate chips for a sweeter finish, or sprinkle a dash of sea salt on top before chilling for a salty‑sweet contrast. Each variation keeps the core technique intact while offering a new flavor adventure.
Nutty Banana Bars
Replace the peanut butter with almond butter and fold in a ripe banana, mashed until smooth. The banana adds natural sweetness and a creamy texture, while the almond butter gives a delicate nutty note. Serve with a drizzle of honey for an extra indulgence.
Citrus Burst
Add the zest of one orange to the mixture and replace half the dark chocolate chips with dried orange peel. The citrus brightens the flavor profile, turning the bars into a refreshing snack perfect for summer afternoons.
Spiced Chai Bars
Stir in a teaspoon of chai spice blend and a dash of cinnamon before pressing the mixture into the pan. The warm spices give the bars a comforting aroma, reminiscent of a cozy winter evening.
Chocolate‑Mint Fusion
Add a few drops of peppermint extract and replace the dark chocolate chips with white chocolate chips. The mint adds a cooling sensation that balances the richness of the chocolate, creating a festive flavor that’s perfect for holiday gifting.
Savory Herb Bars
Omit the maple syrup and instead fold in finely chopped fresh rosemary and thyme. The herbs give a savory kick that pairs well with a cheese plate, turning the bars into an unexpected appetizer.
Vegan Protein Boost
Replace the peanut butter with a vegan protein powder and add a tablespoon of chia seeds. The chia seeds swell, giving the bars a chewy texture, while the protein powder keeps the bars plant‑based and protein‑dense.
Storing and Bringing It Back to Life
Fridge Storage
Keep the bars in an airtight container in the refrigerator for up to a week. The cold environment preserves the texture, ensuring each bite remains chewy and moist. If you notice the bars drying out slightly, a light mist of water before reheating will restore their softness.
Freezer Friendly
For longer storage, wrap each bar individually in plastic wrap and place them in a freezer‑safe bag. They’ll keep for up to three months. When you’re ready to eat, let them sit at room temperature for 10 minutes to soften before cutting.
Best Reheating Method
To reheat a single bar, place it in the microwave for 10–15 seconds. The heat melts the chocolate slightly, giving a warm, gooey center that feels like a mini dessert. Add a splash of water before reheating, and the bar steams back to perfection, maintaining its original texture.