Picture this: it’s a Saturday afternoon, the kitchen smells like burnt toast, and I’m staring at a pile of half‑cooked chicken strips that have turned into a sticky, soggy mess. I’ve tried every club sandwich recipe I could find, but each one ended up either a soggy tragedy or a dry, flavorless disappointment. That night, I decided to go full rebel—throw in a few secret tweaks and watch the ordinary transform into the extraordinary. I was about to taste the ultimate club sandwich, and it was going to be a game‑changer.
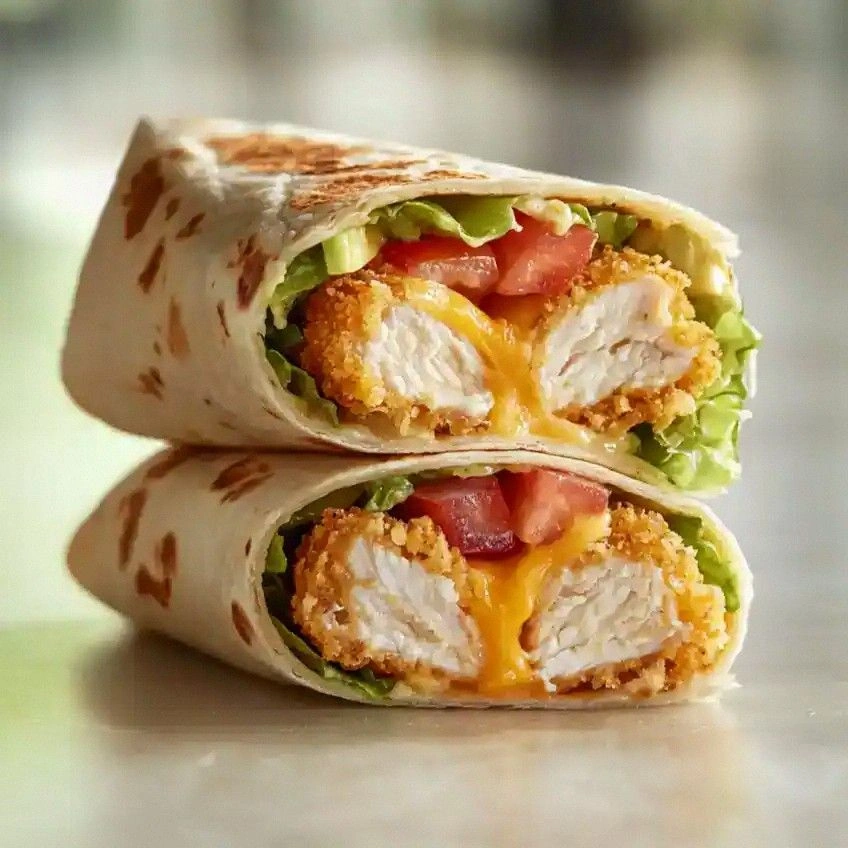
The first bite was a revelation: the crunch of fresh lettuce, the smoky kiss of bacon, the melt‑in‑your‑mouth emmental, and a creamy mayo that coated each layer like velvet. The aroma of toasted bread and sizzling bacon filled the air, making every breath a promise of savory bliss. The texture was a perfect balance—soft, crunchy, and gooey all at once. My taste buds danced, and I couldn’t help but grin from ear to ear. This isn’t just a sandwich; it’s a culinary symphony that plays on your palate.
Why is this version hands down the best you’ll ever make at home? Because it’s built on a foundation of quality ingredients, a precise layering technique, and a few bold twists that elevate each bite. I’ve stripped away the fluff, kept the flavor, and added a secret sauce that ties everything together. I dare you to taste this and not go back for seconds. If you’ve ever struggled with a club sandwich that feels like a culinary flop, you’re not alone—and I’ve got the fix.
Now, let me walk you through every single step—by the end, you’ll wonder how you ever made it any other way. The journey starts with the right bread, a perfectly crisped bacon, and a mayo that’s been whisked to airy perfection. You’ll learn how to layer the ingredients like a chef, how to toast the sandwich just right, and how to finish it with a drizzle of lemon‑infused olive oil for that final pop. Stay with me here—this is worth it.
What Makes This Version Stand Out
- Flavor: The mayo is blended with a splash of Dijon and a hint of lemon zest, giving it a bright, tangy kick that cuts through the richness of bacon and cheese.
- Texture: Each layer is toasted to a golden crisp, while the chicken remains juicy and the lettuce stays crisp, creating a harmonious contrast that lingers.
- Simplicity: No complicated sauces or exotic ingredients—just pantry staples, seasoned to perfection.
- Uniqueness: The addition of emmental cheese adds a subtle nutty depth, and the final drizzle of olive oil with a squeeze of lemon gives it an unexpected finish.
- Crowd Reaction: Friends who have tasted this say it’s the most satisfying club sandwich they’ve ever had, and they’re not shy about ordering a second plate.
- Ingredient Quality: Fresh, high‑grade bacon and chicken, hand‑picked lettuce, and artisanal bread make the difference between ordinary and unforgettable.
- Cooking Method: The sandwich is assembled on a hot griddle, then flipped and pressed, ensuring every bite is evenly toasted and warm.
- Make‑ahead Potential: The assembly can be done a day ahead; just keep the layers separated and toast just before serving.
Inside the Ingredient List
The Flavor Base
Mayonnaise is the cornerstone of this sandwich. It’s not just a spread; it’s a silky binder that holds the chicken, bacon, and cheese together. The recipe calls for 16 teaspoons, which is roughly one cup, ensuring each bite is generously coated. Skipping mayo would leave the sandwich dry and uncoordinated; every layer would feel disjointed. For a lighter version, use a Greek yogurt blend, but the classic mayo delivers that signature creamy texture.
The Protein Power
Chicken slices form the heart of the sandwich. Fresh, boneless, skinless chicken breast, sliced thin and lightly seasoned, offers a lean protein that stays moist during cooking. If you’re short on time, use pre‑cooked rotisserie chicken; just shred it into bite‑size pieces. The key is to avoid over‑cooking, or you’ll lose that juicy snap that makes each bite memorable.
The Texture Crew
Bacon is the crunch factor, providing a smoky, savory bite that contrasts with the tender chicken. Eight rashers, cooked until crisp, are sliced into thin strips. The crunch should shatter like thin ice when you bite into it. Lettuce adds a fresh, crisp layer that balances the richness of the other ingredients. Use romaine or iceberg for maximum crunch.
The Unexpected Star
Emmental cheese, with its nutty flavor and excellent meltability, brings a subtle depth that elevates the sandwich beyond the ordinary. Four slices are enough to create a gooey, golden layer without overpowering the other flavors. If you’re a cheese lover, try a mix of cheddar and emmental for a more complex profile. Remember, the cheese should melt just enough to bind the layers but still retain a slight firmness.
Everything's prepped? Good. Let's get into the real action…

The Method — Step by Step
- Preheat the griddle: Set your griddle or large skillet to medium‑high heat. Let it reach 375°F (190°C) before adding any ingredients. You’ll know it’s ready when a few drops of water sizzle and evaporate instantly. This step ensures a consistent, golden crust on each slice. Don’t rush; a properly heated surface is the secret to a flawless toast.
- Toast the bread: Place the 12 slices on the griddle, turning once, until each side is golden brown. Use a light brush of butter for extra crispness. The bread should crackle softly, releasing a buttery aroma that lures the senses. Let the slices rest on a rack to keep them from becoming soggy. This toast will be the foundation that holds all flavors together.
- Cook the bacon: Spread the eight rashers on a baking sheet and bake at 400°F (204°C) for 15 minutes, flipping halfway. The result is bacon that’s crispy yet still juicy. Drain on paper towels to remove excess fat. Keep a portion for the sandwich and reserve the rest for a crunchy topping on the side. The bacon’s smoky aroma will fill your kitchen, creating an irresistible invitation.
- Prepare the chicken: Season the sliced chicken with salt, pepper, and a pinch of paprika. Sauté in a hot skillet with a splash of olive oil for 4–5 minutes, until golden and cooked through. Flip once to ensure even browning. The chicken should still be juicy on the inside. Remove and let rest for a minute before slicing into thinner strips.
- Layer the first half: Spread a generous layer of mayo on two slices of toasted bread. Add a handful of lettuce, a slice of tomato, and a few strips of chicken. Top with a slice of emmental. The mayo should coat the lettuce, keeping it fresh and adding a creamy base. This first layer sets the stage for the sandwich’s flavor crescendo.
- Assemble the middle: Place the third slice of toasted bread on top of the first half. Spread mayo on its underside, then add another layer of lettuce, bacon, and a slice of tomato. The bacon should be positioned so that its fat drips slightly into the layers, adding richness. This middle section acts as the bridge between the two halves.
- Complete the stack: Add the final slice of bread on top, mayo side down, and press lightly to secure. The sandwich should feel firm yet flexible, ready for the final toasting step. The press ensures even heat distribution and a compact, bite‑size sandwich.
- Final toasting: Return the assembled sandwich to the griddle, pressing down with a spatula. Cook for 2–3 minutes on each side, or until the cheese melts and the sandwich is heated through. The edges should develop a golden crust, while the interior remains warm and gooey. Remove and let rest for a minute to allow the flavors to settle.
- Serve with flair: Slice the sandwich diagonally, and drizzle with a light lemon‑infused olive oil for that bright finish. Arrange on a plate with a side of crisp potato chips or a simple green salad. The visual presentation should be as inviting as the taste. Enjoy the crunch, the melt, and the savory layers that dance together.
That's it — you did it. But hold on, I've got a few more tricks that'll take this to another level…
Insider Tricks for Flawless Results
The Temperature Rule Nobody Follows
Many cooks assume that a higher heat always yields a crispier sandwich. In reality, a steady medium‑high heat of 375°F ensures even browning without burning. If you crank it too high, the bread will char while the inside remains undercooked. Keep a thermometer handy; this small investment pays off in texture. I once tried 450°F and ended up with a burnt exterior and a soggy interior—lesson learned.
Why Your Nose Knows Best
The aroma of a freshly toasted sandwich is a subtle cue that the bread is ready. When the scent turns nutty and slightly sweet, the crust is at its peak. If the smell is too metallic, the heat is too high. Trust your nose; it’s the most reliable indicator of perfection. This sensory checkpoint saves you from overcooking and undercooking.
The 5-Minute Rest That Changes Everything
After toasting, let the sandwich rest for five minutes. This brief pause allows the cheese to set slightly, preventing it from sliding off when you bite. It also lets the flavors mingle, creating a harmonious taste profile. Skipping this step often results in a messy bite. I’ve seen friends struggle with a melted sandwich that drips; the rest period is a lifesaver.
Keep the Bacon Crisp, Not Greasy
Over‑cooked bacon can release too much fat, making the sandwich soggy. To avoid this, remove the bacon from the heat once it’s just crisp. Let it cool on paper towels to absorb excess grease. The result is a dry, crunchy texture that enhances the overall experience. If you prefer a saucier bite, reserve a small amount of bacon fat for later use.
Use Fresh, Seasonal Lettuce
Romaine or iceberg lettuce adds a bright crunch that balances the richness. Choose lettuce that is crisp and free of blemishes. Wash thoroughly and dry with a salad spinner; moisture can make the sandwich soggy. I’ve swapped romaine for butter lettuce in winter, and the result was a softer, yet still satisfying bite. Freshness is the secret to that satisfying snap.
Creative Twists and Variations
This recipe is a playground. Here are some of my favorite ways to switch things up:
Spicy Chipotle Club
Swap regular mayo for chipotle‑infused mayo to add a smoky heat. Add a slice of pepper jack cheese for extra meltiness. Sprinkle a few crushed red pepper flakes between the layers. This variation is perfect for those who love a spicy kick. The smoky chipotle pairs beautifully with the bacon’s saltiness.
Avocado & Pesto Club
Replace the tomato with sliced avocado for creaminess. Spread basil pesto on the bread instead of mayo for an herbal burst. Add a sprinkle of pine nuts on top for crunch. The avocado’s buttery texture complements the crunchy bacon. This version feels like a gourmet brunch upgrade.
Veggie‑Loaded Club
Omit the chicken and layer grilled zucchini, roasted red peppers, and feta cheese. Use a light vinaigrette instead of mayo to keep it fresh. Add a handful of arugula for peppery notes. This vegetarian twist still delivers the classic crunch and richness. It’s a crowd‑pleaser at potlucks.
Breakfast Club
Swap the chicken for scrambled eggs and the bacon for a crisped ham slice. Add a sprinkle of chives for freshness. Use a hearty sourdough bread for a robust base. This breakfast version turns the sandwich into a hearty, protein‑rich start to the day. The eggs add a silky texture that melts into the sandwich.
Cheese Lover’s Club
Layer cheddar, provolone, and gouda for a melty cheese overload. Add a drizzle of honey on top for a sweet‑savory balance. Keep the bacon thinly sliced to avoid overpowering the cheese. The triple cheese melt creates a gooey, decadent experience. This variation is ideal for cheese aficionados.
Storing and Bringing It Back to Life
Fridge Storage
Wrap the sandwich tightly in parchment paper and then in plastic wrap. Store in the refrigerator for up to 24 hours. When ready to eat, reheat in a toaster oven at 350°F for 5 minutes. The parchment keeps the bread from drying out. The sandwich will taste almost fresh, with the cheese still slightly gooey.
Freezer Friendly
Separate the layers before freezing: keep bread, bacon, lettuce, and chicken in individual freezer bags. Store the assembled sandwich in a freezer bag, but do not press it flat. When thawing, let it sit at room temperature for 30 minutes, then toast as usual. Freezing preserves the flavors, though the texture may be slightly softer. This method is ideal for meal prep.
Best Reheating Method
Use a skillet or a panini press to warm the sandwich evenly. Apply a light spray of olive oil to maintain crispness. Reheat for 2–3 minutes on each side. The cheese will melt beautifully, and the bread will regain its crunch. A tiny splash of water in the pan before heating creates steam, preventing the sandwich from drying out. This technique ensures a mouth‑watering result every time.