I was standing in my kitchen, staring at a half‑finished batch of plain old cheesecake that had somehow turned into a soggy, sad mess. My roommate dared me to make something “that would wow a crowd” and I thought, “why not turn those boring cones into a dessert that sings?” The scent of melted butter and graham crumbs hit me like a warm hug, while the fresh strawberries on the counter were practically begging to be part of the party. I grabbed a handful of ice‑cream cones, imagined the crunch of a cookie crust, and felt the excitement of turning a simple snack into a show‑stopping masterpiece.
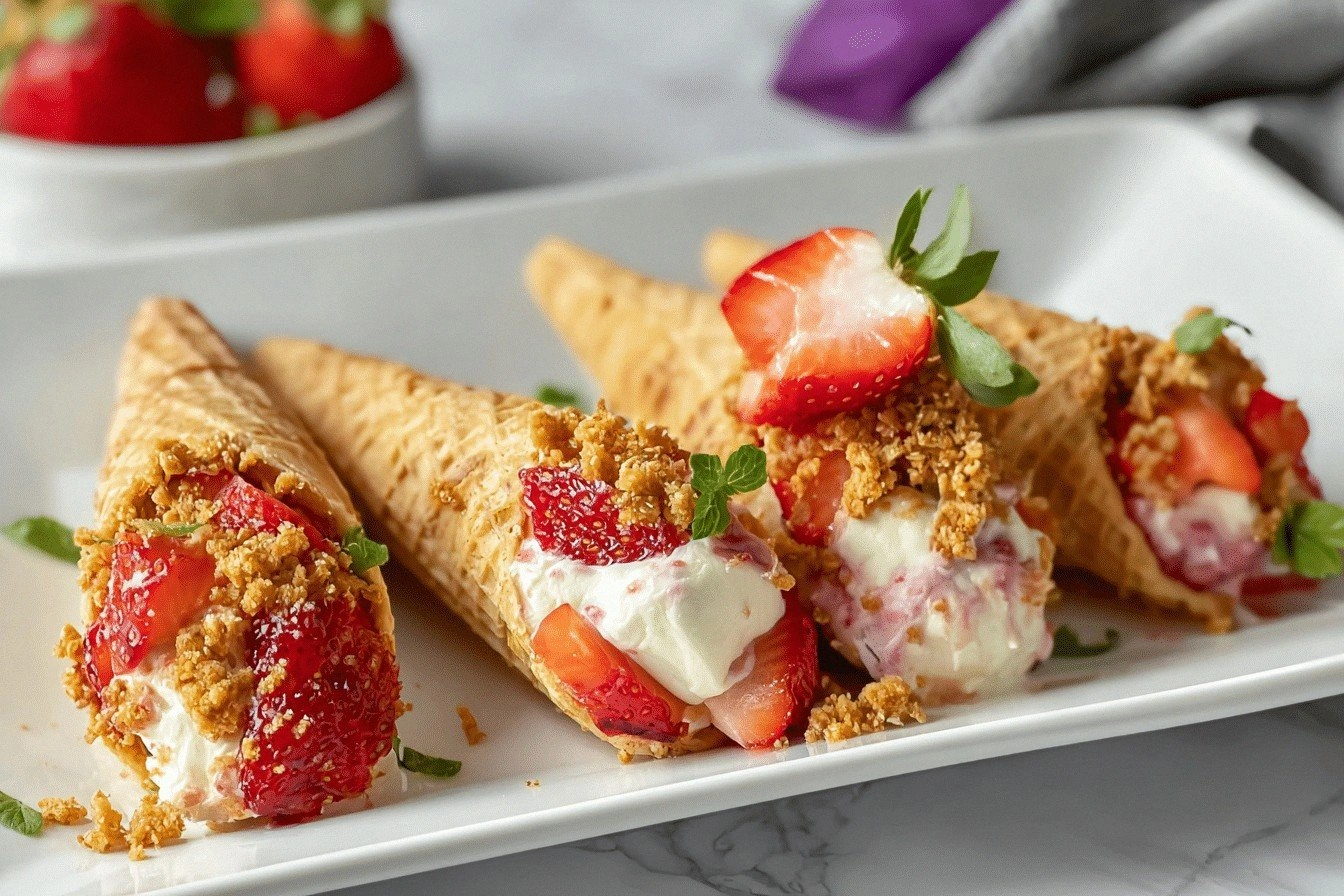
Picture this: a glossy, ruby‑red strawberry glaze draped over a velvety cheesecake filling that slides into a crisp cone like a secret treasure. The first bite delivers a buttery crunch, followed by a silky, slightly tangy cream cheese core, and finishes with the bright pop of fresh strawberries that make your taste buds do a little happy dance. I’ll be honest — I ate half the batch before anyone else got a chance to try it, and that’s a confession worth making because it proves just how addictive this treat is. Most recipes get the crust wrong, ending up soggy or too dense, but this one stays perfectly crisp, even after a couple of hours in the fridge.
What really sets this version apart is a tiny secret I discovered while scrolling through endless forums: a dash of vanilla extract in the filling makes the whole thing sing like a choir of angels, while the powdered sugar adds just enough sweetness without turning the texture gummy. I also tossed in a surprise ingredient — a pinch of sea salt — that amplifies the strawberry’s natural sweetness and balances the richness of the cream cheese. This isn’t just a dessert; it’s a conversation starter, a party trick, and a comfort food all rolled into one elegant cone.
I dare you to taste this and not go back for seconds. Ready for the game‑changer? Let me walk you through every single step — by the end, you’ll wonder how you ever made it any other way.
What Makes This Version Stand Out
- Texture: The graham cracker crust stays crunchy thanks to a precise butter‑to‑crumb ratio that creates a perfect lattice of flavor.
- Flavor: A blend of sweet strawberries, tangy cream cheese, and aromatic vanilla delivers a layered taste experience.
- Simplicity: No fancy equipment required; just a bowl, a whisk, and a handful of ice‑cream cones.
- Visual Impact: The vibrant strawberry topping makes each cone look like a mini‑work of art that begs to be photographed.
- Crowd Reaction: Guests often claim it’s “the best thing they’ve ever had at a party,” and they’ll ask for the recipe twice.
- Ingredient Quality: Using fresh, ripe strawberries and full‑fat cream cheese maximizes richness and depth.
- Method: The no‑bake approach saves time and eliminates the risk of a cracked crust.
- Make‑Ahead Potential: You can prep the crust and filling a day ahead, store them separately, and assemble right before serving.
Inside the Ingredient List
The Flavor Base
The cream cheese is the heart of this dessert. Its natural tang cuts through the sweetness of the strawberries, creating a balanced profile that feels luxurious yet familiar. If you skimp on the cream cheese, the filling turns flat and loses that signature cheesecake silk. For a lighter version, you could substitute half‑fat cream cheese, but expect a less indulgent mouthfeel. Pro tip: let the cream cheese sit at room temperature for 30 minutes before mixing; it blends smoother and eliminates lumps.
The Texture Crew
Graham cracker crumbs and butter form the crunchy shell that holds everything together. The crumbs provide that nostalgic “graham cracker crust” flavor, while the melted butter acts as the glue that keeps the crust from crumbling apart. Skip the butter, and you’ll end up with a dry, crumbly mess that can’t hold the filling. If you’re allergic to dairy, coconut oil works as a vegan substitute, though it adds a faint coconut aroma that changes the flavor profile.
The Unexpected Star
Strawberries are more than just a garnish; they bring acidity, natural sweetness, and a pop of color that makes the dessert Instagram‑ready. Use berries that are fully red and fragrant—those that give off a sweet perfume when you crush them. If you pick strawberries that are too green, the flavor will be tart and the color dull. A great tip is to macerate the sliced strawberries with a pinch of sugar for 10 minutes; this draws out juices and creates a glossy glaze without extra cooking.
The Final Flourish
Powdered sugar and vanilla extract are the finishing touches that turn good into unforgettable. Powdered sugar dissolves effortlessly, ensuring a smooth, lump‑free filling, while vanilla adds depth that you can’t achieve with fruit alone. If you run out of vanilla, a splash of almond extract works, but keep it to half the amount to avoid overpowering the strawberries. Remember, the quality of vanilla matters—a real vanilla bean or pure extract makes a world of difference.
Everything's prepped? Good. Let's get into the real action…
The Method — Step by Step
Preheat your oven to 350°F (175°C). While the oven warms, spread the graham cracker crumbs on a large baking sheet and toast them for 2‑3 minutes, stirring once, until they turn a light golden brown and emit a nutty aroma. This step is pure magic because it awakens the buttery notes hidden in the crumbs. Watch the crumbs closely—they can go from perfect to burnt in seconds.
While the crumbs are cooling, melt 6 tablespoons of butter in a microwave‑safe bowl (or a small saucepan over low heat). Once melted, combine the toasted crumbs with the butter, stirring until every crumb is glossy and fully coated. This mixture should feel like wet sand—moist but not soupy. Press about 1 tablespoon of the mixture into each ice‑cream cone, using the back of a spoon to pack it firmly against the interior walls. The crust will set as it cools, creating a sturdy base for the filling.
In a large mixing bowl, beat the softened cream cheese with an electric mixer on medium speed until it’s smooth and free of lumps—about 2 minutes. Add powdered sugar gradually, allowing it to dissolve completely before moving on. The mixture should become light and fluffy, resembling a cloud that’s just waiting to be poured. Finally, stir in the vanilla extract; the scent will instantly fill the kitchen, signaling that you’re on the right track.
Transfer the cheesecake filling into a piping bag fitted with a wide star tip (or simply use a zip‑top bag with a corner cut off). Pipe the filling into each prepared cone, filling them about three‑quarters full. The star tip creates a decorative swirl that adds visual appeal and helps the filling settle evenly.
Now for the strawberries: slice fresh strawberries thinly, then toss them with a pinch of sugar and a splash of lemon juice. Let them sit for 10 minutes; this maceration process draws out the juices, turning the berries into a glossy, slightly thickened sauce. Spoon the macerated strawberries over the cheesecake filling, allowing the juice to cascade down the sides of the cone, creating a natural glaze.
Place the assembled cones on a baking sheet lined with parchment paper and refrigerate for at least 30 minutes. This chilling step firms up the crust and allows the cheesecake filling to set, ensuring each bite holds its shape. If you’re in a hurry, a quick 15‑minute chill in the freezer works, but be careful not to let the cones freeze solid.
Just before serving, drizzle a thin ribbon of melted chocolate or a light dusting of powdered sugar over the strawberries for an extra touch of elegance. This final flourish adds a subtle bitterness that balances the sweet strawberry glaze, completing the flavor symphony.
Serve the cones upright on a decorative platter, and watch your guests’ eyes light up as they bite into the crunchy shell, creamy interior, and bright fruit topping. Picture yourself pulling this out of the fridge, the whole kitchen smelling incredible, and the first bite delivering a perfect harmony of textures. This is hands down the best version you’ll ever make at home.
That's it — you did it. But hold on, I've got a few more tricks that'll take this to another level...
Insider Tricks for Flawless Results
The Temperature Rule Nobody Follows
Never fill the cones with warm cheesecake filling. Let the mixture chill for at least 10 minutes after beating; this prevents the butter crust from melting and keeps the texture crisp. I once poured a lukewarm filling and watched the crust dissolve like a sandcastle at high tide. The rule of thumb: the filling should be cool to the touch, not cold, before piping.
Why Your Nose Knows Best
When the graham crumbs are toasting, trust your sense of smell more than the timer. The moment you detect a nutty, caramel aroma, pull them out. Over‑toasting is a silent killer that makes the crust taste bitter. This sensory checkpoint saves you from a batch of disappointment.
The 5‑Minute Rest That Changes Everything
After piping the filling, let the cones rest for exactly five minutes before adding the strawberry glaze. This short pause allows the cheesecake to firm up just enough to support the weight of the berries without sliding out. A friend tried skipping this step once — the strawberries slid off like a waterfall, and the presentation suffered.
Maceration Magic
Macerating strawberries with a pinch of salt, not just sugar, intensifies their natural sweetness and balances the overall flavor. The salt draws out moisture, creating a glossy sauce that clings beautifully to the cone. If you forget the salt, sprinkle a tiny pinch just before serving for a quick fix.
The Chill‑Then‑Serve Technique
Store the finished cones upright in a tall, narrow container (like a glass jar) while they chill. This prevents the cones from leaning and the filling from spilling over the sides. The result is a perfectly upright dessert that looks as polished as a bakery’s display case.
Creative Twists and Variations
This recipe is a playground. Here are some of my favorite ways to switch things up:
Chocolate‑Dipped Cones
Dip the tops of the ice‑cream cones in melted dark chocolate before filling. The chocolate adds a bitter contrast that pairs beautifully with the sweet strawberry glaze, and it gives the cone a glossy, professional finish.
Berry Medley Madness
Swap half of the strawberries for raspberries and blueberries. The mix of tart and sweet berries creates a complex flavor profile and a stunning visual mosaic that’s perfect for summer gatherings.
Nutty Crunch Upgrade
Add finely chopped toasted almonds or pistachios to the graham crumb crust. The extra nutty crunch elevates the texture and adds a subtle depth that surprises the palate.
Lemon‑Infused Cheesecake
Stir a teaspoon of fresh lemon zest into the cream cheese filling and replace half the vanilla extract with lemon juice. The citrus zing brightens the overall flavor and makes the dessert feel lighter.
Mini Dessert Shooters
Instead of full‑size cones, use bite‑size wafer cones and serve them in shot glasses. These mini versions are perfect for cocktail parties where guests want a quick, elegant bite.
Storing and Bringing It Back to Life
Fridge Storage
Place the assembled cones in an airtight container and store them in the refrigerator for up to 3 days. The crust remains crisp, and the filling stays creamy. If you notice any condensation, pat the tops gently with a paper towel before serving.
Freezer Friendly
These cones freeze beautifully for up to 2 weeks. Wrap each cone individually in plastic wrap, then place them in a zip‑top bag. When you’re ready to serve, thaw them in the fridge for 2‑3 hours and give them a quick 5‑minute room‑temperature rest before adding fresh strawberries.
Best Reheating Method
If the crust loses its crunch after refrigeration, pop the cones on a low‑heat oven rack (250°F/120°C) for 5 minutes. Add a tiny splash of water to the oven’s back wall to create steam; this revives the crust without drying out the filling.