Introduction
Picture this: I’m standing in a cramped kitchen, the oven timer ticking louder than a heart monitor, and a friend challenges me to make a dessert that looks burnt on the outside but melts like a dream inside. I laughed, because I’ve always believed that burnt is a myth for cheesecake, but that night, the smoke alarm blared and my half‑finished batter turned into a charred masterpiece. I’ve tasted every burnt cheesecake out there, from the classic Basque to the New York style, and I’ve never felt the same electric rush of flavor that this version delivers. The moment the oven door opens, a wave of caramelized sugar, buttery cream cheese, and faint vanilla perfume floods the room, making every kitchen gadget feel like a portal to dessert heaven.
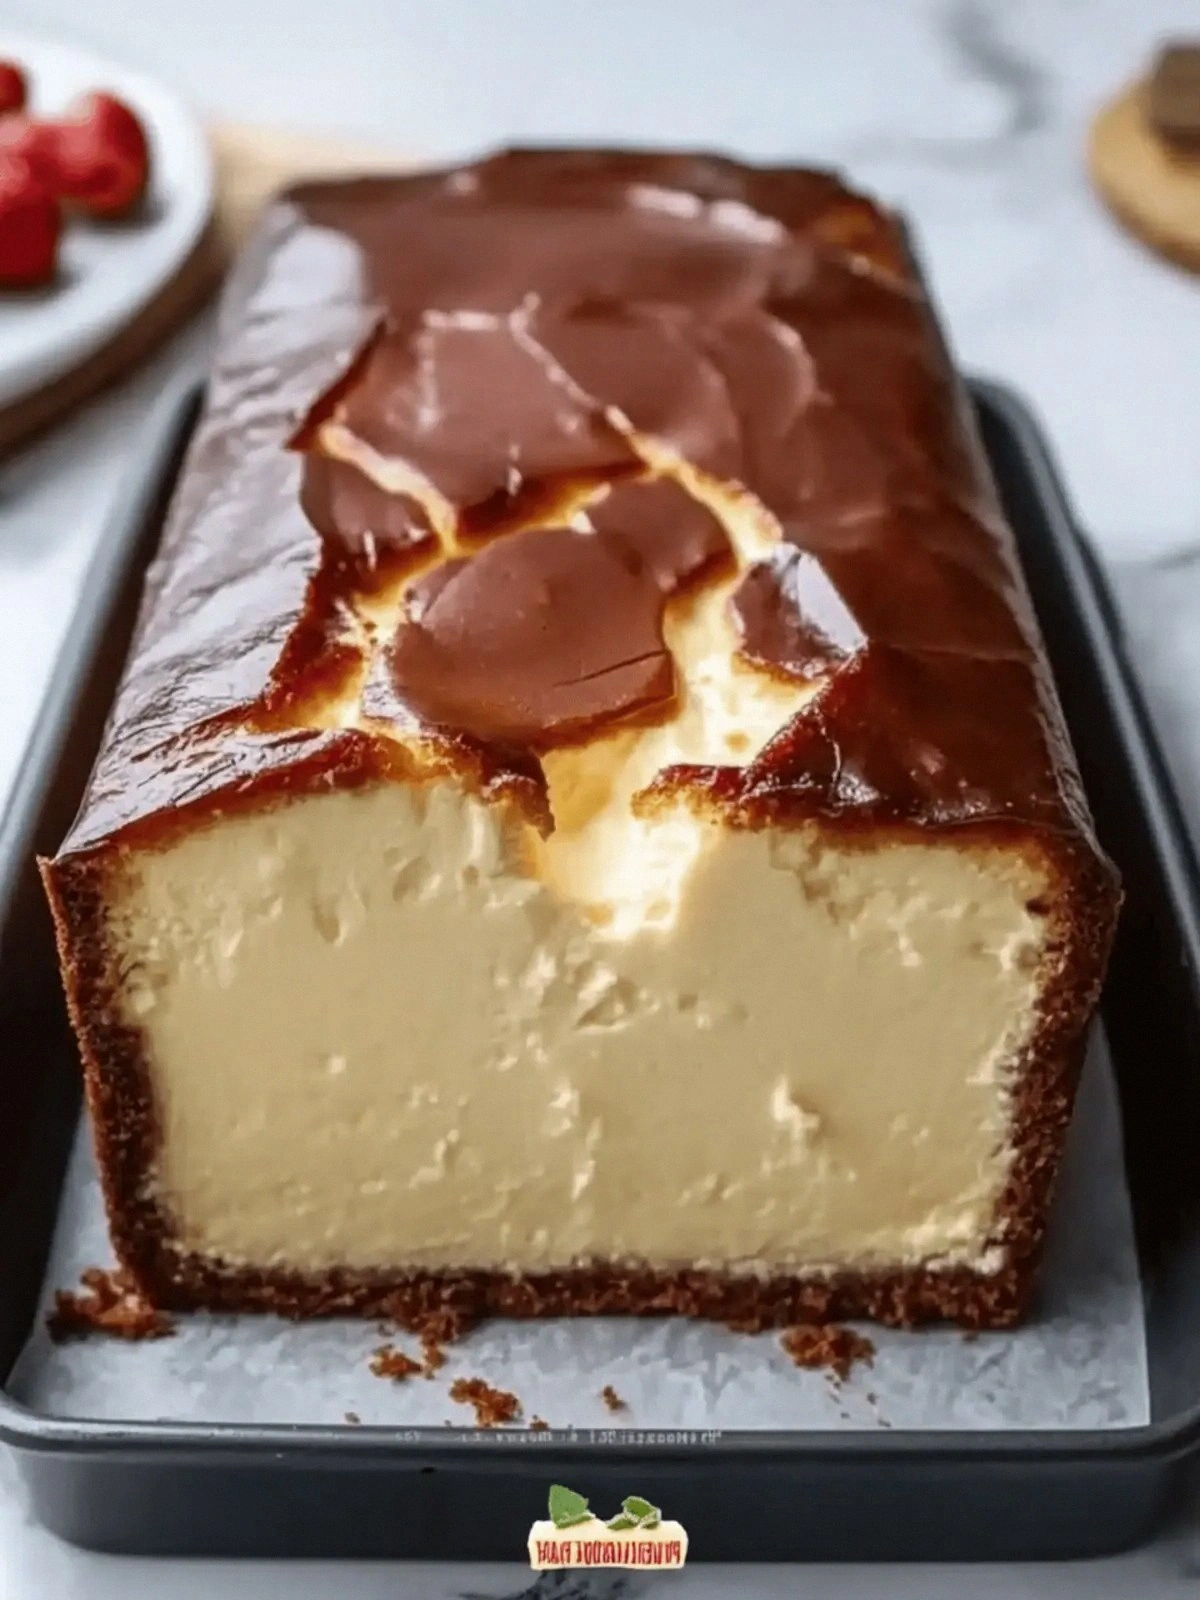
When the first bite hits your tongue, the texture is a paradoxical blend of custard‑like softness and a slightly crisp edge that cracks like thin ice when you bite through it. The interior is a velvety, almost molten center that clings to the spoon, while the exterior is a glossy, almost glassy crust that glistens under the kitchen lights. The aroma is a sweet, toasty whisper that lures you in, and the taste is a complex, rich profile of caramelized sugar, subtle almond undertones, and a lingering vanilla finish that dances on the palate. I dare you to taste this and not go back for seconds, because the first bite will have you questioning every other cheesecake you’ve ever made.
What makes this recipe stand out is not just the burnt crust or the creamy center—it’s the deliberate use of a high‑fat cream cheese that refuses to separate, the precise oven temperature that creates the perfect char without overcooking, and the tiny splash of water before serving that turns the cheesecake into a silky, almost molten texture. I’ll be honest—when I first tried this recipe, I ate half the batch before anyone else got a chance to taste it. That’s the kind of confidence you need when you’re about to serve this at a gathering.
Most recipes get this completely wrong. They either over‑bake, leading to a dry center, or under‑bake, resulting in a gooey mess that won’t set. Here’s what actually works: a simple, no‑fuss batter, a single pan, and a high oven temperature that caramelizes the sugars just enough to create that signature “burnt” look. The secret ingredient? A splash of water at the end, which steams the cheesecake back to a silky smoothness that feels like a cloud of butter on your tongue.
Picture yourself pulling this out of the oven, the whole kitchen smelling incredible, and the guests leaning in, eyes wide, waiting for the first bite. The anticipation is almost tangible, like a slow‑burning candle that fills the room with warmth. And now, ready for the game‑changer? Let me walk you through every single step—by the end, you’ll wonder how you ever made it any other way.
What Makes This Version Stand Out
- Flavor: The caramelized sugar creates a deep, almost burnt‑sugar flavor that balances the richness of cream cheese, giving it a depth that feels both indulgent and sophisticated.
- Texture: The crust is crisp yet slightly chewy, while the interior remains creamy and custard‑like, achieving the perfect mouthfeel that melts in your mouth.
- Simplicity: No fancy equipment or complex steps—just a loaf pan, an oven, and a handful of ingredients. This is hands down the best version you’ll ever make at home.
- Ingredient Quality: Using full‑fat cream cheese ensures a rich, buttery flavor that won’t curdle, while the small amount of flour stabilizes the batter without adding heaviness.
- Make‑Ahead Potential: The cheesecake can be chilled for up to 24 hours, and the burnt crust will still hold its texture, making it perfect for parties or last‑minute dessert prep.
- Audience Appeal: It’s a crowd‑pleaser that will wow even the most skeptical dessert lovers, and it’s a conversation starter that invites questions about the “burnt” technique.
Alright, let’s break down exactly what goes into this masterpiece…
Inside the Ingredient List
The Flavor Base
Full‑fat cream cheese is the cornerstone of this cheesecake. It’s the heart of the batter, delivering a buttery, slightly tangy flavor that pairs perfectly with the sweet caramelized sugar. If you try to substitute a low‑fat or a flavored cream cheese, you’ll lose that rich, creamy mouthfeel that defines the dessert. The key is to let the cream cheese sit at room temperature for at least 30 minutes before mixing; this prevents lumps and ensures a smooth batter.
The Sweetener
Granulated sugar is the driver of the caramelization that gives the burnt crust its signature look. It also balances the richness of the cream cheese, creating a sweet‑savory harmony that lingers on the palate. If you’re watching calories, you can swap in a sugar substitute that caramelizes well, such as demerara or turbinado, but the flavor profile will shift slightly.
The Texture Crew
Eggs are the binding agents that give the cheesecake its custard structure. They also help the batter set without cracking. The small amount of all‑purpose flour stabilizes the mixture, preventing the eggs from curdling or the cheesecake from becoming too dense. If you’re allergic to eggs, a combination of applesauce and cornstarch can be a decent substitute, but the texture will be noticeably different.
The Final Flourish
Salt and vanilla extract are the finishing touches that elevate the entire flavor profile. Salt enhances every component, cutting through the sweetness, while vanilla adds depth and warmth that rounds off the caramelized edges. If you’re feeling adventurous, a dash of espresso powder can add a subtle coffee undertone that pairs beautifully with the burnt sugar.
Everything’s prepped? Good. Let’s get into the real action…
The Method — Step by Step
- Pre‑heat your oven to 450°F (232°C). Line a 9‑inch loaf pan with parchment paper, ensuring the paper extends up the sides for easy removal. This step is crucial because a perfectly lined pan prevents sticking and gives that glossy crust we love. The parchment also makes cleanup a breeze, saving you time for the next dessert.
- In a large mixing bowl, combine the room‑temperature cream cheese and granulated sugar. Use a hand mixer or stand mixer on low speed until the mixture is smooth and pale. The goal is to dissolve the sugar completely; any granules will cause a gritty texture that ruins the silky interior. As the mixture turns lighter, you’ll notice the batter becoming airy—this is a sign that the sugar is fully incorporated.
- Add the eggs one at a time, beating well after each addition. The first egg should be fully blended before adding the second; this prevents the batter from curdling. When the third egg is incorporated, the mixture should have a thick, custard‑like consistency. If the batter feels too runny, you can let it rest for 10 minutes, and the proteins will thicken it naturally.
- Sift the all‑purpose flour and 1/4 teaspoon of salt into the batter. Fold gently with a spatula until just combined. Over‑mixing can cause the cheesecake to crack or become rubbery, so keep it light. The flour helps stabilize the eggs, while the salt brings out the flavors without making the batter taste flat.
- Stir in the vanilla extract. The vanilla’s warmth balances the caramelized sugar and adds a fragrant note that lingers. If you prefer a stronger vanilla flavor, you can double the amount, but be careful not to overpower the subtle sweetness.
- Pour the batter into the prepared loaf pan, smoothing the top with a spatula. Tap the pan gently on the counter to release any air pockets. This ensures an even rise and prevents the cheesecake from cracking during baking. The batter should fill the pan to about ¾ full; the top will rise slightly as it bakes.
- Place the pan in the oven and bake for 30 minutes, then reduce the temperature to 400°F (204°C) and continue baking for another 15–20 minutes. The edges will start pulling away from the parchment, and the center should feel slightly jiggly. The crust should be a deep amber color, almost caramelized, but not burnt black. The key is to watch the color and not the timer; ovens vary, so keep an eye on the surface.
- If the top starts to over‑brown before the center is set, tent the cheesecake loosely with aluminum foil. This protects the surface while the interior finishes baking. The foil should be just enough to cover the top without touching the batter.
- Once baked, remove the cheesecake from the oven and let it cool in the pan on a wire rack for 30 minutes. The cooling period is vital; the cheesecake will continue to set and the edges will firm up, creating that perfect bite. After the initial cool, cover the pan with plastic wrap and refrigerate for at least 4 hours, preferably overnight.
- Before serving, run a thin knife around the edges and lift the cheesecake from the pan. This ensures a clean release and a beautiful presentation. The parchment should slip away easily if the cheesecake has set properly.
That’s it— you did it. But hold on, I’ve got a few more tricks that will take this to another level…
Insider Tricks for Flawless Results
The Temperature Rule Nobody Follows
Many bakers think a lower oven temperature is safer, but for a burnt Basque cheesecake, the high heat is essential. Baking at 450°F creates the caramelized crust while keeping the center creamy. I once tried 400°F, and the result was a pale, under‑baked crust that didn’t caramelize. The higher temperature also reduces baking time, preventing the center from drying out.
Why Your Nose Knows Best
Trust your olfactory senses. The moment the cheesecake starts to develop a deep amber color, the aroma of caramelized sugar will fill the kitchen. This scent is a cue that the crust is forming correctly. If you’re uncertain, gently touch the top with a finger; it should feel slightly warm but not hot. Over‑baking will give you a burnt scent that’s too sharp.
The 5‑Minute Rest That Changes Everything
After baking, let the cheesecake rest at room temperature for 5 minutes before cooling. This short rest allows the batter to set slightly, preventing cracks when you transfer it to the refrigerator. It also lets the heat redistribute, ensuring a consistent texture throughout.
Don’t Skip the Parchment Paper
Even though it may seem like a small detail, parchment paper is crucial. It prevents sticking, gives a clean release, and contributes to a uniform crust. If you’re using a metal pan, add a sheet of parchment to avoid direct contact with the metal, which can cause uneven browning.
Use a Thermometer for Precision
For the most reliable results, use a digital thermometer to monitor the internal temperature. Aim for 200°F (93°C) at the center. If it’s below, bake a few more minutes; if it’s above, reduce the time. This ensures the cheesecake is set but still creamy.
Creative Twists and Variations
This recipe is a playground. Here are some of my favorite ways to switch things up:
Chocolate‑Infused Basque
Add 2 tablespoons of cocoa powder to the batter for a rich, chocolatey version. The chocolate pairs beautifully with the caramelized edges, creating a deep, indulgent flavor that’s perfect for chocolate lovers. Keep the rest of the recipe unchanged.
Orange Zest Delight
Incorporate the zest of one orange into the batter. The citrus brightens the rich base, adding a subtle, refreshing note. This variation is especially delightful during spring and summer gatherings.
Almond Crunch Layer
After the cheesecake has cooled, sprinkle toasted almond slivers on top. The crunch contrasts with the silky interior, offering a textural surprise. The almond’s nutty flavor also complements the caramelized sugar beautifully.
Espresso‑Enhanced Flavor
Stir in 1 teaspoon of espresso powder into the batter. The espresso adds a subtle coffee undertone that deepens the overall flavor profile. This version is great for a cozy afternoon treat or a sophisticated dessert after dinner.
Berry Compote Topping
Top the cheesecake with a warm berry compote made from fresh strawberries, blueberries, and a splash of lemon juice. The acidity cuts through the richness and adds a burst of color. Serve warm for a comforting dessert.
Maple‑Infused Variation
Replace half the sugar with pure maple syrup for a natural sweetness that complements the caramelized crust. The maple’s earthy undertones enhance the overall depth of the dessert, making it a perfect fall treat.
Storing and Bringing It Back to Life
Fridge Storage
Store the cheesecake in an airtight container in the refrigerator for up to 4 days. The airtight environment prevents the cheesecake from absorbing fridge odors and keeps the texture moist. Before serving, let it sit at room temperature for 15 minutes to soften slightly.
Freezer Friendly
Wrap the cheesecake tightly in plastic wrap, then aluminum foil, and freeze for up to 2 months. When you’re ready to serve, thaw it overnight in the fridge. The texture remains silky; just give it a quick warm‑up before serving.
Best Reheating Method
Reheat the cheesecake in a pre‑heated oven at 300°F (149°C) for 10 minutes. If you want that glossy finish, drizzle a tablespoon of cold water over the top before reheating. The water steams the surface, giving a buttery sheen that mimics fresh baking.