When the kitchen lights flickered and my phone buzzed with a frantic text from a friend, I was staring at a bag of stale granola, a jar of peanut butter, and a half‑sized bottle of maple syrup. “You have to try this,” the message read, a dare that felt almost like a culinary crime. I had always been a fan of quick snacks, but the last batch I made was a soggy, flavorless mess that left me wondering why anyone would bother with granola at all. That night, I decided to turn the kitchen into a laboratory, mixing protein powder, chia, and a pinch of cinnamon until the mixture smelled like a warm, buttery promise.
From the moment the peanut butter hit the saucepan, the air filled with a nutty sweetness that made my taste buds do a little dance. The maple syrup glistened, turning the mixture into a glossy, amber liquid that seemed to hold the sun in a spoonful. As I stirred, the protein powder began to dissolve, releasing a faint, chocolatey aroma that mingled with the cinnamon’s earthy undertone. The texture transformed from a thick paste to a silky, almost velvety coating that clung to the oats like a second skin. I could hear the gentle hiss of the mixture warming, a subtle reminder that even a no‑bake recipe can have a touch of drama.
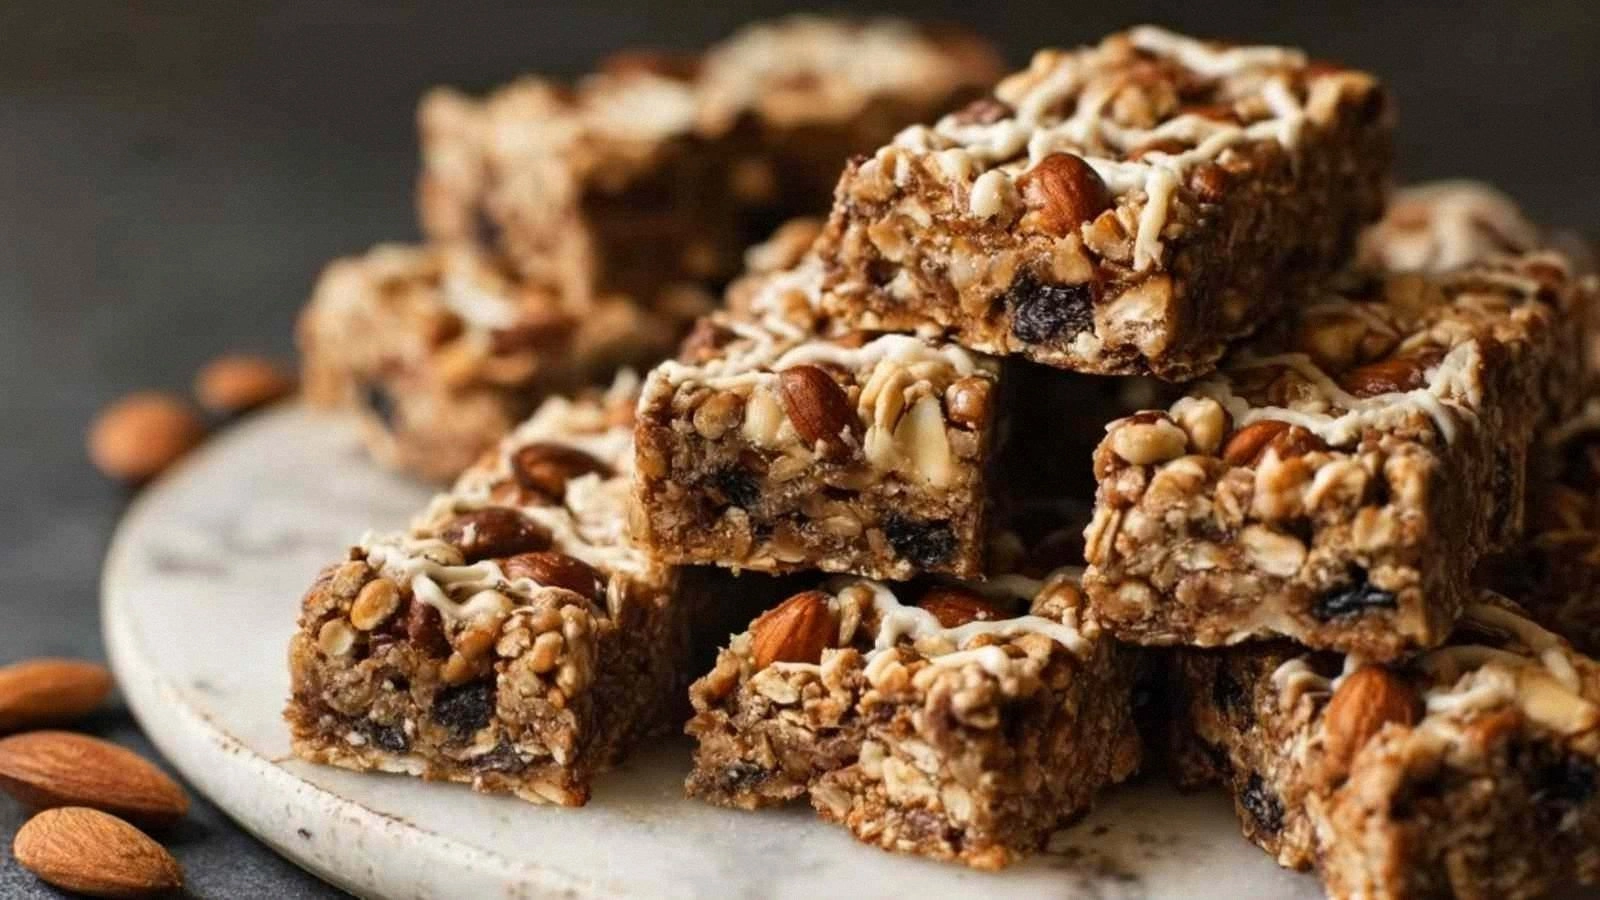
What makes this version stand out is not just the ingredients but the way they interact in a dance of flavor and texture. It’s a bold claim, but I dare you to taste this and not go back for seconds. The result is a crunchy bar that snaps like thin ice yet melts in your mouth with the richness of real butter. The protein boost turns a simple snack into a post‑workout staple, while the natural sweetness eliminates the need for refined sugars. Most recipes get this completely wrong, but here’s what actually works: a balanced ratio of fats to carbs and a precise method that locks in moisture without the need for an oven. Picture yourself pulling this out of the fridge, the whole kitchen smelling incredible, and knowing you’ve just created something that feels both indulgent and wholesome.
Let me walk you through every single step — by the end, you’ll wonder how you ever made it any other way. I’ve spent hours tweaking this formula, and the final version is hands down the best you’ll ever make at home. The secret? A simple, no‑bake technique that preserves the natural textures of each ingredient while creating a cohesive, bite‑sized treat. I’ll be honest — I ate half the batch before anyone else got to try it — and that’s a testament to its irresistible quality. Stay with me here — this is worth it.
What Makes This Version Stand Out
- Flavor: The combination of maple syrup and natural peanut butter creates a sweet, nutty base that’s both comforting and energizing. The vanilla or chocolate protein powder adds depth without overpowering the other elements.
- Texture: The oats, chia, and flaxseed provide a satisfying crunch that contrasts with the smooth protein coating. The mini dark chocolate chips add a subtle burst of richness.
- Health: Each bar delivers a solid protein punch, healthy fats from nuts and seeds, and no added refined sugar.
- Convenience: No baking required; just a quick stir, press, and chill. Perfect for busy mornings or a mid‑day pick‑me‑up.
- Versatility: The recipe can be customized with different protein flavors, nut varieties, or sweeteners to suit any palate.
- Make‑ahead potential: These bars keep well in the fridge for a week and freeze for longer storage, making them ideal for meal prep.
- Ingredient quality: Using natural peanut butter and pure maple syrup ensures each bite is free from artificial additives.
- Visual appeal: The golden crust and dark chocolate flecks create an Instagram‑ready snack that’s as beautiful as it is tasty.
Alright, let’s break down exactly what goes into this masterpiece…
Inside the Ingredient List
The Flavor Base
The rolled oats are the backbone of these bars, offering a hearty, chewy foundation that holds everything together. They absorb the liquid mixture, becoming tender yet retaining a satisfying bite. If you skip them, the bars will fall apart and lose their structure. For a gluten‑free version, replace the oats with certified gluten‑free oats, which maintain the same texture.
The Texture Crew
Chia and flaxseed are the unsung heroes that add a subtle crunch and a boost of omega‑3 fatty acids. The chia seeds swell slightly, creating a gel-like coating that keeps the bars moist. Ground flaxseed, on the other hand, provides a nutty flavor and helps bind the mixture. If you’re allergic to nuts, you can double the flaxseed to compensate for the missing crunch.
The Unexpected Star
Mini dark chocolate chips are the final flourish that turns a healthy snack into a decadent treat. Their small size ensures they melt into pockets of chocolatey delight without overwhelming the other flavors. If you prefer a sweeter bar, consider using white chocolate chips or a drizzle of melted dark chocolate on top.
The Final Flourish
Ground cinnamon and sea salt bring balance to the sweetness and add a subtle warmth that lingers on the palate. The cinnamon’s natural sweetness cuts through the richness of the peanut butter, while the salt enhances every bite. If you’re watching sodium intake, reduce the sea salt to a quarter teaspoon.
Everything’s prepped? Good. Let’s get into the real action…
The Method — Step by Step
- In a medium saucepan, combine the natural peanut butter, pure maple syrup, and protein powder. Warm over low heat, stirring constantly until the mixture becomes smooth and glossy. The key is to avoid overheating; too hot and the protein will denature, losing its nutritional value. The aroma of toasted peanut butter should fill the kitchen, signaling that the base is ready.
- Add the ground cinnamon and a pinch of sea salt, stirring until the spices are evenly distributed. This step is crucial for flavor balance; the cinnamon’s warmth counteracts the sweetness, while the salt sharpens every bite. Let the mixture sit for a minute to allow the spices to meld. The scent should be comforting, like a cozy campfire.
- In a large bowl, combine the rolled oats, chia seeds, ground flaxseed, chopped nuts, and mini dark chocolate chips. Toss the dry ingredients until they’re evenly mixed; this ensures each bite contains a balanced blend of textures and flavors. The nuts add crunch, while the chocolate chips provide pockets of sweetness.
- Pour the warm peanut butter mixture over the dry ingredients, stirring vigorously until everything is coated. The oats should be glazed with the sticky base, forming a cohesive mass. If the mixture feels too dry, add an extra tablespoon of maple syrup; if it’s too wet, add a few more oats.
- Line an 8×8 inch pan with parchment paper and press the mixture firmly into the pan using a spatula or the back of a spoon. The goal is to create an even layer that will set uniformly. Check the edges; they should be slightly raised, indicating the mixture has firmed up. If the edges are too low, give the pan a gentle tap to settle the mixture.
- Refrigerate the pan for at least 30 minutes, or until the bars are firm enough to cut. The chilling process allows the fats to solidify, giving the bars their characteristic snap. When you lift the parchment, the bars should hold together without crumbling. This step is crucial for a clean cut.
- Once set, lift the bar slab out of the pan using the parchment and place it on a cutting board. Use a sharp knife to cut into squares or bars of your preferred size. Clean the knife between cuts to avoid sticking. Store the bars in an airtight container.
- Enjoy immediately or keep refrigerated for up to a week. For an extra touch of indulgence, drizzle melted dark chocolate over the top before chilling. This adds a glossy finish and a burst of flavor that pairs wonderfully with the nutty base.
That’s it — you did it. But hold on, I’ve got a few more tricks that’ll take this to another level.
Insider Tricks for Flawless Results
The Temperature Rule Nobody Follows
Many people think the peanut butter mixture needs to be hot, but it’s actually best kept just warm. Over‑heating can scorch the maple syrup, giving the bars a burnt taste. Keep the heat low and stir constantly to maintain a gentle warmth. This ensures the protein powder dissolves fully without losing its nutritional benefits.
Why Your Nose Knows Best
Before you press the mixture into the pan, give it a quick sniff. A pleasant, toasted aroma indicates the right level of caramelization. If the scent is flat, give the mixture another minute on the heat. Your nose is a reliable indicator of flavor development.
The 5-Minute Rest That Changes Everything
After the mixture is poured over the dry ingredients, let it sit for five minutes before pressing. This brief rest allows the oats to soak up the liquid, resulting in a more cohesive bar. I once skipped this step and the bars were crumbly. The 5‑minute rest saved the day.
Even Bars Every Time
To ensure each bar is the same size, use a cookie cutter or a square mold. If you’re cutting by hand, mark the pan with a ruler before pressing. This keeps the bars uniform, making them easier to eat and share.
The Quick Chill Trick
For a faster set, place the pan in the freezer for 10 minutes. The cold snaps the mixture, giving the bars an instant snap. Just be careful not to over‑freeze; you don’t want the bars to become brittle.
Creative Twists and Variations
This recipe is a playground. Here are some of my favorite ways to switch things up:
Peanut Butter Swirl
Swap the natural peanut butter for almond or cashew butter to change the nut profile. The creamy texture remains, but the flavor shifts to a lighter, sweeter note. Ideal for those who want a different nutty base.
Chocolate Powerhouse
Use chocolate protein powder and add cacao nibs instead of dark chocolate chips. The result is a richer, more chocolatey bar that satisfies a sweet tooth while still providing protein.
Spiced Cinnamon Delight
Introduce a dash of nutmeg or cardamom to the spice mix. The warm, aromatic spices add depth, turning the bars into a cozy, winter‑season snack.
Berry Boost
Fold in dried cranberries or chopped dried apricots for a fruity twist. The natural sweetness from the fruits pairs well with the nutty base, creating a balanced flavor profile.
Trail Mix Edition
Replace the chopped nuts with a mix of pumpkin seeds, sunflower seeds, and dried coconut flakes. This variation offers a diverse crunch and a tropical flair.
Low‑Calorie Option
Reduce the maple syrup by a quarter cup and substitute it with a natural sweetener like stevia or monk fruit. The bars remain chewy and tasty, but with fewer calories.
Storing and Bringing It Back to Life
Fridge Storage
Keep the bars in an airtight container at room temperature for up to a week. If you notice the bars becoming slightly soft, a quick chill in the fridge will restore their snap. The airtight container prevents moisture from seeping in.
Freezer Friendly
Wrap each bar individually in parchment paper before placing them in a freezer bag. They can stay in the freezer for up to three months. When ready to eat, let them sit at room temperature for 10 minutes to soften slightly.
Best Reheating Method
To revive a frozen bar, place it on a microwave‑safe plate and heat on medium for 20–30 seconds. Add a splash of water before reheating to create steam, which helps the bar regain its original texture. Be careful not to over‑microwave, or the bar will become chewy.