I still remember the night I swore off baking forever. It was 11:47 p.m., my kitchen looked like a flour bomb had detonated, and the cake I'd promised for my niece's birthday party had collapsed into something resembling a geological fault line. The oven had betrayed me, the humidity had turned my meringue into soup, and I was pretty sure I'd just heard the neighbor's dog laughing at me through the window. That's when desperation birthed genius: what if I could create that same decadent, creamy, chocolate-drenched experience without ever turning on the oven? What if the humble graham cracker could become my culinary superhero, swooping in to save dessert when all hope seemed lost?
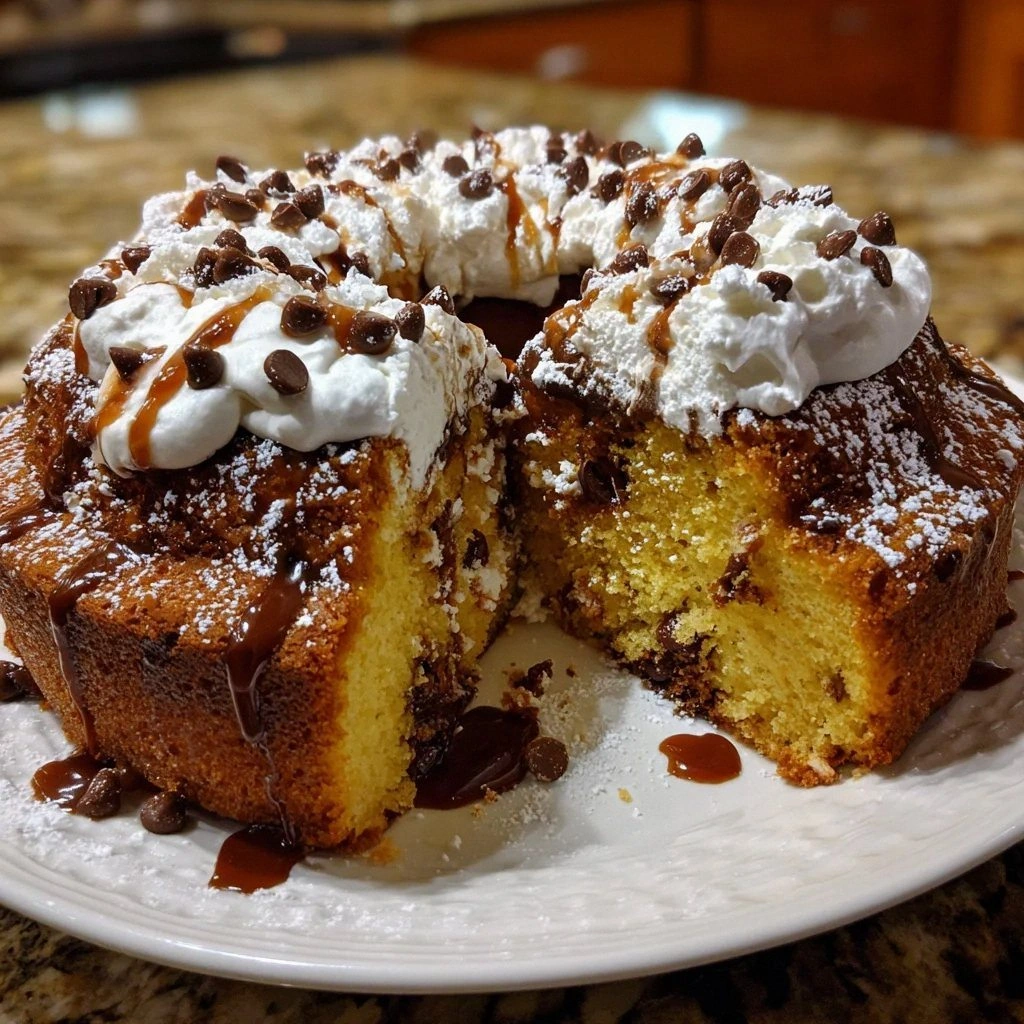
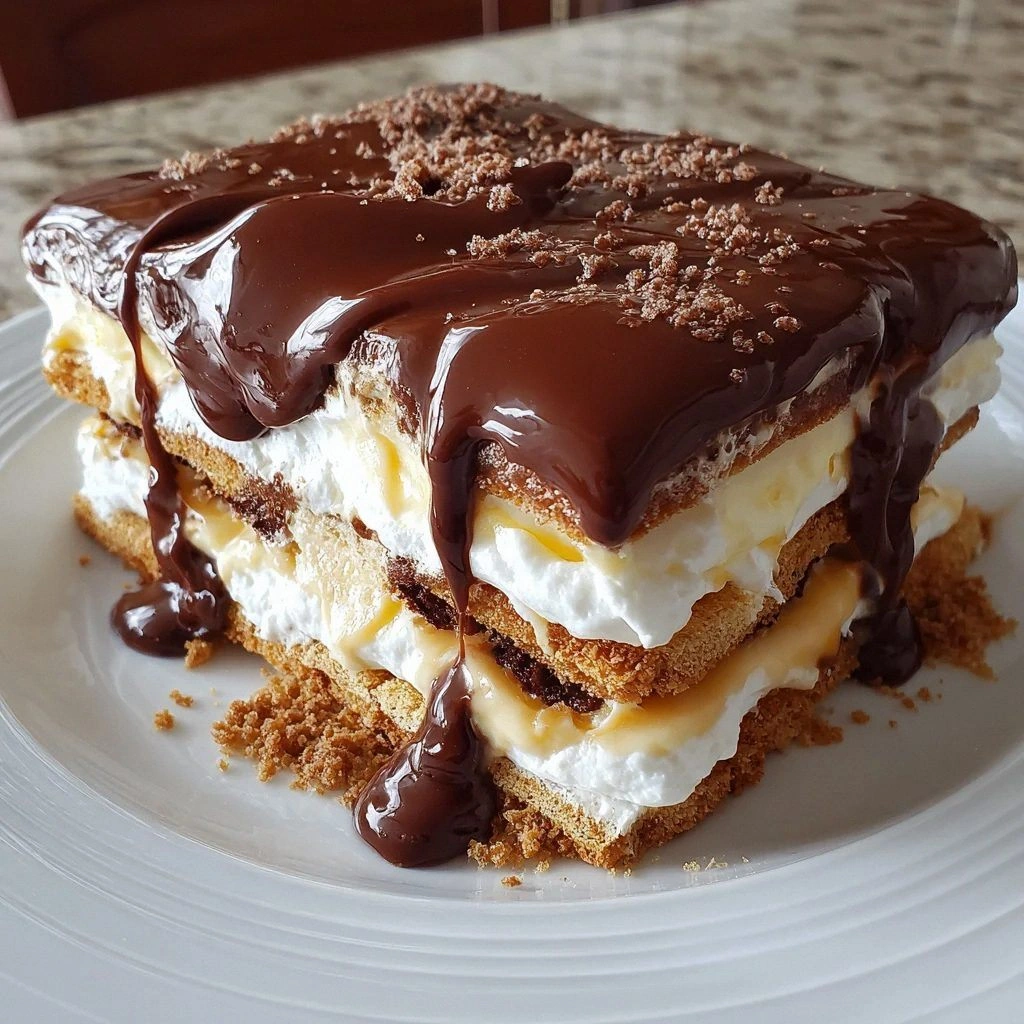
Fast forward through three weeks of obsessive experimentation, twelve pounds of chocolate chips, and one incident involving my cat walking across the pudding layer (don't ask), and I emerged victorious with this no-bake chocolate eclair cake that will make you question everything you thought you knew about dessert. This isn't just another icebox cake masquerading as something fancy — this is the dessert equivalent of finding out your quiet neighbor is actually a retired rock star. It's layers of vanilla pudding so silky they make silk jealous, graham crackers that transform into cake-like tenderness, and a chocolate glaze so glossy you could check your reflection in it. The whole thing comes together faster than you can preheat an oven, and the result is so luxurious that I've seen grown adults fight over the last piece like it was the last lifeboat on the Titanic.
Here's the kicker: this cake actually gets better the longer it sits, which means you can make it tonight and serve it tomorrow looking like the kind of dessert that requires culinary school training and a small army of interns. Your guests will never guess that the hardest part of this recipe is waiting for it to chill. I've served this at dinner parties where people assumed I'd spent hours tempering chocolate and folding egg whites, when really I'd spent most of that time binge-watching cooking shows while the fridge did all the heavy lifting. This recipe is my delicious little secret, and today, I'm trusting you with it because great desserts deserve to be shared, not hoarded.
So forget everything you know about traditional eclairs with their finicky choux pastry and temperamental filling. We're about to embark on a journey that starts in your pantry and ends with a dessert that will make believers out of skeptics and converts out of dieters. Picture this: it's tomorrow evening, you're pulling this beauty out of the fridge, and the chocolate glaze is catching the light like liquid mahogany. Your fork slides through layers that give just the right amount of resistance before yielding to reveal that perfect contrast of creamy and crunchy. That first bite? It's going to ruin all other desserts for you, and honestly, I'm not even sorry. Let me walk you through every single step — by the end, you'll wonder how you ever made it any other way.
What Makes This Version Stand Out
Silky Factor: This isn't your average pudding mixture. By folding the whipped topping into vanilla pudding that's been mixed with cold milk, you create a mousse-like filling that's lighter than traditional pastry cream but every bit as luxurious. The texture is so impossibly smooth that it practically melts on your tongue, creating that same sensation you get from the best French patisseries, minus the attitude and the tiny portions.
Crunch Preservation: Most no-bake cakes turn into soggy disasters after a day, but not this beauty. The graham crackers absorb just enough moisture to become cake-like while maintaining a pleasant bite. It's like they attended a finishing school for cookies and emerged as the best version of themselves — confident, sophisticated, and ready to mingle with chocolate.
Chocolate That Behaves: The ganache formula here is bulletproof. By heating the cream just enough to melt the chocolate chips, you get a glaze that sets to the perfect consistency — pourable enough to create those Instagram-worthy drips but firm enough to slice cleanly. No more chocolate that cracks like dry earth or stays permanently sticky like a toddler's fingers.
Make-Ahead Magic: This cake is the ultimate dinner party hack because it actually requires advance preparation. The longer it chills, the better the flavors meld and the textures develop. You can make it up to three days ahead, which means less stress and more time to perfect your "oh, this old thing?" modest smile when guests rave about it.
Ingredient Flexibility: Once you understand the ratios, this recipe becomes your canvas. Swap the vanilla pudding for chocolate or butterscotch, use chocolate graham crackers for extra decadence, or add a layer of sliced bananas or strawberries for a fruit-forward twist. It's like the little black dress of desserts — classic on its own but ready for any accessorizing you throw at it.
Zero Special Equipment: No springform pans, no candy thermometers, no piping bags filled with mysterious contents. If you've got a 9x13 dish and a mixing bowl, you're in business. This is democratic dessert-making at its finest — no culinary degree required, just a willingness to embrace the lazy genius of not baking.
Crowd Psychology: There's something about this dessert that makes people lose their minds. Maybe it's the familiar flavors presented in an unexpected way, or perhaps it's the way it feeds a crowd without breaking the bank. Whatever the magic is, I've never seen leftovers, and I've definitely never seen anyone turn down a second piece. Even self-proclaimed "not dessert people" find themselves asking for the recipe.
Inside the Ingredient List
The Flavor Base
Instant vanilla pudding mix is the unsung hero here — don't you dare substitute cook-and-serve pudding unless you want to spend your evening stirring over a hot stove like some kind of dessert masochist. The instant variety contains modified food starch that activates with cold milk, creating that perfect set we need for our no-bake masterpiece. When you're shopping, grab the full-fat version if you can find it; the difference in richness is like comparing a luxury sedan to a go-kart. And here's a pro tip that will change your pudding game forever: sift the powder before adding milk to prevent those annoying lumps that look like tiny islands in your smooth sea of vanilla.
The cold milk isn't just a liquid ingredient — it's the catalyst that transforms powder into possibility. Use milk that's been chilling in the coldest part of your fridge, not the door where temperatures fluctuate like a teenager's mood. Whole milk creates the most luxurious texture, but I've made this with 2% in a pinch and lived to tell the tale. If you're feeling particularly indulgent, swap out a quarter cup of milk with heavy cream for pudding so rich it could probably file its own taxes. The key is keeping everything cold so the pudding sets properly instead of remaining a sad, soupy mess that would make any self-respecting dessert weep.
The Texture Crew
Whipped topping is where we separate the dessert dilettantes from the serious players. Yes, you could whip your own cream, and if you're serving this to royalty or trying to impress that cute neighbor, go for it. But for everyday dessert excellence, the frozen stuff works like a charm and saves you from potential whipped cream disasters that have ended many a dinner party on a sour note. Make sure it's properly thawed — trying to fold in partially frozen whipped topping is like trying to mix concrete with a feather. The folding technique matters here: use a large rubber spatula and make figure-eight motions, turning the bowl as you go. This keeps the air bubbles intact, ensuring your filling stays light and fluffy rather than deflating like a punctured balloon animal.
Graham crackers are the architectural backbone of this dessert, and quality matters more than you'd think. Those generic brands that taste like sweetened cardboard will not do your cake any favors. Look for crackers with visible graham flour and a rich, honey-forward flavor. When you're layering, don't just throw them down like you're playing Tetris — overlap slightly and press gently to create a solid foundation. Some people like to dip their crackers in milk first, but I find this creates unnecessary sogginess. Trust the process; the pudding will do all the hydrating work for you while you focus on more important things, like sampling the chocolate chips to ensure quality.
The Unexpected Star
Semi-sweet chocolate chips are where this recipe gets its personality, so don't cheap out here. Those bargain bin chips that taste like brown crayons will single-handedly ruin your dessert faster than you can say "what happened to my chocolate?" Look for chips with a cocoa content between 50-60% — anything darker becomes bitter, anything lighter tastes like candy. The melting process is where most people panic, but it's actually simpler than parallel parking. Heat your cream until it's just steaming, not boiling like a witch's cauldron, then pour it over the chips and walk away for two minutes. When you return, the chips will have surrendered to the heat, and a gentle whisk will create glossy perfection.
Heavy cream in the glaze isn't just about richness — it's about creating that perfect pourable consistency that makes professional pastry chefs look like they have magic hands. The fat content (usually 36-40%) is what allows the ganache to set at room temperature without becoming rock solid. If you try to substitute milk here, you'll end up with something that never quite sets, creating a sticky situation that will have you serving dessert with a ladle instead of a spatula. Room temperature cream incorporates more smoothly, so pull it out of the fridge when you start assembling the cake. By the time you're ready for the glaze, it'll be perfectly behaved and ready to create those gorgeous drips that make people think you went to culinary school.
The Final Flourish
While the basic recipe is perfect as-is, a few strategic additions can elevate your cake from crowd-pleaser to legendary status. A teaspoon of espresso powder dissolved in the milk before adding the pudding mix deepens the chocolate flavor without making it taste like coffee. It's like adding a bass line to your favorite song — you might not consciously notice it, but you'd miss it if it were gone. A splash of good vanilla extract (the real stuff, not the imitation that smells like a candle store) adds complexity to the pudding layer that makes people wonder what your secret ingredient is. They'll never guess it's something as simple as vanilla enhancing vanilla, but that's the beauty of understanding how flavors work together.
For the chocolate enthusiasts who believe there's no such thing as too much chocolate, reserve a handful of chocolate chips to sprinkle between the layers. They'll stay slightly firm, creating little pockets of chocolate that burst in your mouth like caviar for dessert lovers. If you're feeling particularly fancy, a light dusting of flaky sea salt on top of the glaze before it sets creates that sweet-salty balance that makes taste buds sing hallelujah. Just remember that restraint is key — we're making dessert here, not conducting a science experiment in excess. Everything's prepped? Good. Let's get into the real action...
The Method — Step by Step
- Start by clearing enough space in your refrigerator for a 9x13 baking dish — trust me, there's nothing worse than assembling this masterpiece only to realize you're playing refrigerator Jenga. In a large mixing bowl, combine your instant vanilla pudding mix with cold milk, and here's where patience pays off. Whisk vigorously for exactly two minutes — set a timer because under-whisking leaves powdery pockets while over-whisking can make the pudding too thick. The mixture should coat your whisk like liquid velvet and smell like the inside of an ice cream parlor. Let it stand for five minutes to fully set; during this time, you can practice your humble "oh, this little thing?" smile for when people compliment your dessert later.
- While your pudding is doing its thickening magic, grab your thawed whipped topping and prepare for the gentlest folding session of your life. Scrape the pudding from the bowl's edges first — it tends to set faster there — then plop the whipped topping on top. Using your largest rubber spatula, slice down through the center, scoop under the bottom, and fold over the top in one smooth motion. Rotate the bowl a quarter turn and repeat, imagining you're tucking in a very delicate baby blanket. This isn't the time for aggressive stirring; treat the mixture like it owes you money but you don't want to make a scene. The goal is a homogeneous mixture that's lighter than pudding but richer than mousse — it should mound softly when dropped from the spatula.
- Now for the architectural phase: arrange your first layer of graham crackers in the bottom of your 9x13 dish. This isn't just random cracker scattering — think of yourself as building the foundation of a dessert skyscraper. Break crackers as needed to fit, creating a solid layer with minimal gaps. If you're a perfectionist, you can trim crackers with a sharp knife for exact fits, but honestly, the slightly rustic look has charm. The key is ensuring no large gaps where pudding could leak through and create soggy spots. Once your foundation is solid, give yourself a mental high five because you're about to create something magical.
- Spread half your pudding mixture over the crackers, using an offset spatula or the back of a spoon to create an even layer. Start from the center and work outward, pushing rather than pulling to avoid disturbing your cracker foundation. The layer should be about half an inch thick — enough to provide creamy richness but not so much that it overwhelms the structural integrity. Don't worry about making it perfectly smooth; slight swirls create interesting texture and prove it's homemade. If you find yourself tempted to taste-test at this point, I fully support your decision — quality control is crucial, and licking the spatula is basically a professional requirement.
- Repeat your cracker layer, pressing down gently this time to ensure everything settles together like old friends at a reunion. The second layer of crackers should nestle into the pudding slightly, creating a unified structure that will slice cleanly later. Continue with the remaining pudding mixture, spreading it to the edges and corners with the same gentle technique. By now, you're probably questioning whether this hodgepodge of crackers and pudding could possibly transform into something spectacular, but trust the process. Cover the dish with plastic wrap — press it directly onto the surface to prevent a skin from forming — and refrigerate while you prepare the chocolate glaze.
- For the chocolate glaze, measure your chocolate chips into a heatproof bowl and set aside. In a small saucepan, heat the heavy cream over medium heat until it's steaming and tiny bubbles form around the edges — this should take about three to four minutes. Don't walk away here; cream has a sneaky habit of boiling over when you turn your back, creating a mess that even the most patient person would find challenging. Once steaming, remove from heat and let it rest for exactly thirty seconds — this prevents the chocolate from seizing and creating that grainy texture that haunts dessert dreams.
- Pour the hot cream over your chocolate chips and resist the urge to stir immediately. Walk away. Seriously, go check your email, scroll through social media, or practice your acceptance speech for the imaginary dessert competition you're winning. After two minutes, return with your whisk and start stirring from the center in small circles, gradually working outward. The chocolate will surrender to the cream, creating a glossy ganache that looks like liquid silk. If you encounter stubborn chips that refuse to melt, microwave the mixture in five-second bursts, stirring between each burst. Overheating is the enemy of smooth chocolate, so patience is your virtue here.
- Remove your chilled cake from the refrigerator and pour the chocolate glaze over the top, starting in the center and letting it flow naturally toward the edges. Use your offset spatula to guide the glaze to the corners, creating a smooth, even layer that looks like a chocolate lake at sunset. Don't worry if it doesn't look perfect — the glaze will settle as it cools, and any imperfections just prove it's homemade with love rather than mass-produced in a factory. For those Instagram-worthy drips, gently nudge a bit of glaze over the edges with your spatula, but don't overdo it. We're going for elegant, not trying to recreate Niagara Falls in chocolate form.
- Now comes the hardest part: cover the cake again and refrigerate for at least four hours, though overnight is better if you can stand the anticipation. During this time, magic happens — the crackers soften to cake-like tenderness, the flavors meld into something greater than the sum of their parts, and the chocolate glaze sets to the perfect consistency. If you're the impatient type, you can sneak a peak after three hours, but the texture won't be quite right. Use this waiting time to clean your kitchen, plan your serving presentation, or just sit back and bask in the knowledge that you've created something extraordinary with minimal effort.
- When you're ready to serve, remove the cake from the refrigerator and let it stand for ten minutes — this slight warming makes slicing cleaner and brings out the flavors. Use a sharp knife dipped in hot water for the cleanest cuts, wiping between slices for professional presentation. The first piece is always the trickiest, but once you see those distinct layers — the creamy pudding, the tender cake-like crackers, the glossy chocolate — you'll understand why this dessert has ruined other cakes for me forever. Serve chilled, preferably to people who will appreciate the genius of creating something this spectacular without ever turning on the oven.
That's it — you did it. But hold on, I've got a few more tricks that'll take this to another level...
Insider Tricks for Flawless Results
The Temperature Rule Nobody Follows
Here's the thing about no-bake desserts: temperature isn't just important, it's everything. Your ingredients need to be cold, your kitchen should be cool, and your patience needs to be infinite. I learned this the hard way when I tried to rush the chilling process during a heatwave and ended up with a dessert that resembled chocolate soup with cracker islands. The pudding mixture should feel cool to the touch when you spread it — if it's even slightly warm, pop it in the fridge for fifteen minutes before assembly. Your whipped topping should still have tiny ice crystals when you fold it in; fully thawed topping deflates faster than a punctured balloon animal. Even your serving plates should be chilled if you want clean slices that don't melt into puddles before they hit the table.
But here's the counterintuitive part: your chocolate glaze needs to be slightly warm when you pour it. Not hot, not cold — think baby bottle temperature. Too hot and it melts the pudding layer underneath, creating unsightly craters. Too cool and it sets before you can spread it evenly, leaving you with chocolate that looks like it was applied by a drunk bricklayer. The perfect temperature creates that slow, lava-like flow that settles into a mirror-smooth surface. Test it by dropping a small amount on your wrist — it should feel warm but not uncomfortable. If you wouldn't put a baby bottle at that temperature in your mouth, it's too hot. Trust your instincts here; your skin knows better than any thermometer.
Why Your Nose Knows Best
Most people rely on their eyes when making desserts, but your nose is the unsung hero of perfect timing. When the pudding is properly set, it smells like vanilla ice cream on a hot day — sweet, fragrant, and impossible to resist. If it still smells powdery or artificial, it needs more time. The chocolate glaze is ready when your kitchen smells like a European chocolate shop, rich and complex without any hint of burnt or bitter notes. This usually happens about thirty seconds before it looks ready, so trust your nose and remove it from heat immediately.
The real secret is in the final assembly: when everything is perfectly balanced, your kitchen will smell like the best ice cream parlor you've ever visited. It's a combination of vanilla, chocolate, and something indefinably comforting that makes people wander in asking what's for dessert. If you don't get that reaction, something's off — maybe the pudding didn't set properly, or the chocolate seized, or the crackers are too old. Your nose is your quality control manager, and it's never wrong. A friend tried skipping this sensory check once — let's just say her dessert tasted like disappointment and broken dreams.
The 5-Minute Rest That Changes Everything
After you pour the chocolate glaze, resist every instinct screaming at you to immediately smooth it out. Walk away for exactly five minutes. This brief pause allows the glaze to begin setting, which means when you do your final smoothing pass, you'll create that professional-looking surface that makes people ask which bakery you visited. The chocolate will have cooled just enough to hold texture but still be pliable enough to manipulate. Use this time to clean your spatula with hot water, ensuring it's perfectly smooth for the final pass.
Those five minutes are also when the glaze decides whether it's going to cooperate or throw a tantrum. If you try to work with it too soon, it flows like water and creates thin spots that show the pudding underneath. Wait too long and it sets with spatula marks that look like a zen garden gone wrong. But hit that sweet spot — when it feels like cool honey — and you'll create a surface so smooth you could check your reflection. I set a timer because I'm impatient, and impatience has ruined more desserts than bad recipes ever could.
The Layer Thickness Sweet Spot
Here's where most people go wrong: they get excited about the creamy layers and pile them on like they're building a pudding lasagna. But the magic ratio is thinner than you think. Each pudding layer should be just thick enough to completely cover the crackers without letting them peek through — about half the thickness of your finger. Any thicker and the dessert becomes a pudding bomb that overwhelms the subtle textural play. Any thinner and you lose that luxurious creaminess that makes this cake special.
The same principle applies to the chocolate glaze. You're not frosting a birthday cake here; you're creating a thin, glossy coating that complements rather than dominates. Think of it as the difference between a chocolate coating and a chocolate avalanche. The glaze should be just thick enough to hide the pudding layer underneath while still letting the edges of the crackers create subtle ridges. When you slice into it, you want to see distinct layers, not a chocolate wall that requires excavation equipment to penetrate. This is sophisticated dessert architecture, not chocolate demolition.
Creative Twists and Variations
This recipe is a playground. Here are some of my favorite ways to switch things up:
The Peanut Butter Cup Makeover
Replace half the vanilla pudding mix with chocolate pudding, then fold in a half-cup of creamy peanut butter with the whipped topping. The result tastes like the best parts of a peanut butter cup exploded into cake form. Use chocolate graham crackers for the layers and sprinkle chopped peanut butter cups between them. The chocolate glaze gets a tablespoon of peanut butter melted in, creating that perfect sweet-salty balance that makes people close their eyes when they take a bite.
The Tropical Vacation Version
Swap the vanilla pudding for coconut cream pudding and fold in crushed pineapple that's been drained within an inch of its life. Use coconut milk instead of regular milk for extra tropical oomph, and replace half the graham crackers with crushed vanilla wafers. Top with toasted coconut flakes and a chocolate glaze infused with a teaspoon of dark rum. It's like a pina colada and chocolate eclair had a beautiful dessert baby that will transport you to a beach with every bite.
The S'mores Mashup
Use chocolate pudding as your base, then fold in mini marshmallows and crushed graham crackers into the pudding mixture. Layer with regular graham crackers and sprinkle chocolate chips between layers. The chocolate glaze gets topped with toasted marshmallows and a drizzle of hot fudge. Use a kitchen torch to toast the marshmallows just before serving for that campfire flavor without the smoke in your eyes or mosquitoes in your dessert.
The Coffee Lover's Dream
Dissolve two tablespoons of instant espresso powder in your milk before adding the vanilla pudding mix. Replace a third of the graham crackers with chocolate-covered espresso biscuits, and fold chocolate-covered espresso beans into the pudding mixture. The chocolate glaze gets enhanced with a shot of espresso, creating a mocha experience that will keep you coming back for "just one more sliver" until you've somehow eaten half the pan while standing in front of the refrigerator.
The Berry Beautiful Twist
Add a layer of fresh raspberries or sliced strawberries between the pudding layers for a pop of color and tartness that cuts through the richness. Use vanilla pudding mixed with a teaspoon of lemon zest for brightness, and replace the chocolate glaze with a white chocolate version infused with freeze-dried berry powder. The result looks like a dessert from a fancy patisserie but tastes like summer in cake form.
The Holiday Spice Spectacular
During fall and winter, add a teaspoon of pumpkin pie spice to your vanilla pudding, and use cinnamon graham crackers for extra warmth. Fold in dried cranberries and chopped pecans for texture, and top with a chocolate glaze infused with a pinch of cayenne for a subtle heat that builds slowly. It's like the best parts of holiday baking condensed into one no-bake masterpiece that will have you making excuses to celebrate something — anything — just so you have a reason to make it.
Storing and Bringing It Back to Life
Fridge Storage
This cake is the rare dessert that actually improves with age — up to a point. Properly stored in an airtight container (or wrapped tightly in plastic wrap), it keeps beautifully for up to four days in the refrigerator. The flavors meld and deepen, the textures achieve perfect harmony, and it slices even more cleanly after a day or two. Keep it in the coldest part of your fridge, not the door where temperature fluctuations can cause the glaze to sweat and become sticky. If you're storing individual slices, separate them with wax paper to prevent them from becoming a dessert jigsaw puzzle.
The key is protecting it from refrigerator odors — unless you want your dessert tasting like last night's leftover Chinese food. I learned this lesson after a particularly pungent garlic dish turned my beautiful cake into something that confused everyone who tasted it. If your fridge tends to harbor strong smells, double-wrap the dish or store it in a cake carrier with a tight seal. And here's a pro tip: add a small piece of bread to the container — it absorbs excess moisture and prevents the cake from becoming soggy, buying you an extra day of perfect texture.
Freezer Friendly
Despite being a no-bake dessert, this cake freezes like a champion. Wrap individual slices in plastic wrap, then aluminum foil, and freeze for up to two months. The texture changes slightly — the crackers become more cake-like and the glaze may crack — but the flavor remains spectacular. Thaw overnight in the refrigerator, not on the counter, to prevent condensation from making the surface sticky. The chocolate glaze might need a quick refresh with a hot knife passed over the surface to restore its shine.
For best freezing results, freeze the cake before adding the chocolate glaze. Make the glaze fresh when you're ready to serve — it takes five minutes and ensures that glossy finish that makes people think you're a dessert wizard. If you've already glazed it, no worries — just know that the glaze may develop hairline cracks as it thaws, but this actually creates a rustic, artisanal look that most people find charming. Pro tip: freeze slices on a baking sheet first, then wrap individually. This prevents them from getting squished and makes it easy to grab just one piece for those midnight dessert emergencies.
Best Reheating Method
Here's the beautiful thing about this cake: it doesn't need reheating. In fact, reheating would be a crime against dessert humanity. But if your cake has been in the fridge for a few days and seems a bit firm, let it sit at room temperature for fifteen minutes before serving. This takes the chill off and allows the flavors to bloom — cold mutes sweetness and flavor complexity, while slightly warmer temperatures wake everything up.
If your chocolate glaze has lost its shine after storage, you can refresh it with a quick blast from a kitchen torch held about six inches away, moving constantly. This melts just the surface, restoring that glossy finish without warming the entire cake. No torch? Hold a hair dryer on low heat about twelve inches away for a few seconds. It's like a spa day for your dessert — quick, refreshing, and it leaves everything looking better than before. Just don't get carried away or you'll end up with chocolate soup and a very sad dessert situation.