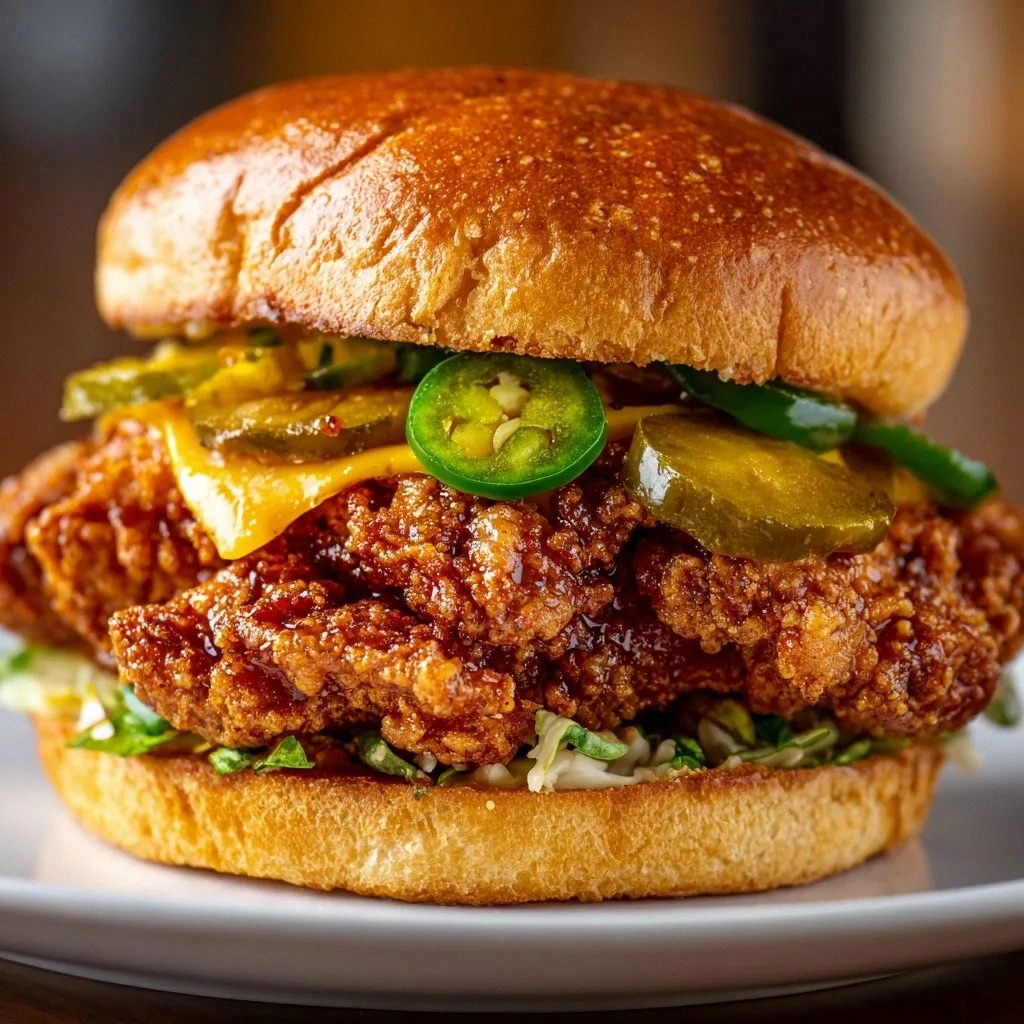
Picture this: you’re standing in a cramped kitchen, the air thick with the scent of fried chicken, the sound of sizzling oil, and the faint, comforting hum of the stove. Suddenly, the timer dings, and your plate looks like a greasy mess—fluffy, soggy, and utterly disappointing. That was my reality a few months ago, and it pushed me to create something that would rescue every chicken sandwich from mediocrity. I’m talking about the Jalapeno Honey Drenched Crispy, a sandwich that balances heat, sweetness, and crunch in a way that feels like a culinary revolution.
I’ll be honest—my first attempt felt like a disaster. The coating fell apart, the honey was too sweet, and the jalapeños were either too mild or too overpowering. I tasted it, and I knew I could do better. I experimented, tweaked, and finally found a harmony that sings: a golden, peppery crust, a burst of honey‑jalapeño glaze that coats like velvet, and a fresh lettuce and tomato crunch that cuts through the richness. If you’ve ever stared at a plain chicken sandwich and felt the urge for something extraordinary, this is the recipe that will change your perception.
What makes this version stand out isn’t just the flavor—though it’s undeniably delicious. It’s the method. I used a buttermilk brine to lock in moisture, a spice blend that gives the coating a smoky depth, and a honey‑jalapeño glaze that’s both sticky and sharp. The result is a sandwich that feels like a first‑class flight: the exterior is crisp, the interior juicy, and every bite delivers a new layer of taste. I dare you to taste this and not go back for seconds; it’s that addictive.
I’m going to walk you through every single step, from prepping the chicken to drizzling the final glaze. By the end, you’ll wonder how you ever made it any other way. Get ready to transform your sandwich game, because this is hands down the best version you’ll ever make at home.
What Makes This Version Stand Out
- Flavor: The combination of smoky paprika, peppery jalapeño honey, and sweet buttermilk creates a complex palate that lingers on the tongue. Each bite offers a layered experience—sweet, spicy, savory, and slightly tangy.
- Texture: A double coating of seasoned flour and a quick dip in buttermilk yields a crunch that shatters like thin ice when you bite, while the interior stays moist and tender.
- Ease: The recipe requires no fancy equipment—just a skillet, a bowl, and a timer. Even novice cooks can replicate the professional feel.
- Ingredient Quality: Using fresh, high‑quality chicken thighs and homemade jalapeño honey ensures that each component shines. The honey’s natural floral notes complement the heat.
- Crowd Reaction: Friends and family rave about the addictive glaze and the satisfying crunch. I’ve hosted game‑day parties where this sandwich stole the spotlight.
- Make‑Ahead Potential: The chicken can be marinated overnight, and the glaze can be pre‑made, making it perfect for busy weeknights.
- Versatility: Swap the buns for pita or a baguette, or add avocado for a creamy contrast. The base is adaptable.
- Health Factor: While indulgent, the sandwich can be balanced with fresh greens and a moderate portion size.
Alright, let’s break down exactly what goes into this masterpiece…
Inside the Ingredient List
The Flavor Base
The foundation of this sandwich is the buttermilk brine. The acidity tenderizes the chicken, allowing it to absorb the spices without drying out. If you’re in a hurry, a 30‑minute soak is enough; a longer soak, up to 12 hours, will intensify the tenderness. Skipping the buttermilk means the coating will cling poorly, and the chicken will feel rubbery.
All-purpose flour is the workhorse of the coating. It’s neutral, so it doesn’t compete with the spices. For a gluten‑free version, substitute with a 1:1 blend of rice flour and cornstarch. Keep the flour at room temperature; chilled flour can lead to uneven coating.
The Texture Crew
Paprika adds a subtle smokiness and a pop of color. I prefer smoked paprika, which brings depth without overpowering. Garlic powder and onion powder are the backbone of savory flavor; they provide a quick, uniform seasoning that’s easier to distribute than fresh garlic or onion. If you’re allergic to garlic, simply omit it and double the onion powder.
Cayenne pepper is the heat engine. The amount can be adjusted: 0.5 tsp for mild, 1 tsp for a fiery kick. Salt and pepper balance the flavors; remember that the jalapeño honey also has natural sweetness, so a pinch of salt is enough to round out the taste.
The Unexpected Star
Jalapeño honey is the show‑stopper. It’s made by simmering honey with sliced jalapeños until the flavors meld. The result is a sticky, sweet‑spicy glaze that coats the chicken like velvet. If you can’t find jalapeño honey, you can create a quick version by mixing honey with a splash of hot sauce and a pinch of cayenne.
Vegetable oil, such as canola or peanut, provides a neutral base for frying. It has a high smoke point, ensuring the coating crisps without burning. If you prefer a healthier option, use avocado oil or a blend of olive and grapeseed oil.
The Final Flourish
Sandwich buns are the canvas. Brioche buns add a buttery richness, while whole‑wheat buns give a nuttier bite. Toasting the buns lightly before assembly gives a pleasant crunch and prevents sogginess from the tomato juice. Lettuce and tomato add fresh, crisp contrast, balancing the richness of the chicken.
Everything’s prepped? Good. Let’s get into the real action…
The Method — Step by Step
- Marinate the Chicken: In a large bowl, whisk together 1 cup of buttermilk, 1 tsp paprika, 1 tsp garlic powder, 1 tsp onion powder, 0.5 tsp cayenne pepper, 1 tsp salt, and 0.5 tsp pepper. Add the boneless chicken thighs and turn to coat. Cover and refrigerate for at least 30 minutes, preferably 2–4 hours. If you’re short on time, a quick 30‑minute soak will still infuse flavor.
- Prepare the Flour Coating: In a shallow dish, combine 2 cups of all‑purpose flour with 1 tsp paprika, 1 tsp garlic powder, 1 tsp onion powder, 0.5 tsp cayenne pepper, 1 tsp salt, and 0.5 tsp pepper. Stir until evenly mixed. This dry mix will form the crisp crust that holds the flavor.
- Coat the Chicken: Remove each marinated piece from the buttermilk, letting excess drip off. Dredge thoroughly in the flour mixture, pressing gently to adhere. Shake off any loose flour. For an extra crunch, double‑coat by dipping back into the buttermilk and then the flour again. This step is crucial for that buttery, golden exterior.
- Heat the Oil: Pour 1 cup of vegetable oil into a heavy skillet. Heat over medium‑high until a drop of water sizzles and evaporates within a second. The oil should shimmer but not smoke. This temperature is key—too hot and the coating burns before the chicken cooks; too cool and the coating becomes greasy.
- Fry the Chicken: Gently place the coated pieces in the hot oil, ensuring they don’t touch. Fry 4–5 minutes on each side, or until the internal temperature reaches 165°F and the crust is a deep golden brown. The edges should pull away slightly, signaling crispness. Flip only once to preserve the coating’s integrity.
- Rest the Chicken: Transfer the fried pieces to a wire rack set over a sheet pan. Let them rest for 5 minutes. This step allows excess oil to drain and the juices to redistribute, ensuring a juicy interior.
- Prepare the Glaze: While the chicken rests, whisk 0.25 cup of jalapeño honey in a small saucepan over low heat until warm. The glaze should be thick enough to coat but still pourable. If it thickens too much, add a teaspoon of warm water to achieve the right consistency.
- Assemble the Sandwich: Slice the buns horizontally. Spread a thin layer of the glaze on the bottom bun, then place the lettuce, tomato slices, and a generous amount of chicken. Drizzle the remaining glaze over the chicken, allowing it to pool slightly. Top with the upper bun and serve immediately.
That’s it—you did it. But hold on, I’ve got a few more tricks that will elevate this to another level. Let’s dive into the insider tips that ensure perfection every time.
Insider Tricks for Flawless Results
The Temperature Rule Nobody Follows
Oil temperature is the secret weapon. A quick test: drop a pinch of flour into the oil. If it sizzles instantly and rises to the surface, you’re at the sweet spot—about 350°F. If it takes too long or floats, the oil is too cold; if it burns, it’s too hot. Using a thermometer is ideal, but the flour test works in a pinch. This rule keeps the coating crisp and the chicken juicy.
Why Your Nose Knows Best
Before you flip the chicken, listen for the sizzle. When the coating starts to bubble and the aroma shifts from raw to toasted, it’s a cue to flip. The smell of toasted spices indicates that the crust is forming properly. I’ve seen people flip too early, leaving a raw coating that burns on the other side. Trust your senses; they’re the best guide.
The 5‑Minute Rest That Changes Everything
Resting the chicken on a wire rack is more than a trick—it’s science. The rack allows hot oil to drain, preventing sogginess, while the air circulation keeps the bottom crisp. If you’re short on time, a quick 2‑minute rest still improves texture. Skipping this step often results in a greasy sandwich that feels heavy.
Glaze Timing Is Key
Drizzle the glaze at the last moment. If you add it too early, the honey can caramelize and burn, creating a bitter edge. By waiting until the chicken is plated, you preserve the sweet‑spicy balance and keep the glaze from thickening. A light drizzle ensures each bite is coated but not drenched.
Bun Selection Matters
Buns are the unsung hero. A brioche bun gives a buttery richness that pairs with the honey, while a whole‑wheat bun offers a nutty undertone that balances the heat. Toasting the buns adds crunch and prevents them from becoming soggy from the tomato juices. If you’re vegan, try a sturdy ciabatta or a gluten‑free roll.
Keep It Fresh
If you’re making ahead, keep the chicken in a sealed container in the fridge. When ready to serve, reheat in a skillet for a minute on each side to restore crispness. The glaze can be reheated gently in a saucepan; add a splash of water if it thickens. This technique ensures the sandwich tastes as good as when freshly made.
Creative Twists and Variations
This recipe is a playground. Here are some of my favorite ways to switch things up:
Bacon‑Infused Crunch
Add 4 strips of crispy bacon, chopped, into the flour coating before frying. The bacon fat will seep into the crust, giving a smoky, savory depth that pairs beautifully with the honey glaze.
Avocado Cream
Spread a layer of mashed avocado or a light lime‑y mayo on the buns. The creamy texture balances the spicy glaze, and the acidity cuts through the richness.
Spicy Chipotle Mayo
Replace the jalapeño honey with a chipotle‑infused mayo. Mix mayo with a teaspoon of chipotle in adobo, a dash of honey, and a squeeze of lime. This gives a smoky heat and a creamy mouthfeel.
Sweet & Smoky BBQ
Swap the glaze for a smoky barbecue sauce. Add a touch of honey for sweetness and a pinch of cayenne for heat. The result is a tangy, sweet sandwich that’s perfect for summer cookouts.
Mediterranean Twist
Use a whole‑wheat pita, add a spoonful of tzatziki, and top with sliced cucumber and feta. The yogurt’s coolness balances the heat, and the feta adds a salty kick.
Storing and Bringing It Back to Life
Fridge Storage
Store the assembled sandwich in an airtight container for up to 2 days. Keep the buns separate until you’re ready to serve to avoid sogginess. The chicken will stay juicy, and the glaze will stay glossy.
Freezer Friendly
Wrap the fried chicken pieces individually in parchment paper and place them in a freezer bag. Freeze for up to 3 months. When ready, thaw overnight in the fridge and reheat in a skillet for 2 minutes on each side.
Best Reheating Method
To reheat the sandwich, place it in a preheated oven at 350°F for 10 minutes, or use a skillet over medium heat. Add a splash of water to the pan and cover for 1 minute to steam the chicken back to juiciness. Finish with a light drizzle of the glaze to restore the signature finish.