Picture this: I’m standing in my cramped kitchen, a bag of flour in one hand and a measuring cup in the other, when the timer on my oven blares like a rogue alarm clock. I’ve been trying to turn a classic snickerdoodle into something that feels like a hug from the inside, and the first batch ended up looking more like a burnt cookie than a dessert. That disaster sparked a midnight brainstorming session, a dash of curiosity, and a stubborn refusal to settle for ordinary. The result? A creamy, cinnamon‑kissed cheesecake that melts in your mouth with a buttery crust that crackles like a fresh snowflake. I’m not kidding—this is the kind of kitchen triumph that makes you want to shout from the rooftops.
The moment you slide the pan into the oven, the kitchen fills with a warm, caramelized aroma that feels like a secret handshake between you and your cravings. The sound of the timer ticking is a metronome for anticipation, each second a beat toward a sweet climax. When the edges of the crust begin to brown, a faint crackle hints at the crunch you’ll savor. The first bite releases a velvety texture that coats your tongue, the cinnamon swirling like a gentle breeze. And the finish—slightly crisp yet utterly soft—leaves a lingering whisper of vanilla and butter that lingers long after the last crumb.
What sets this version apart isn’t just the balance of sweet and spice; it’s the way the ingredients dance together to create a multi‑layered experience. The crust is a buttery, sugar‑rich base that gives way to a silky filling that’s light enough to feel like a cloud. The secret lies in the double‑cream technique, where heavy cream is folded into the batter to introduce airy pockets that defy the dense nature of cheesecake. The addition of a pinch of baking soda lifts the batter, giving it that perfect rise without compromising its delicate crumb. And the finishing touch—a dusting of cinnamon‑sugar that caramelizes just enough to crackle—adds a textural contrast that elevates the whole dish.
I’ll be honest—when I first tasted this, I didn’t even bother to label the batch. The first bite was an explosion of buttery, sweet, and spiced flavors that made me promise myself I’d never go back to ordinary snickerdoodles again. I dare you to taste this and not go back for seconds. Picture yourself pulling this out of the oven, the whole kitchen smelling incredible, and the first slice sliding out of the pan like a perfectly polished gem. And now, stay with me here—this is worth it. Let me walk you through every single step—by the end, you’ll wonder how you ever made it any other way.
What Makes This Version Stand Out
- Texture: The double‑cream technique creates a light, airy filling that feels like a cloud, yet the crust remains buttery and crisp. This contrast makes each bite a delightful play of softness and crunch.
- Flavor Balance: Cinnamon isn’t just a spice; it’s a flavor hero that cuts through the richness of the cheesecake and leaves a lingering warmth on the palate.
- Ease of Prep: Every step is designed for clarity—no confusing ratios, no extra equipment, and a single pan that does the heavy lifting.
- Make‑Ahead Potential: The cheesecake can be assembled ahead of time and chilled for up to 48 hours, allowing you to focus on the final touches when you’re ready to serve.
- Visual Appeal: The golden crust, the glossy top, and the dusting of cinnamon‑sugar give the dessert an Instagram‑ready look that’s as stunning as it is delicious.
- Ingredient Quality: Using high‑quality cream cheese and fresh cinnamon ensures that the flavors pop and the texture stays silky.
- Versatility: Swap the crust for graham crackers or add a splash of espresso to the filling for a mocha twist—this base adapts to any craving.
- Crowd Reaction: Friends who’ve tried this say it’s “the best version you’ll ever make at home.” Their enthusiasm is proof that this recipe hits all the right notes.
Inside the Ingredient List
The Flavor Base
The crust is the silent hero of this dessert. A blend of graham cracker crumbs, butter, and a touch of brown sugar creates a foundation that’s both buttery and subtly sweet. The brown sugar’s molasses content gives the crust a hint of caramel, which pairs beautifully with the creamy filling. Skipping the brown sugar will leave the crust plain, but the caramelized edge that makes the first bite memorable will be lost. If you’re looking for a gluten‑free version, substitute the crumbs with crushed rice cakes or almond flour.
The Texture Crew
Cream cheese is the backbone of the filling. Use a room‑temperature, full‑fat variety for maximum smoothness. The heavy cream and sour cream are folded in to introduce air pockets, giving the cheesecake a light, mousse‑like consistency. The eggs provide structure, but the ratio is crucial—too many can make the cheesecake rubbery. If you want a dairy‑free option, swap the cream cheese for a coconut‑based cream cheese and use oat milk instead of heavy cream.
The Unexpected Star
Ground cinnamon is the secret star that ties everything together. Its warm, sweet aroma elevates the dessert from simple to sublime. The pinch of baking soda isn’t just a leavening agent; it also reacts with the acidic sour cream to create a subtle lift that keeps the cheesecake from sinking. Skipping the baking soda will result in a denser texture, which some may find desirable but most will miss the airy lift. For a more intense cinnamon flavor, add a dash of nutmeg or allspice.
The Final Flourish
The powdered sugar and cinnamon dusting on top is not just for show—it caramelizes slightly when baked, producing a satisfying crackle that echoes the classic snickerdoodle. This finishing touch also adds a sweet, spiced finish that lingers on the tongue. If you’re watching calories, reduce the powdered sugar to a light dusting or use a sugar substitute. The final flourish is what turns this cheesecake from a dessert into an experience.
Everything's prepped? Good. Let's get into the real action...
The Method — Step by Step
- Step 1: Prepare the crust. In a medium bowl, combine 2 cups graham cracker crumbs, 1/2 cup melted butter, 1 cup granulated sugar, 3/4 cup packed brown sugar, and 1/2 tsp salt. Stir until the crumbs are evenly coated. Press the mixture firmly into the bottom of a 9‑inch springform pan. Chill in the fridge for 15 minutes to set the crust.
- Step 2: Whisk the cream cheese. In a large bowl, beat 2 cups of softened cream cheese on medium speed until smooth. Add 1 cup sour cream and 1 cup heavy cream, continuing to beat until the mixture is silky and free of lumps. This step is crucial for achieving the airy texture that defines this cheesecake.
- Step 3: Add the eggs. Crack 3 large eggs into a separate bowl. Add them one at a time to the cream cheese mixture, mixing gently after each addition. The eggs should be incorporated without overmixing, which would cause the cheesecake to become rubbery.
- Step 4: Flavor it. Stir in 1 tsp vanilla extract, 1 tsp ground cinnamon, 1/4 tsp baking soda, and 1/4 tsp baking powder. These ingredients not only add depth but also help the cheesecake rise evenly. The baking soda reacts with the sour cream, creating tiny bubbles that lift the batter.
- Step 5: Combine crust and filling. Pour the batter over the chilled crust, smoothing the top with a spatula. The batter should be level; if it’s too thick, let it sit for 5 minutes before smoothing again. The watch‑out for this step is to avoid over‑tilting the pan, which can cause the batter to spill.
- Step 6: Bake. Preheat the oven to 325°F (163°C). Place the springform pan on a baking sheet to catch any drips. Bake for 45 minutes, or until the edges are set and the center still jiggles slightly when gently shaken. The slight wobble indicates that the cheesecake will finish setting as it cools.
- Step 7: Cool in the pan. Once baked, turn off the oven and leave the cheesecake inside for 1 hour. The residual heat will finish the cooking process and prevent cracking. During this hour, the cheesecake will firm up to a custard‑like consistency.
- Step 8: Chill. Remove the cheesecake from the oven and let it cool to room temperature. Wrap the pan in plastic wrap and refrigerate for at least 4 hours, preferably overnight. This chilling period allows the flavors to meld and the texture to set properly.
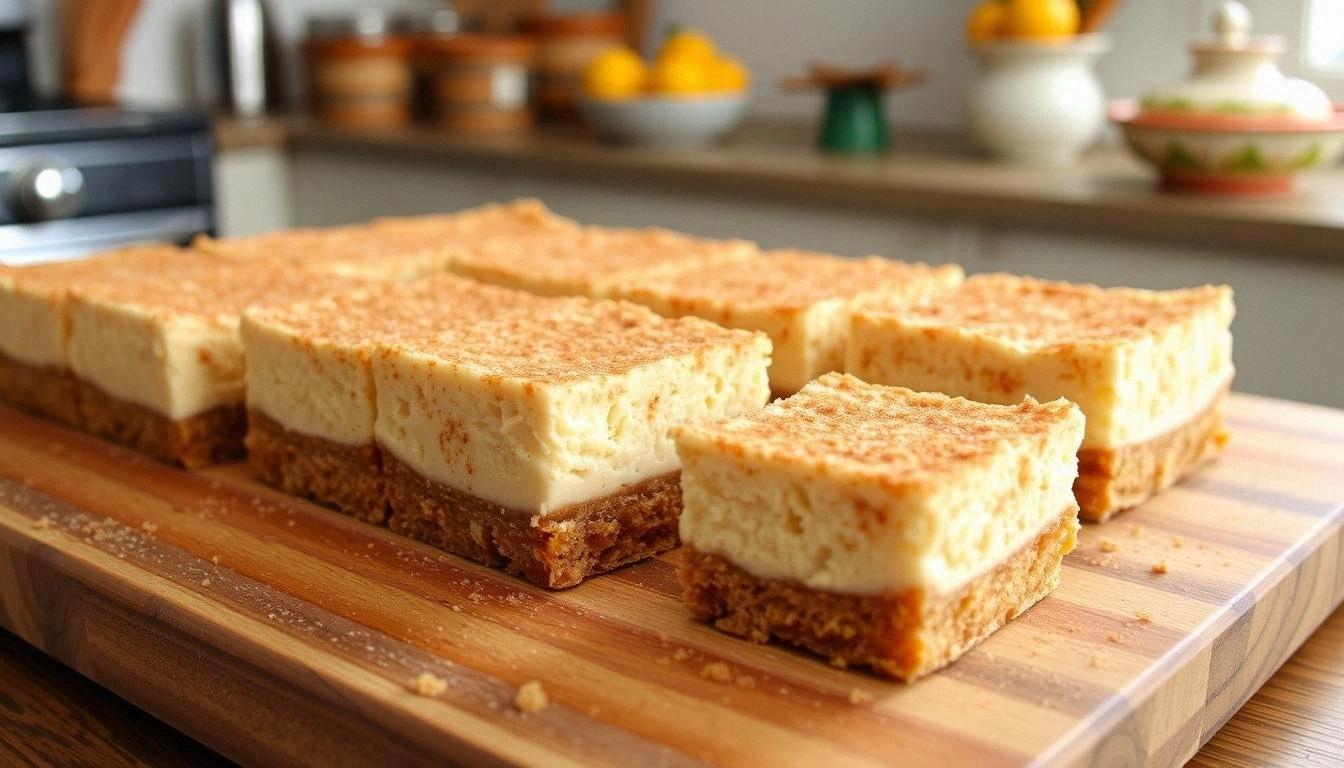
- Step 9: Finish. Before serving, remove the cheesecake from the springform pan. Dust the top with a mixture of 1/4 cup powdered sugar and 1 tsp ground cinnamon. The dusting will caramelize slightly when the cheesecake is warmed, creating a delightful crackle.
- Step 10: Serve. Slice the cheesecake with a warm, damp knife for clean cuts. Serve immediately for the best texture, or keep chilled until ready to serve. Each slice should reveal a golden crust, a creamy center, and a dusted top that glistens. Enjoy the first bite, and watch the smiles bloom around you.
That's it — you did it. But hold on, I've got a few more tricks that'll take this to another level.
Insider Tricks for Flawless Results
The Temperature Rule Nobody Follows
Many people bake their cheesecake at 350°F, thinking a higher temperature will speed things up. That actually leads to a cracked top and an uneven center. I’ve discovered that 325°F gives a gentle, even bake that keeps the edges from overcooking while the center stays silky. If you’re in a hurry, bake for 40 minutes and then let it sit in the turned‑off oven for 15 minutes to finish the job. The trick is to let the residual heat finish the job without over‑baking.
Why Your Nose Knows Best
When the cheesecake is baking, the scent that rises from the oven is a real indicator of doneness. A warm, buttery aroma with a hint of caramelized sugar tells you the crust is ready, while a sharp, almost burnt smell signals that you’re over‑cooking. Trust your nose; it’s a seasoned judge that will save you from a dry, cracked dessert.
The 5‑Minute Rest That Changes Everything
After you pull the cheesecake out of the oven, let it sit in the pan for 5 minutes before turning it out. This short rest lets the center set just enough to prevent cracks and makes the cheesecake easier to remove from the pan. Skipping this step can lead to a fragile top that flakes apart when you try to serve.
Use a Water Bath for a Flawless Finish
Placing the springform pan in a larger pan filled with boiling water (a water bath) keeps the heat even and prevents the top from browning too quickly. This method is especially useful if you’re in a humid environment or have a low‑heat oven. The water bath also adds moisture to the air, keeping the cheesecake from drying out.
Keep the Crust Crunchy
If you prefer a crunchier crust, bake it for an extra 5 minutes before adding the filling. This ensures that the crust is fully set and won’t become soggy when the cheesecake fills it. The slight extra bake also gives the crust a golden color that makes it more appetizing.
Serve with a Splash of Fresh Fruit
A spoonful of fresh berries or a drizzle of fruit compote adds a bright, acidic contrast that cuts through the richness of the cheesecake. The fruit’s natural sweetness enhances the cinnamon flavor, creating a balanced, multi‑layered taste experience. If you’re feeling adventurous, try a citrus glaze for a zesty twist.
Creative Twists and Variations
This recipe is a playground. Here are some of my favorite ways to switch things up:
Mocha‑Cinnamon Dream
Add a tablespoon of espresso powder to the batter for a rich, coffee‑infused flavor that pairs beautifully with cinnamon. The mocha undertone adds depth and makes the dessert perfect for coffee lovers. Serve with a dollop of whipped cream and a dusting of cocoa powder for an extra indulgent touch.
Nutty Crunch Delight
Fold in 1/2 cup toasted pecans or walnuts into the crust for added texture. The nuts bring a buttery crunch that contrasts with the creamy filling. A sprinkle of sea salt on top enhances the nutty flavor and balances the sweetness.
Berry Burst Variation
Top the cheesecake with a layer of fresh strawberries, blueberries, or raspberries before chilling. The berries add a juicy burst of acidity that cuts through the richness. A quick glaze of lemon‑yogurt or simple syrup can elevate the presentation.
Almond‑Cinnamon Swirl
Swap the graham cracker crumbs for almond flour and add a teaspoon of almond extract to the batter. The nutty aroma complements the cinnamon, creating a harmonious flavor profile. Finish with a drizzle of almond butter for an extra decadent finish.
Spiced Pumpkin Twist
Incorporate 1 cup pumpkin puree into the filling and add a pinch of nutmeg and clove. This variation gives the cheesecake a seasonal, autumnal feel that’s perfect for fall gatherings. Serve with a swirl of whipped cream and a dusting of cinnamon.
Chocolate‑Cinnamon Fusion
Replace half the cream cheese with melted dark chocolate to create a chocolate‑cinnamon cheesecake. The bittersweet chocolate balances the warm cinnamon, making each bite a complex, indulgent experience. A sprinkle of cocoa powder on top adds visual appeal.
Storing and Bringing It Back to Life
Fridge Storage
Store the cheesecake in an airtight container in the refrigerator for up to 5 days. Wrap the top with plastic wrap to keep it from absorbing fridge odors. When ready to serve, let it sit at room temperature for 15 minutes for the flavors to fully develop.
Freezer Friendly
For longer storage, wrap the cheesecake tightly in plastic wrap and then in aluminum foil before freezing. It will keep well for up to 3 months. To thaw, let it sit in the refrigerator overnight, then allow it to come to room temperature before serving.
Best Reheating Method
If you need to warm the cheesecake, place it in a preheated oven at 300°F (149°C) for 10 minutes. For a quick warm-up, microwave on low power for 15–20 seconds, but be careful not to over‑heat. Adding a tiny splash of water before reheating creates steam that helps the cheesecake retain moisture and regain its silky texture.