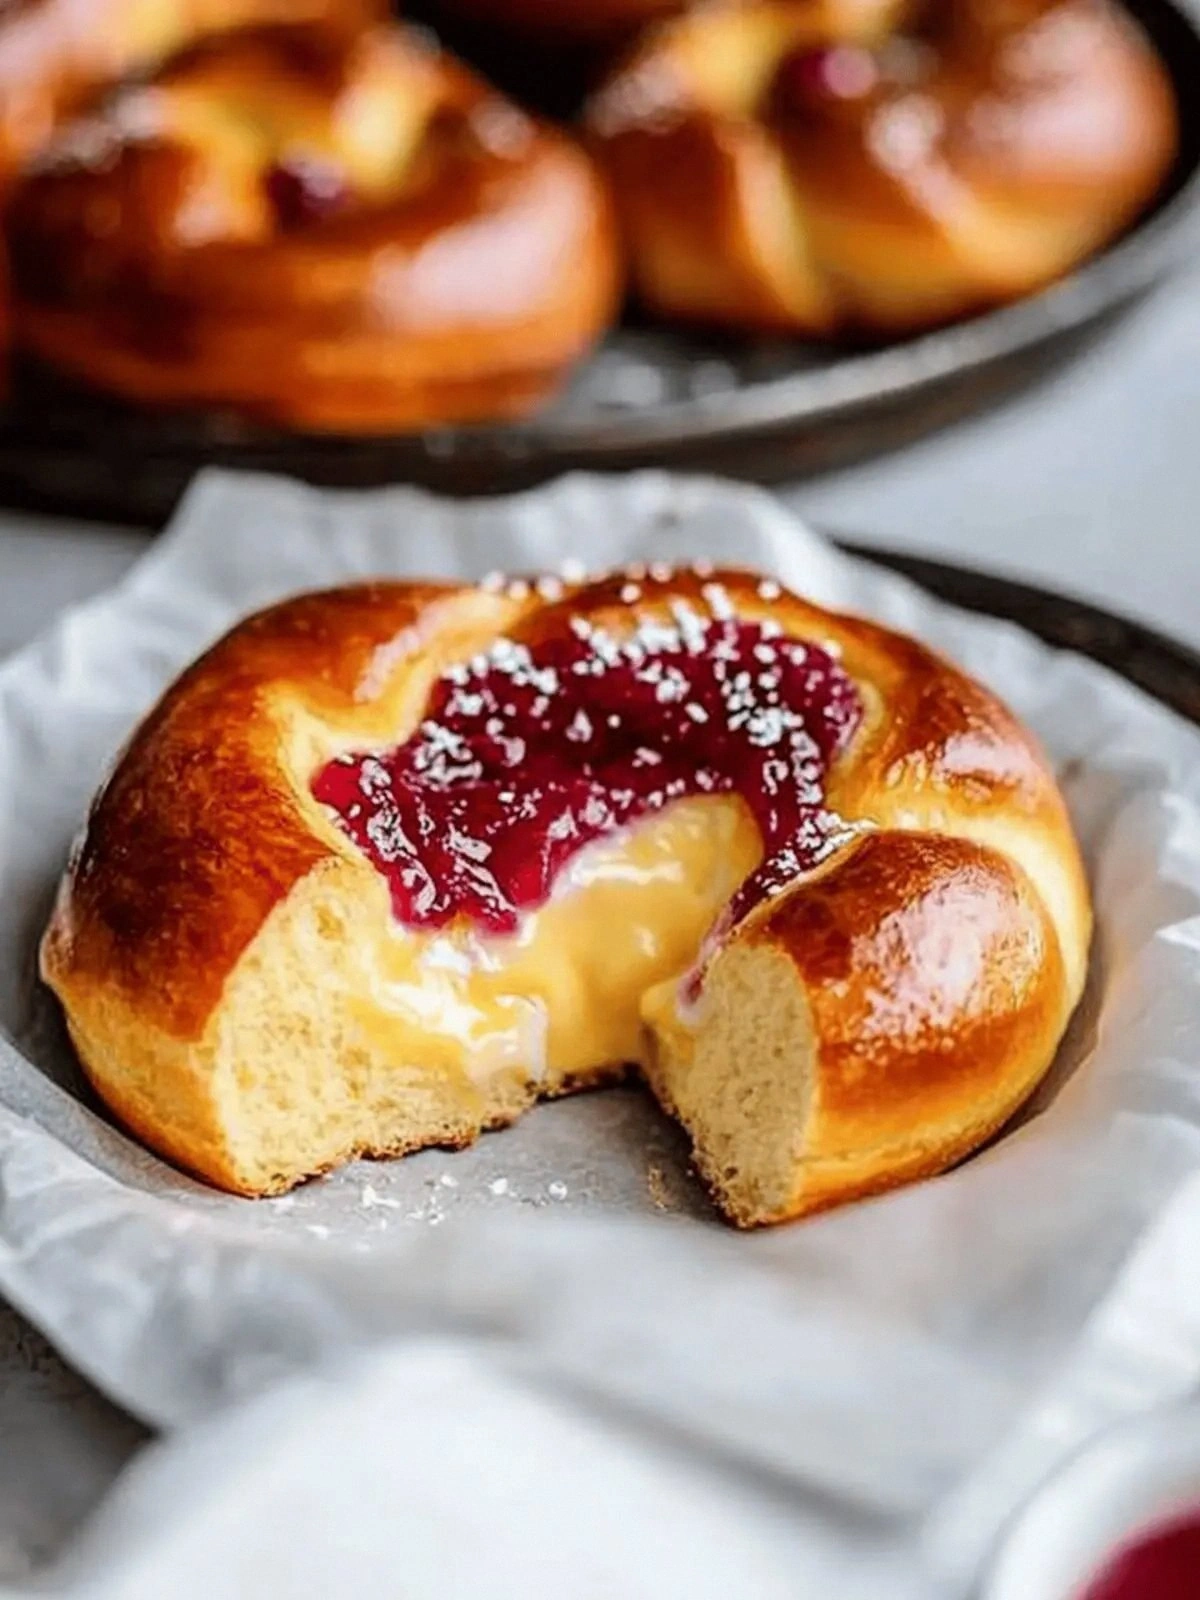
Picture this: it’s a rainy Saturday, you’re scrolling through Instagram, and a friend drops a photo of golden, custard‑filled brioche buns that look like they’re made of clouds. You stare at the screen, your stomach growls louder than the thunder, and you swear, “I’m going to make this.” That’s the moment when I discovered the ultimate vanilla custard brio—an indulgent treat that turns a simple breakfast into a showstopper. I’ll be honest—when I first baked these, I ate half the batch before anyone else got to taste them, and the kitchen still smells like freshly baked dreams.
I’m not just talking about a fluffy loaf; we’re talking about a buttery, airy brioche that cradles a silky vanilla custard that oozes out like melted caramel when you bite into it. The dough is so soft it melts in your mouth, while the custard is thick enough to stay inside yet liquid enough to drip into your fingers. Every bite feels like a sweet, warm hug, and the chocolate chips add a crunchy surprise that keeps your palate dancing. The secret? A precise blend of milk, eggs, and a touch of cornstarch that locks in that silky texture, and a gentle hand in shaping the buns so they rise just right.
If you’ve ever tried a custard brioche and found it dry or the custard too runny, you’re not alone—most recipes get this completely wrong. The trick is balancing the egg yolks with the right amount of sugar and cornstarch, and then letting the dough rest long enough to develop that soft crumb. I dare you to taste this and not go back for seconds. Picture yourself pulling this out of the oven, the whole kitchen smelling incredible, and sharing a piece with a friend who will immediately ask for the recipe. This is hands down the best version you’ll ever make at home.
Let me walk you through every single step—by the end, you’ll wonder how you ever made it any other way. From the first whisk to the final golden crust, we’ll dive into the science behind the rise, the art of the custard, and a few kitchen hacks that will save you time and frustration. Stay with me here—this is worth it.
What Makes This Version Stand Out
Flavor: The vanilla custard is the star—rich, sweet, and balanced with a hint of nutmeg that lingers on the tongue, unlike the flat vanilla found in many brioche recipes.
Texture: The dough achieves a tender crumb with a slight chew, thanks to the combination of whole milk and the gentle kneading technique that keeps gluten from overdeveloping.
Visual Appeal: The glossy, golden crust is achieved by brushing with a mixture of egg yolk and milk, giving the buns a professional look that makes them Instagram‑ready.
Ease: Even though it’s a multi‑step process, each step is straightforward and the recipe includes clear timing cues so you can multitask without missing a beat.
Versatility: Swap the mini chocolate chips for dried fruit or nuts, or add a splash of espresso to the custard for an espresso brioche that’s perfect for brunch.
Make‑Ahead: The dough can be refrigerated overnight, and the custard can be pre‑made and refrigerated, making this a stress‑free breakfast option for busy mornings.
Ingredient Quality: Using real butter, fresh eggs, and high‑grade vanilla extract elevates the flavor profile, giving you that bakery‑quality taste without the cost.
Alright, let's break down exactly what goes into this masterpiece…
Inside the Ingredient List
The Flour Foundation
All‑purpose flour is the backbone of the brioche, providing structure while remaining light. A generous 4 cups gives the dough volume and a slightly chewy texture that holds the custard. If you’re gluten‑sensitive, you can swap in a 1:1 blend of a gluten‑free flour mix, but you’ll need to add a binder like xanthan gum to mimic the elasticity. Skipping the flour would turn this into a flat pancake, losing the iconic brioche rise.
The Sweetness Quotient
The 1/4 cup granulated sugar in the dough balances the buttery richness and helps the dough brown beautifully. The additional 1/2 cup sugar in the custard ensures a silky sweetness without overwhelming the vanilla note. If you prefer a lower sugar version, reduce the custard sugar by 25% and add a splash of vanilla extract to compensate.
Yeast: The Rising Agent
Active dry yeast is the secret to that airy, domed top. It ferments the sugars in the dough, producing carbon dioxide that leavens the bread. Use warm milk (around 110°F) to activate the yeast; if the milk is too hot, it will kill the yeast, and if too cold, it won’t activate. A quick trick: sprinkle a pinch of sugar on the yeast to ensure it starts bubbling within 5 minutes.
The Fat Factor
Butter is the soul of brioche. The 1/2 cup of unsalted butter in the dough melts into the crumb, creating a tender crumb and a rich flavor. The additional 2 tablespoons of butter in the custard adds depth, while the 1 tablespoon of milk in the custard keeps the mixture silky. For a dairy‑free version, use a plant‑based butter and a non‑dairy milk alternative.
The Liquid Layer
The 1 cup warm milk plus 2 cups whole milk provide moisture and a subtle richness. Whole milk’s fat content enriches the custard, giving it a velvety mouthfeel. If you’re watching calories, swap whole milk for 2% or skim, but expect a slightly drier custard. The 1 tablespoon milk in the custard is a tiny touch that smooths the mixture.
Eggs: The Binding Power
Eggs are the glue that binds the dough and custard together. Two large eggs in the dough create a soft crumb, while four yolks in the custard give it a custard‑like richness. The extra large egg added to the custard mixture helps stabilize the custard during baking. If you’re vegan, you can replace the eggs with flaxseed meal or a commercial egg replacer, but the texture will differ.
The Thickening Agent
Cornstarch is the unsung hero that turns the custard from runny to silky. It thickens the mixture without making it gloopy. If you can’t find cornstarch, arrowroot powder works as a substitute, though it may need a slightly higher quantity. Skipping it will result in a watery custard that leaks out during baking.
The Flavor Enhancers
Vanilla extract brings a warm, aromatic note that elevates both the dough and custard. The 1 teaspoon in the dough provides a subtle depth, while the 1 teaspoon in the custard gives the filling its signature flavor. For a twist, add a pinch of sea salt to the custard to balance the sweetness.
The Unexpected Star
Mini chocolate chips add a burst of chocolate that contrasts the sweet custard. They melt slightly during baking, creating pockets of chocolatey richness. If you’re a dark chocolate lover, swap them for dark chocolate chunks. If you’re allergic, you can leave them out for a pure vanilla experience.
Everything's prepped? Good. Let's get into the real action…
The Method — Step by Step
- Step 1: Prepare the Dry Mix. In a large bowl, whisk together the flour, 1/4 cup sugar, yeast, salt, and cornstarch. Make a well in the center and pour in the warm milk. Stir until a shaggy dough forms. The dough should look slightly sticky but manageable.
- Step 2: Activate the Yeast. Let the dough sit for 5 minutes while you whisk the eggs. The yeast will start bubbling—if it doesn’t, your yeast may be expired and you should start over. This is the moment of truth.
- Step 3: Knead the Dough. Add the eggs and butter to the dough. Knead on a floured surface for 8–10 minutes until the dough is smooth and elastic. If you’re short on time, use a stand mixer with a dough hook for 5 minutes.
- Step 4: First Rise. Place the dough in a lightly oiled bowl, cover with a damp towel, and let it rise for 1 hour, or until doubled in size. The dough should feel airy and spring back when pressed.
- Step 5: Shape the Buns. Punch down the dough, divide it into 12 equal pieces, and roll each into a ball. Place the balls on a parchment‑lined baking sheet, spacing them 2 inches apart. Cover again and let them rise for 30 minutes.
- Step 6: Prepare the Custard. In a saucepan, whisk together 2 cups milk, 4 yolks, 1/2 cup sugar, cornstarch, and vanilla. Cook over medium heat, stirring constantly, until the mixture thickens and reaches 170°F. Remove from heat and let cool slightly.
- Step 7: Fill the Buns. Using a small spoon, make a slit in each dough ball and spoon a heaping teaspoon of custard into the center. Gently press the dough around the custard to seal the opening.
- Step 8: Second Rise. Cover the filled buns and let them rise for another 30 minutes. The dough will puff up, creating a pocket for the custard.
- Step 9: Brush and Bake. Preheat the oven to 375°F. In a small bowl, whisk 1 large egg with 1 tablespoon milk. Brush the tops of the buns with the egg wash, then sprinkle mini chocolate chips over each. Bake for 20–22 minutes, or until golden brown and a toothpick comes out clean.
- Step 10: Cool and Serve. Let the buns cool on a wire rack for 10 minutes before serving. The custard will be slightly set, but still creamy. Serve warm for the ultimate experience.
That's it — you did it. But hold on, I've got a few more tricks that'll take this to another level...
Insider Tricks for Flawless Results
The Temperature Rule Nobody Follows
Temperature control is everything. Use a digital thermometer to keep the custard at exactly 170°F. If it goes over, it will curdle; if under, it will stay runny. I once left the custard on low heat for too long, and it split. The next time, I set the stove to medium and checked the temperature every 2 minutes. The result was a silky custard that stayed put.
Why Your Nose Knows Best
Before you bake, open the oven door and let the heat circulate for 30 seconds. Then close it and give the dough a quick sniff. A faint buttery aroma signals the dough is ready for the second rise. If it smells sour, give it a little more time.
The 5-Minute Rest That Changes Everything
After the first rise, let the dough rest for 5 minutes before dividing. This relaxes the gluten, making the dough easier to shape and preventing it from shrinking back. It’s a small step that makes a huge difference in the final texture.
The Egg Wash Trick
Instead of a plain egg wash, mix in a teaspoon of honey or maple syrup for a subtle caramel glaze. The glaze gives the buns a glossy finish and a hint of sweetness that complements the custard.
The Mini Chocolate Chip Variation
If you want a less sweet version, replace the mini chocolate chips with finely chopped toasted almonds. The nutty flavor pairs beautifully with the vanilla custard and adds a crunchy texture.
Creative Twists and Variations
This recipe is a playground. Here are some of my favorite ways to switch things up:
Espresso Brioche
Add 1 teaspoon of instant espresso powder to the custard for a mocha flavor. The espresso cuts through the sweetness, creating a balanced, coffee‑kissed treat.
Lemon‑Zest Brioche
Incorporate 1 tablespoon of lemon zest into the dough and 1 teaspoon into the custard. The citrus brightens the flavor profile, making it perfect for spring and summer breakfasts.
Almond‑Butter Brioche
Replace half the butter in the dough with almond butter and add a pinch of almond extract to the custard. The nutty undertone adds depth and a subtle crunch.
Maple‑Honey Brioche
Swap the sugar in the custard for equal parts maple syrup and honey. The complex sweetness elevates the custard and gives the buns a warm, earthy finish.
Berry‑Stuffed Brioche
Fold fresh blueberries or raspberries into the custard before filling the buns. The berries burst with juice, adding a tangy contrast to the creamy custard.
Chocolate‑Dipped Brioche
After baking, dip the tops in melted dark chocolate and sprinkle sea salt. The chocolate coating provides a glossy finish, and the salt accentuates the sweetness.
Storing and Bringing It Back to Life
Fridge Storage
Cool the buns completely, then wrap them tightly in plastic wrap and store in the refrigerator for up to 3 days. The custard will firm up, so reheat gently.
Freezer Friendly
Place the cooled buns in a freezer bag, removing excess air, and freeze for up to 2 months. Thaw overnight in the fridge before reheating.
Best Reheating Method
Preheat the oven to 350°F. Place the buns on a baking sheet and bake for 10 minutes, or until warmed through. Add a splash of water to the bottom of the pan to create steam, which keeps the buns moist and prevents the custard from drying out.