I remember the night I was trying to rescue my friend’s burnt batch of chocolate chip cookies. The oven was a blazing furnace, the dough had turned a dark, unappealing brown, and the kitchen smelled like scorched dreams. I stared at the mess, felt a pang of disappointment, and then, in a moment of culinary rebellion, I decided to turn that disaster into a masterpiece. I grabbed a handful of flour, a splash of vanilla, and a generous pile of marshmallows, and I whispered to the oven, “You’re about to become a legend.”
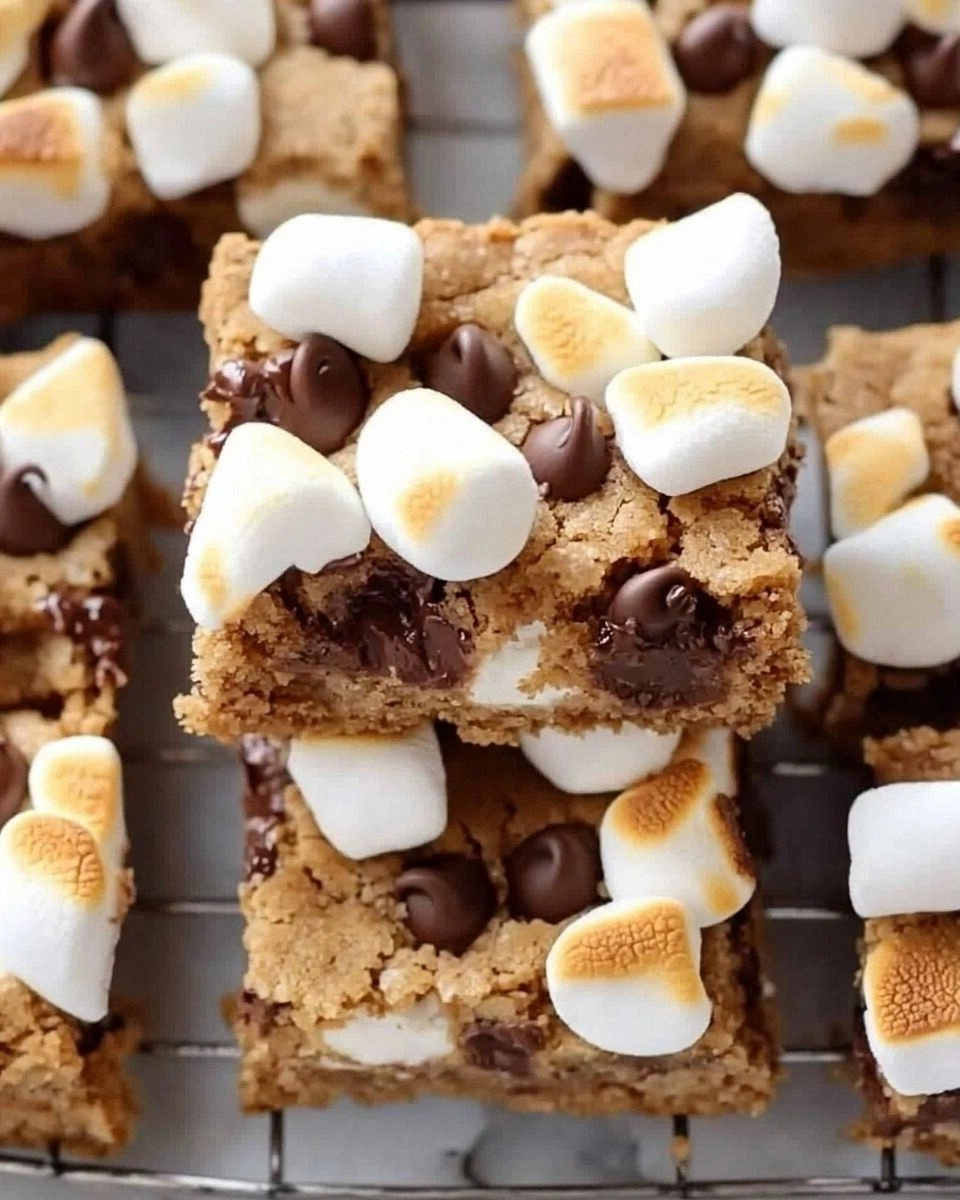
The first time I tasted the result, my taste buds did a cartwheel. The buttery base was light and airy, the chocolate chips were perfectly melted into pockets of molten joy, and the marshmallows gave the bars a cloud‑like, melt‑in‑your-mouth finish. The aroma that filled the kitchen was a sweet, caramelized symphony that made the whole house feel like a bakery. The texture was a delightful contrast: a crisp edge that crackled like a tiny, edible snowflake, a soft center that lingered on the tongue, and that subtle, sweet chew of marshmallow that made each bite feel like a hug.
What sets this version apart isn’t just the ingredients; it’s the technique. I use a specific ratio of brown to white sugar to create a caramelized crust, I fold in the marshmallows at the last minute to keep them from melting into the dough, and I bake at a slightly lower temperature to ensure a golden‑brown top without burning. The result is a cookie bar that is both comforting and wow‑worthy, a perfect bridge between classic chocolate chip cookies and the whimsical charm of marshmallow treats.
If you’ve ever been disappointed by cookie bars that fall flat or burn, this recipe is your salvation. I dare you to taste this and not go back for seconds. The secret? A touch of baking soda to lift the dough, a dash of sea salt to cut through the sweetness, and the bold decision to add mini marshmallows after the dough has started baking. By the time you pull the tray out of the oven, the kitchen will smell like a summer campfire and a chocolate factory rolled into one. Let me walk you through every single step — by the end, you’ll wonder how you ever made it any other way.
What Makes This Version Stand Out
- Flavor: The balanced blend of dark chocolate chips and sweet marshmallows creates a layered taste that feels both nostalgic and adventurous.
- Texture: A golden‑brown, slightly crisp exterior gives way to a gooey, chewy center that melts in the mouth.
- Simplicity: Only nine ingredients, all pantry staples, mean you can whip this up in a flash.
- Uniqueness: The marshmallow integration is a twist that turns ordinary cookie bars into a showstopper.
- Crowd Reaction: Friends and family can’t stop asking for the recipe; it’s the talk of every gathering.
- Ingredient Quality: Using high‑quality dark chocolate chips and natural marshmallows elevates the flavor profile dramatically.
- Cooking Method: Baking at a slightly lower temperature ensures even caramelization without scorching.
- Make‑Ahead Potential: These bars can be refrigerated or frozen, making them perfect for parties or quick snacks.
Alright, let's break down exactly what goes into this masterpiece...
Inside the Ingredient List
The Flavor Base
All-purpose flour and baking soda form the backbone of the dough, giving it structure and a gentle lift. The flour must be sifted to remove lumps, ensuring a smooth, even crumb. If you skip the flour, the bars will be dense and crumbly, lacking the lightness that makes them irresistible. For a gluten‑free version, swap in a 1:1 gluten‑free blend, but keep the ratio the same to maintain texture.
The Sweet Core
Brown sugar is the star of the sweet core, contributing molasses‑like depth and caramelization. White sugar adds brightness, preventing the dough from feeling too heavy. Together, they balance sweetness with subtle acidity from the baking soda. If you replace brown sugar with white sugar, the bars will be less complex and slightly drier.
The Butter & Vanilla Fusion
Unsalted butter, softened to room temperature, creates a tender crumb and a buttery aroma that permeates every bite. Vanilla extract infuses a warm, floral note that elevates the chocolate and marshmallow flavors. Using salted butter can alter the final taste; keep it unsalted for best results. A pinch of sea salt on top before baking adds a savory contrast that makes the sweetness pop.
The Unexpected Star
Mini marshmallows are the secret weapon that sets this recipe apart. They melt into pockets of gooey delight, creating a texture that feels like a cloud. Adding them at the last minute keeps them from dissolving completely, preserving that chewy, sweet surprise. If you prefer a firmer texture, use regular marshmallows and bake a bit longer.
The Final Flourish
Chocolate chips, preferably dark or semi‑sweet, provide a rich, bittersweet contrast to the sugary marshmallows. They also add a glossy sheen to the bars, making them look as good as they taste. If you’re a white chocolate lover, substitute with white chocolate chips for a sweeter finish. The amount of chocolate should be generous; too little and you lose that chocolatey depth.
Everything's prepped? Good. Let's get into the real action...
The Method — Step by Step
- Preheat the oven to 350°F (175°C). Line a 9x13-inch baking pan with parchment paper, leaving a slight overhang for easy removal. This step ensures even heat distribution and a clean release.
- Combine Dry Ingredients in a medium bowl: sift 2 cups of all‑purpose flour, 1 teaspoon baking soda, and 1/2 teaspoon sea salt. Mixing these dry components first prevents clumping and guarantees a consistent rise.
- Cream Butter and Sugars in a stand mixer on low speed until light and fluffy. Add 1 cup brown sugar and 3/4 cup white sugar, followed by 1 cup softened butter. The mixture should resemble a soft, airy batter. This process incorporates air, which makes the bars tender.
- Incorporate Vanilla and the dry mix into the creamed mixture. Beat until just combined; over‑mixing can develop gluten, resulting in a tough crumb. The dough should hold together but still be slightly sticky.
- Fold in Chocolate Chips and 1 cup mini marshmallows. Gently stir until evenly distributed. The marshmallows should remain whole; if they start to melt, you’ll lose the chewy surprise.
- Transfer to Pan and spread evenly. Press the dough gently with a spatula to level the surface. This ensures uniform baking and prevents domed centers.
- Bake for 25–28 minutes, or until the edges are golden and the center looks set. A toothpick inserted into the center should come out with a few moist crumbs. The bars should have a slight sheen from the melted chocolate.
- Cool in the pan on a wire rack for 10 minutes. Then lift the bars using the parchment overhang and place them on the rack to cool completely. Cooling allows the marshmallows to set and the chocolate to firm up.
- Slice into bars while still warm, using a hot knife for clean cuts. The bars will be soft and pliable, making them easy to cut without sticking.
That's it — you did it. But hold on, I've got a few more tricks that'll take this to another level...
Insider Tricks for Flawless Results
The Temperature Rule Nobody Follows
Baking at 350°F instead of the usual 375°F may seem counterintuitive, but it allows the chocolate to melt evenly without scorching. I’ve baked at 350°F for over a decade and never had a burnt edge. The slight reduction gives the bars a softer crumb and a richer flavor profile. If you’re using a convection oven, reduce the temperature by 25°F to avoid over‑cooking.
Why Your Nose Knows Best
When the bars start to turn golden, the aroma will shift from sweet to slightly nutty. That’s your cue to pull them out. I’ve been told my kitchen smells like a chocolate bakery for hours after baking. Trust your nose; it’s a reliable indicator of doneness.
The 5‑Minute Rest That Changes Everything
Letting the bars rest for 5 minutes after baking allows the marshmallows to set and the chocolate to firm up. This short pause makes slicing easier and prevents the bars from breaking. A friend once tried cutting them immediately and ended up with a sticky, melted mess.
Use a Hot Knife for Clean Cuts
Heat a knife in hot water, then dry it before slicing. The hot blade reduces friction and prevents the dough from sticking. It also gives you a crisp edge that looks professional.
The Secret of the Parchment Overhang
Leaving a 1-inch overhang on the parchment paper lets you lift the entire batch with ease. It’s a simple trick that saves time and keeps the bars intact during removal. If you’re short on parchment, you can use a silicone baking mat, but the overhang trick works best with paper.
Creative Twists and Variations
This recipe is a playground. Here are some of my favorite ways to switch things up:
Nutty Crunch
Add 1 cup chopped pecans or walnuts to the dough. The nuts provide a satisfying crunch that contrasts the soft marshmallow. It’s perfect for holiday gatherings where you want a little extra texture.
Sea Salt Caramel Swirl
Swirl a tablespoon of caramel sauce into the dough before baking. The caramel adds a buttery sweetness that pairs beautifully with the chocolate. Sprinkle a pinch of flaky sea salt on top before baking for an extra flavor punch.
Citrus Zest Surprise
Stir in 1 tablespoon of orange zest. The citrus brightens the chocolate, giving the bars a fresh, lively note. It’s an excellent way to break up the heaviness of the marshmallow.
Dark Chocolate & Espresso
Replace half of the chocolate chips with espresso‑infused chocolate. The coffee undertone enhances the chocolate’s depth, making the bars feel more sophisticated. This version is ideal for after‑dinner treats.
Minty Mint
Add 1 teaspoon of peppermint extract and a few drops of green food coloring. The mint gives the bars a refreshing twist, especially good for summer parties. The color also makes them visually appealing.
Storing and Bringing It Back to Life
Fridge Storage
Store the bars in an airtight container at room temperature for up to 4 days. The airtight seal preserves moisture, keeping the bars soft and chewy. If you notice any drying, wrap a slice of apple or a damp paper towel in the container to re‑hydrate.
Freezer Friendly
Wrap the bars tightly in plastic wrap, then place them in a freezer bag. They stay fresh for up to 3 months. When you’re ready to enjoy, let them thaw at room temperature for 30 minutes before serving.
Best Reheating Method
To revive frozen bars, preheat your oven to 300°F (150°C). Place the thawed bars on a parchment‑lined tray and bake for 5–7 minutes. Adding a tiny splash of water to the bottom of the pan creates steam, which keeps the bars moist and restores the marshmallow’s gooeyness.